Contribute
Register

wildwillow's Dual Boot Skylake Build : Asus Z170 Deluxe - i5-6600K - GTX970 SSC - 32GB RAM

Status
Not open for further replies.
It was showing, but not activable. Something weird happened. The system rebooted alone, and then a message said it was because some error. After the reboot, bluetooth works again. Strange!.
 
First of all your guide and this thread has been amazing! I failed miserably the first hackintosh I ever tried to build 7 years ago, so I'm so grateful to have found this guide. My hair just finally grew back enough that I was willing to try again!

I'm having problems getting the proper USB speeds, other than that everything is working perfectly! I am running BIOS version 3201. I performed a clean install using your instructions but the only donor computer I could find had Sierra so I used that. I have read every post and read your and ammulder/Rehabman's instructions many times. I loaded USBInjectAll.kext and followed the "raise port limit" instructions for Sierra and removed the uia_exclude_ss argument.

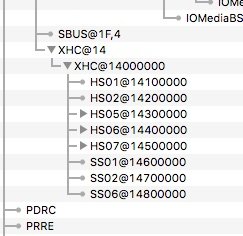
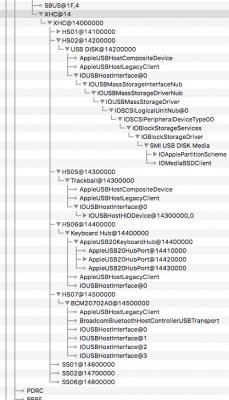
I proceeded to plug in my USB 2.0 and 3.0 thumb drive into every port. But I never was able to see more than 15 ports (most of the SS ports were not listed). I kinda gave up on this and instead loaded your SSDT file (removing the HS11 and 12 ports b/c I'm not using those). I've attached a screen capture of the ports that I am seeing now.

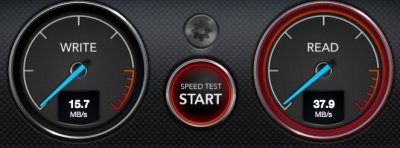
When I plug in my USB 3.0 drive it shows it connected to HS01 or 02, I can never get it to connect to SS01 or 02. I can only get roughly 14Mb/s write and 40Mb/s Read out of the two USB 3.0 case ports (using black magic disk app). The Asmedia ports on the back are slightly faster but no where near 3.0 speeds.

I'm hoping someone has also seen this problem?? Could it possibly be the BIOS version or a setting I have disabled? My thumb drive is formatted FAT32 if it matters?

USB Ports.jpeg
 
My thumb drive is formatted FAT32 if it matters
Hi ABaller,
Welcome to the forums. This will definitely hinder any USB disk speed tests. There are limitations using FAT32 with both speed and file size. Best to run the tests again using Apple HFS and you'll see the difference.
The Intel USB 3 ports from your screen shot, SS01 and SS02 are connected to internal headers and via the case. There is only one Intel port on the rear that is SS06.
 
Hi ABaller,
There is only one Intel port on the rear that is SS06.

When I plug my USB3.0 drive into the back port it does show it connected to the SS06 port. If i plug a USB 2.0 drive into the same port it shows it connected to HS06. For some reason if i do the same on the case ports it always shows either HS01 or 02... i cannot ever get it to connect to the SS01 or SS02 ports. My case is the Deepcool Genone II with two front mounted USB 3.0 ports connected to the same MB header you are using.
 
When I plug my USB3.0 drive into the back port it does show it connected to the SS06 port. If i plug a USB 2.0 drive into the same port it shows it connected to HS06. For some reason if i do the same on the case ports it always shows either HS01 or 02... i cannot ever get it to connect to the SS01 or SS02 ports. My case is the Deepcool Genone II with two front mounted USB 3.0 ports connected to the same MB header you are using.
Perhaps there is a problem with the case USB ports. Since you have an issue only with case ports maybe they are only working as USB2.0 not as USB3.0.

Out of curiosity I've connected my 2xUSB3.0 ports on the case with USB3.0 devices and they appear as documented in Post#1 and are attached to SS01 and SS02. Another thing to note on your screen shot there is no BT device attached to HS07. Here is my screen shot for reference of both SS01/02 and HS07.
Screen Shot 2017-03-30 at 16.00.55.png
 
The BT device is connected to HS07, I just had It collapsed last time. Trackball in HS05, and Apple keyboard in HS06. I reformatted my USB 3.0 thumb drive as HFS+ (apple partition map) and plugged into one of my case ports... it still shows up as HS02 (or HS01 depending on which port you use), I cannot for the life of me get it to show connected to SS01 or SS02. The speed test is from it connected to HS02 formatted as HFS. Like it said, it seems to be working perfectly using the intel port on the back. It connects to either HS06 or SS06 depending on whether it was a USB 2 or 3 device.

USB INSERTED2.jpeg
Speed.jpeg
 
Last edited:
Currently I'm running BIOS v1801, I've run them all up to v3201 and they're all work. The reason I'm running v1801 is because I'm using the Asus ThunderboltEX3 and it boots consistently with it installed. The newer BIOSes seem to cause boot failures into OS X on occasions.
How did you downgrade BIOS version to 1801 from 3201? Because when i try it i'm getting error.
 
How did you downgrade BIOS version to 1801 from 3201? Because when i try it i'm getting error.
I do not recommend downgrading a BIOS so any user wishing to do so does so at their own risk.

Downloaded BIOS name is Z170-DELUXE-ASUS-1801.CAP
If you update a BIOS file it will run the file as it is named, no need to rename it.
To downgrade I needed to give the BIOS file a generic name for it work but only using the BIOS Flashback procedure, not through the UEFI BIOS Flash Utility in the BIOS screen.

Renamed Z170-DELUXE-ASUS-1801.CAP to Z170D.CAP
Put the renamed file on a FAT32 formatted USB - Asus recommends using a USB 2.0 flash drive.
Inserted the USB into the green outlined USB port on the rear panel (the BIOS Flashback Port).
The problem I had the first time I tried to flash/downgrade the green LED would blink 3 times and stay on - if this happens to you nothing is going on with your BIOS flashback. The green LED will stay for as long as you leave it. At this point power down your motherboard until all the lights go out. Then boot normally.
Here is an important step that is not mentioned in the manual before you attempt the downgrade -> Reset the CMOS.
After resetting the CMOS the motherboard will then automatically enter the BIOS set-up.
At this point just power down the motherboard. Once powered down hold the BIOS Flashback button for 3 seconds, it'll start blinking - now it says in the manual the LED will stay on until it is complete. It blinks from here on out and blinks quicker during the write process.
After a couple minutes the LED stops blinking and you are good to go.
Boot into the BIOS and configure as you would.
 
Last edited:
Yes. Get any USB audio card. They all work out of the box and end those audio problems for good.
 
Status
Not open for further replies.
Back
Top