
- Joined
- Dec 21, 2013
- Messages
- 150
- Motherboard
- Gigabyte Z490 Auros Ultra
- CPU
- i9-10850K
- Graphics
- RX 6900 XT
- Mac
- Mobile Phone
Build guide for my i9-10850K running on a GA-Z490M Gaming X with a Broadcom BCM943602CDP wifi card using OpenCore 0.9.5 and Ventura 13.6.1


Hardware
Build
The Z490 Gaming X itself shipped with F4 BIOS. It was initially necessary to flash it to version F20b or later (the latest is F20d) which fixes a whole bunch of graphics card compatibility issues.
Struggled a while to disable CSM in my BIOS to install MacOS as I had previously flashed the RX 580 GPU BIOS with a custom fan curve which disabled the ability for the card to be used with EUFI. With CSM enabled the Z490 would not post and emitted 5 beeps indicating a CPU error. After finding the original GPU BIOS online at tweaktown and restoring it I was able to disable CSM.
After upgrading to an RX 5600 XT I had issues with the GPU fan not spinning - thank you to "u/Z4mp4n0" for his post detailing how to fix this by generating PowerPlay tables for for Polaris (i.e. RX 560, 570, 580, 590) GPU's which help me adapt it for Navi. Also thank you to the RedPowerBIOS team for releasing tools (Windows only) that allow reading, writing and the introspection of the Navi GPU BIOS.
BIOS Settings
From the Dortana guide I used the following BIOS settings.
Gigabyte and other board manufacturers are notorious for "over-volting" chipsets and the i9-10850K is no exception. In order to get stable temps of less than 80C under load I used the following additional settings
UPDATE: Note that in order to for FaceTime to be able to work correctly and decode remote video streams, the internal intel graphics should be set to
This is important because my configuration provided in the
The
Config.plist
I followed the OpenCore Comet Lake Guide and decided to use the
The attached
The following were required for this board
Drivers
ACPI
Kexts
Your final EFI folder should look like the screenshot below (note that

Boot args
USB Mapping
For USB Mapping, the standard OpenCore Intel Guide was used to generate a custom

Two USB ports on the back had to be disabled to come in under the 15 port limit.

Note: For my install I already had a USB Map previously created. USB Mapping can only be performed in MacOS Big Sur 11.2.3 and earlier. As such you may need access to a Windows install/Windows Live USB/Windows PE and should use USBToolBox instead. Note that you need to install the
See the
DRM
I struggled to get DRM (specifically Apple TV+) working. Executing the following command was the final part of the puzzle.
UPDATE:
Corsair H115i
Unfortunately MacOS does not have AIO support. However the
Next create a file named
Calling
The following modified BitBar / XBar plugin (from https://gist.github.com/geoffmyers/3fee8449ca187dff6e063fcad1ad9787) can be used to monitor the AIO from the menubar as shown below

For more details regarding liquidctl, see the following excellent Mini Guide by @CaseySJ - https://www.tonymacx86.com/threads/...olt-3-i5-10400-amd-rx-580.298642/post-2138475
AMD Navi GPU Temperature Monitoring
Unfortunately VirtualSMC does not support AMD Navi GPU temperatures due to a decision from the development team to not introduce any MacOS unsupported features to ensure future MacOS version compatibility . The developers of FakeSMC doesn't share this view so by replacing VirtualSMC with FakeSMC we can get monitoring in place by updating your
UPDATE: The RadeonSensor project now provides a kext which is natively compatible with VirtualSMC. Note that both the

Remove the following Kexts.
Add the following Kexts from the "FakeSMC3_with_plugins" GitHub project.
One of the issues with the RX 5600XT (it may apply to the RX 5700 XT) is that the GPU Memory Clock will run at full speed all the time if more than one monitor is used in both Windows and MacOS.
In addition to this the GPU temperatures seem to fluctuate between 50C and 60C with the GPU fan only kicking in at 60C and stopping at 50C.
This is too high for my liking and as such it make sense to disable the ZeroFan profile (i.e. make the GPU fan run all the time instead of allow it to stop). In Windows this is fairly straight forward using the Radeon Adrenaline Software, however as no version exists for MacOS we need another approach referred to as "PowerPlay Tables".
RX 5600 XT PowerPlay Table Generation
UPDATE: Note that unfortunately the Red BIOS Editor is not supported on AMD Radeon RX6000 and later cards. As such this section of the guide only applies to series 5000 and earlier cards.
While there are various PowerPlay table strings and excel spreadsheets available online, the values vary by graphics card vendor and it is recommended that you do not re-use anything unless you have the exact same card as an author.
For us we will first boot into Windows and dump our GPU BIOS using the export button (
 ) in GPU-Z (Windows only)

This will output a
Next we will use the "ATOMBiosReader" utility (Windows only) to check the hexadecimal offset and length of the PowerPlay table in as indicated by the
Next we will download the "More Power Tool" (Windows only) and load the


We will disable the
Next we will download the "Red BIOS Editor" (Windows only) and open the
Now we will use our favourite hexadecimal editor to extract the updated PowerPlay definition by opening the updated
Next we navigate to the
Note - if you wish to use this you MUST have a Sapphire Pulse RX 5600 XT. Using this definition on other GPU card may have unintended consequences including causing the card to be permanently damaged !
Adding PowerPlay Table Definitions
AMD GPU PowerPlay table settings can be added to your

Note that you should use either Xcode or PropertyTree to add these values as they are of a data type
You graphics card address will vary depending on the slot on the motherboard it is plugged into but can be determined using the
The final entry for the
Note - if you wish to use this you MUST have a Sapphire Pulse RX 5600 XT. Using this definition on other GPU card may have unintended consequences including causing the card to be permanently damaged !
GeekBench Scores


Hardware
- i9-10850K
- Gigabyte Z490M Gaming X
- 32 GB RAM (4 x Corsair 8GB DDR4 3600 RAM)
Sapphire Pulse RX 580 8GBSapphire Pulse RX 5600 XT 6GBSapphire Pulse RX 6900 XT- Corsair RM750 PSU
- Corsair H115i Platinum Water Cooler (CPU)
Corsair H50 Water Cooler (GPU)Fenvi T919 Wifi and BluetoothUPDATE: Replaced with a BCM943602CDP Wifi and Bluetooth card with a PCI Adaptor to fix bluetooth audio issues.2 x Apple Cinema LED 27 inch (DisplayPort)- 1 x Alienware AW3821DW (DisplayPort)
Samsung EVO 970 Plus 500GB M2 SSD- UPDATE: Replaced with a Western Digital Black SN750 1TB due to NVME SSD trim and boot time issues as reported here https://github.com/dortania/bugtracker/issues/192NZXT Kraken G12 (RX 580 GPU Cooler mount)- NZXT H400 case
- Sleep, Wake
- Audio
- Bluetooth
- iCloud, iMessage, FaceTime (see notes in DRM and BIOS sections below)
- Handoff
- FaceTime Continuity and FateTime Continuity WebCam (see notes in DRM and BIOS sections below)
- Sidecar
- Control Center
- Apple Watch unlock
- DRM (see note regarding FaceTime conflict)
- USB 3
USB ejects after wake from sleep (there are other posts that claim this may be related to Apple ships iMacs with DDR4 2666Mhz RAM and disabling XMP in the BIOS addresses the issue.)FIXED by ensuringKernel -> Quirks -> XhciPortLimitis disabled after generating and including a USBMap.kextRX 5600 XT Navi GPU Sensors (Temperature, Fan) - this seems to be a MacOS issue however there are reports that using FakeSMC instead of VirtualSMC allows this to work. Note that this issue does not occur with Polaris (i.e. RX 580) cards.FIXED see RX 5600 XT Monitoring and Fan control below
Build
The Z490 Gaming X itself shipped with F4 BIOS. It was initially necessary to flash it to version F20b or later (the latest is F20d) which fixes a whole bunch of graphics card compatibility issues.
Struggled a while to disable CSM in my BIOS to install MacOS as I had previously flashed the RX 580 GPU BIOS with a custom fan curve which disabled the ability for the card to be used with EUFI. With CSM enabled the Z490 would not post and emitted 5 beeps indicating a CPU error. After finding the original GPU BIOS online at tweaktown and restoring it I was able to disable CSM.
After upgrading to an RX 5600 XT I had issues with the GPU fan not spinning - thank you to "u/Z4mp4n0" for his post detailing how to fix this by generating PowerPlay tables for for Polaris (i.e. RX 560, 570, 580, 590) GPU's which help me adapt it for Navi. Also thank you to the RedPowerBIOS team for releasing tools (Windows only) that allow reading, writing and the introspection of the Navi GPU BIOS.
BIOS Settings
From the Dortana guide I used the following BIOS settings.
- Fast Boot -> Disable
- Secure Boot -> Disable
- Serial/COM Port -> Disable
- VT-d (can be enabled if you set DisableIoMapper to YES)
- CSM -> Disable
- Intel SGX -> Disable
- Intel Platform Trust -> Disable
- Resizable BAR Support -> Disable
- VT-x -> Enable
- Above 4G decoding -> Enable
- Hyper-Threading -> Enable
- Execute Disable Bit -> Enable
- EHCI/XHCI Hand-off -> Enable
- OS type: Windows 10 UEFI Mode
- DVMT Pre-Allocated(iGPU Memory): 64MB
- SATA Mode: AHCI
Gigabyte and other board manufacturers are notorious for "over-volting" chipsets and the i9-10850K is no exception. In order to get stable temps of less than 80C under load I used the following additional settings
- CPU Upgrade -> Advanced Profile
- XMP -> Profile 1
- Dynamic VCore (DVID) -> -0.07V
UPDATE: Note that in order to for FaceTime to be able to work correctly and decode remote video streams, the internal intel graphics should be set to
Enabled instead to Auto in the BIOS. If the setting is left to Auto, FaceTime will work however you will not be able to see video from other call participants.This is important because my configuration provided in the
ga-z490-gaming-x-config-template is based on a iMac 20.2 SMBios to closely match the actual hardware in my build.The
iMac 20.2 (https://everymac.com/systems/apple/...8-core-27-inch-retina-5k-2020-20-2-specs.html) ships with a i7-10700K processor (https://ark.intel.com/content/www/u...0700k-processor-16m-cache-up-to-5-10-ghz.html) which has Intel UHD Graphics 630 which MacOS expects to be continuously enabled.Config.plist
I followed the OpenCore Comet Lake Guide and decided to use the
iMac 20.2 (https://everymac.com/systems/apple/...8-core-27-inch-retina-5k-2020-20-2-specs.html) SMBios definition which closely matches my hardware configuration.The attached
ga-z490-gaming-x-config-template can be used however you should set:- Rename the
ga-z490-gaming-x-config-template.plistfile toconfig.plistand place it in our/EFI/OC/directory. - A Serial Number, MLB and System UUID. These can be generated as per the Dortana OpenCore Guide.
- The ROM should be set to the encoded MAC address of the ethernet network card as per the Dortana OpenCore Guide.
- Remember to run ProperTree against our config.plist to make sure your kext and drivers are loaded in the correct order and are correctly configured.
Kernel -> Quirks -> XhciPortLimit should be disabled after a custom USB Map is generated and included in the kext section of the config.plist.The following were required for this board
Drivers
- HfsPlus.efi
- OpenCanopy.efi
- OpenRuntime.efi
ACPI
- SSDT-AWAC.aml
- SSDT-EC-USBX-DESKTOP.aml
- SSDT-PLUG-DRTNIA.aml
Kexts
- Audio
- AppleALC.kext
- Network
- IntelMausi.kext
- General
- Lilu.kext
- WhateverGreen.kext
- VirtualSMC.kext
- Sensors
- SMCProcessor.kext
- SMCSuperIO.kext
- RadeonSensor.kext
- SMCRadeonGPU.kext
- USB
- USBMap.kext (or whatever you have named your USB key map)
- Disk
- NVMEFix.kext
- Misc
- FeatureUnlock.kext (For Control Center, etc)
Your final EFI folder should look like the screenshot below (note that
USBMap.kext will only be present once you have created a custom USB Keymap).Boot args
Code:
-v keepsyms=1 debug=0x100 alcid=1 agdpmod=pikeraUSB Mapping
For USB Mapping, the standard OpenCore Intel Guide was used to generate a custom
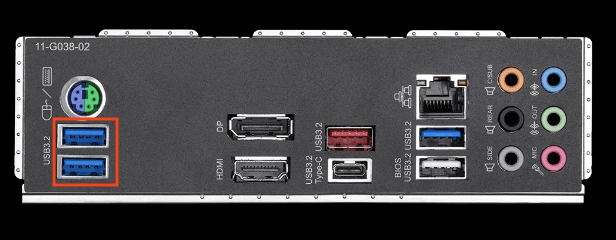
USBMap.kext, however making sure to mark the Fenvi T919 Bluetooth, Corsair RM750 and Corsair H115i internal USB header connectors as internal (i.e. type 255)| Location | Name | Type |
| Back Top Middle USB2.x | HS01 | 3 - USB 3.0 Type-A connector |
| Back Middle Bottom (USB-C) | HS02 | 10 - Type C connector - USB 2.0 and USB 3.0 without Switch |
| Back Bottom Right USB2.x | HS05 | 3 - USB 3.0 Type-A connector |
| Back Top Right USB2.x | HS06 | 3 - USB 3.0 Type-A connector |
| Front Right USB2.x | HS07 | 3 - USB 3.0 Type-A connector |
| Front Left USB2.x | HS08 | 3 - USB 3.0 Type-A connector |
| Internal USB - Wifi Card (Bluetooth) | HS09 | 255 - Proprietary connector |
| Internal USB - Corsair H115i | HS10 | 255 - Proprietary connector |
| Internal USB | HS11 | 255 - Proprietary connector |
| Back Middle Top USB3.x | SS01 | 3 - USB 3.0 Type-A connector |
| Back Bottom Right USB3.x | SS05 | 3 - USB 3.0 Type-A connector |
| Back Top Right USB 3.x | SS06 | 3 - USB 3.0 Type-A connector |
| Front USB Right USB 3.x | SS07 | 3 - USB 3.0 Type-A connector |
| Front USB Port Left USB 3.x | SS08 | 3 - USB 3.0 Type-A connector |
Two USB ports on the back had to be disabled to come in under the 15 port limit.
Note: For my install I already had a USB Map previously created. USB Mapping can only be performed in MacOS Big Sur 11.2.3 and earlier. As such you may need access to a Windows install/Windows Live USB/Windows PE and should use USBToolBox instead. Note that you need to install the
USBToolBox.kext for the generated UTBMap.kext and no USB ACPI renames are required as per the Dortania USB Post Install guide.See the
EFI snapshot - 29-10-2023.zip for a complete EFI folder. Note that you must create proper values for MLB, ROM, SystemSerialNumber and SystemUUID as per the Dortania guides. Failure to do so will leave your system inoperable and may result in your Apple ID being added to a block list by Apple.DRM
I struggled to get DRM (specifically Apple TV+) working. Executing the following command was the final part of the puzzle.
Code:
defaults write com.apple.AppleGVA gvaForceAMDKE -boolean yesUPDATE:
- For some reason this breaks FaceTime by not allowing remote video to stream and resulting in a "poor connection" message with audio but a grey screen if
defaults write com.apple.AppleGVA gvaForceAMDKE -boolean truehas been set andshikigvaboot arguments are present. - Executing the following and removing
shikigvaboot arguments enables FaceTime to work correctly againdefaults write com.apple.AppleGVA gvaForceAMDKE -boolean false - Executing
defaults write com.apple.AppleGVA gvaForceAMDKE -boolean yesonly seems to be required to start playing a video. After a video is starteddefaults write com.apple.AppleGVA gvaForceAMDKE -boolean falsecan be executed if you want use SharePlay in MacOS Monterey 12.1 and later - On MacOS Ventura Apple TV+ content now works without the
gvaForceAMDKEswitch required. However some content (possibly protected with a different version of FairPlay) still requires this switch to use the dedicated graphics card to decode content instead of the internal Intel GPU. (This can be addressed by using a MacPro SMBios definition instead of an iMac SMBios definition.)
Corsair H115i
Unfortunately MacOS does not have AIO support. However the
liquidctl utility can be used to configure and control the H115i.
Code:
brew install liquidctlNext create a file named
liquidctl-corsair.sh as with the content below to control and initialise the H115i
Code:
#!/bin/bash

# initialize the device before use
/usr/local/bin/liquidctl -m Corsair initialize --pump-mode balanced
# set all fan speed profile
/usr/local/bin/liquidctl -m Corsair set fan speed 20 20 30 60 40 70 50 100
Calling
liquidctl status should then show you the Corsair H115i temperature, fan and pump speeds.
Code:
$ liquidctl status
Corsair H115i Platinum (experimental)
├── Liquid temperature    25.9  °C
├── Fan 1 speed            949  rpm
├── Fan 2 speed            949  rpm
└── Pump speed            2477  rpm
The following modified BitBar / XBar plugin (from https://gist.github.com/geoffmyers/3fee8449ca187dff6e063fcad1ad9787) can be used to monitor the AIO from the menubar as shown below
Code:
#!/bin/bash

LIQUIDCTL="/usr/local/bin/liquidctl"
STATUS=$($LIQUIDCTL status)
LIQUID_TEMP=$(echo $STATUS | grep "Liquid temperature" | egrep -o "[0-9]{2,3}\.[0-9]{1}")
FAN1_RPM=$(echo $STATUS | egrep -o "Fan 1 speed [0-9]{3,4}" | egrep -o "[0-9]{3,4}")
FAN2_RPM=$(echo $STATUS | egrep -o "Fan 2 speed [0-9]{3,4}" | egrep -o "[0-9]{3,4}")
PUMP_RPM=$(echo $STATUS | egrep -o "Pump speed [0-9]{3,4}" | egrep -o "[0-9]{3,4}")

echo "${LIQUID_TEMP} °C ${PUMP_RPM} rpm  ${FAN1_RPM} rpm ${FAN2_RPM} rpm  | size=10"

echo "$STATUS"
For more details regarding liquidctl, see the following excellent Mini Guide by @CaseySJ - https://www.tonymacx86.com/threads/...olt-3-i5-10400-amd-rx-580.298642/post-2138475
AMD Navi GPU Temperature Monitoring
/EFI/OC/Kexts folder as per the screenshot belowUPDATE: The RadeonSensor project now provides a kext which is natively compatible with VirtualSMC. Note that both the
RadeonSensor.kext and SMCRadeonGPU.kext is required. The RadeonSensor.kext should be loaded before the SMCRadeonGPU.kext kext in your config.plist and after the Lilu.kext.VirtualSMC.kextSMCProcessor.kextSMCSuperIO.kext
FakeSMC.kextIntelCPUMonitor.kextIntelMCHMonitor.kextITEIT87x.kextRadeonMonitor.kext
One of the issues with the RX 5600XT (it may apply to the RX 5700 XT) is that the GPU Memory Clock will run at full speed all the time if more than one monitor is used in both Windows and MacOS.
In addition to this the GPU temperatures seem to fluctuate between 50C and 60C with the GPU fan only kicking in at 60C and stopping at 50C.
This is too high for my liking and as such it make sense to disable the ZeroFan profile (i.e. make the GPU fan run all the time instead of allow it to stop). In Windows this is fairly straight forward using the Radeon Adrenaline Software, however as no version exists for MacOS we need another approach referred to as "PowerPlay Tables".
RX 5600 XT PowerPlay Table Generation
UPDATE: Note that unfortunately the Red BIOS Editor is not supported on AMD Radeon RX6000 and later cards. As such this section of the guide only applies to series 5000 and earlier cards.
While there are various PowerPlay table strings and excel spreadsheets available online, the values vary by graphics card vendor and it is recommended that you do not re-use anything unless you have the exact same card as an author.
For us we will first boot into Windows and dump our GPU BIOS using the export button (
This will output a
bios.rom file.Next we will use the "ATOMBiosReader" utility (Windows only) to check the hexadecimal offset and length of the PowerPlay table in as indicated by the
PowerPlayInfo section our GPU BIOS. The output should look like the below and I have indentified the offset for the RX 5600 XT as cc8c with a length of 068a
Code:
Read 80000 bytes of data from bios.rom

Command Tables:
  0000:   9308  Len 0025  (ASIC_Init)
  0001:   -               (GetDisplaySurfaceSize)
  0002:   -               (ASIC_RegistersInit)
  0003:   -               (VRAM_BlockVenderDetection)
  0004:   ab60  Len 0314  (SetClocksRatio/DIGxEncoderControl)
  0005:   -               (MemoryControllerInit)
  0006:   932e  Len 004b  (EnableCRTCMemReq)
  0007:   -               (MemoryParamAdjust)
  0008:   -               (DVOEncoderControl)
  0009:   943e  Len 00ca  (GPIOPinControl)
  000a:   -               (SetEngineClock)
  000b:   -               (SetMemoryClock)
  000c:   9508  Len 03c3  (SetPixelClock)
  000d:   9940  Len 073c  (DynamicClockGating)
  000e:   -               (ResetMemoryDLL)
  000f:   -               (ResetMemoryDevice)
  0010:   -               (MemoryPLLInit)
  0011:   -               (AdjustDisplayPll)
  0012:   -               (AdjustMemoryController)
  0013:   -               (EnableASIC_StaticPwrMgt)
  0014:   a07c  Len 00bc  (ASIC_StaticPwrMgtStatusChange/SetUniphyInstance)
  0015:   937a  Len 006e  (DAC_LoadDetection)
  0016:   93e8  Len 0028  (LVTMAEncoderControl)
  0017:   98cc  Len 0073  (LCD1OutputControl)
  0018:   9410  Len 002e  (DAC1EncoderControl)
  0019:   -               (DAC2EncoderControl)
  001a:   c528  Len 0024  (DVOOutputControl)
  001b:   -               (CV1OutputControl)
  001c:   -               (GetConditionalGoldenSetting/SetCRTC_DPM_State)
  001d:   -               (TVEncoderControl)
  001e:   -               (TMDSAEncoderControl)
  001f:   -               (LVDSEncoderControl)
  0020:   be86  Len 01a7  (TV1OutputControl)
  0021:   a138  Len 0072  (EnableScaler)
  0022:   a1aa  Len 0073  (BlankCRTC)
  0023:   a21e  Len 0043  (EnableCRTC)
  0024:   -               (GetPixelClock)
  0025:   a262  Len 00cf  (EnableVGA_Render)
  0026:   -               (EnableVGA_Access/GetSCLKOverMCLKRatio)
  0027:   c45c  Len 00cb  (SetCRTC_Timing)
  0028:   -               (SetCRTC_OverScan)
  0029:   a332  Len 01d5  (SetCRTC_Replication)
  002a:   a508  Len 00bf  (SelectCRTC_Source)
  002b:   a5c8  Len 015e  (EnableGraphSurfaces)
  002c:   a726  Len 0042  (UpdateCRTC_DoubleBufferRegisters)
  002d:   a768  Len 0013  (LUT_AutoFill)
  002e:   c1c2  Len 01b2  (EnableHW_IconCursor)
  002f:   -               (GetMemoryClock)
  0030:   -               (GetEngineClock)
  0031:   a77c  Len 01c6  (SetCRTC_UsingDTDTiming)
  0032:   -               (ExternalEncoderControl)
  0033:   bd2a  Len 015b  (LVTMAOutputControl)
  0034:   -               (VRAM_BlockDetectionByStrap)
  0035:   c112  Len 00af  (MemoryCleanUp)
  0036:   a942  Len 01d8  (ReadEDIDFromHWAssistedI2C/ProcessI2cChannelTransaction)
  0037:   -               (WriteOneByteToHWAssistedI2C)
  0038:   ab1a  Len 0046  (ReadHWAssistedI2CStatus/HPDInterruptService)
  0039:   -               (SpeedFanControl)
  003a:   -               (PowerConnectorDetection)
  003b:   -               (MC_Synchronization)
  003c:   c374  Len 00e7  (ComputeMemoryEnginePLL)
  003d:   c02e  Len 00e4  (MemoryRefreshConversion)
  003e:   -               (VRAM_GetCurrentInfoBlock)
  003f:   -               (DynamicMemorySettings)
  0040:   -               (MemoryTraining)
  0041:   -               (EnableSpreadSpectrumOnPPLL)
  0042:   -               (TMDSAOutputControl)
  0043:   -               (SetVoltage)
  0044:   -               (DAC1OutputControl)
  0045:   -               (DAC2OutputControl)
  0046:   -               (SetupHWAssistedI2CStatus)
  0047:   -               (ClockSource)
  0048:   -               (MemoryDeviceInit)
  0049:   -               (EnableYUV)
  004a:   -               (DIG1EncoderControl)
  004b:   -               (DIG2EncoderControl)
  004c:   ae74  Len 010c  (DIG1TransmitterControl/UNIPHYTransmitterControl)
  004d:   af80  Len 0b2e  (DIG2TransmitterControl/LVTMATransmitterControl)
  004e:   baae  Len 021f  (ProcessAuxChannelTransaction)
  004f:   bcce  Len 005c  (DPEncoderService)

Data Tables:
  0000:   -                          (UtilityPipeLine)
  0001:   -                          (MultimediaCapabilityInfo)
  0002:   d316  Len 00c8  Rev 04:05  (MultimediaConfigInfo)
  0003:   c54c  Len 00c8  Rev 02:01  (StandardVESA_Timing)
  0004:   d3de  Len 006c  Rev 03:03  (FirmwareInfo)
  0005:   c614  Len 0034  Rev 02:01  (DAC_Info)
  0006:   c648  Len 005c  Rev 02:01  (LVDS_Info)
  0007:   c7fe  Len 0202  Rev 05:03  (TMDS_Info)
  0008:   e06e  Len 00f4  Rev 03:04  (AnalogTV_Info)
  0009:   ca58  Len 01c7  Rev 02:05  (SupportedDevicesInfo)
  000a:   -                          (GPIO_I2C_Info)
  000b:   c6a4  Len 000c  Rev 02:01  (VRAM_UsageByFirmware)
  000c:   cc20  Len 006c  Rev 02:01  (GPIO_Pin_LUT)
  000d:   c6b0  Len 0074  Rev 01:01  (VESA_ToInternalModeLUT)
  000e:   ca00  Len 0058  Rev 02:05  (ComponentVideoInfo)
  000f:   cc8c  Len 068a  Rev 0c:00  (PowerPlayInfo)
  0010:   -                          (CompassionateData)
  0011:   c724  Len 0014  Rev 02:01  (SaveRestoreInfo/DispDevicePriorityInfo)
  0012:   e04e  Len 0020  Rev 02:01  (PPLL_SS_Info/SS_Info)
  0013:   -                          (OemInfo)
  0014:   e03a  Len 0014  Rev 02:02  (XTMDS_Info)
  0015:   -                          (MclkSS_Info)
  0016:   c738  Len 0088  Rev 01:04  (Object_Info/Object_Header)
  0017:   c7c0  Len 0005  Rev 01:01  (IndirectIOAccess)
  0018:   df74  Len 0059  Rev 03:03  (MC_InitParameter/AdjustARB_SEQ)
  0019:   -                          (ASIC_VDDC_Info)
  001a:   -                          (ASIC_InternalSS_Info/ASIC_MVDDC_Info)
  001b:   c7c6  Len 0038  Rev 04:03  (TV_VideoMode/DispOutInfo)
  001c:   d44a  Len 0b29  Rev 02:04  (VRAM_Info)
  001d:   -                          (MemoryTrainingInfo/ASIC_MVDDQ_Info)
  001e:   -                          (IntegratedSystemInfo)
  001f:   -                          (ASIC_ProfilingInfo/ASIC_VDDCI_Info)
  0020:   dfce  Len 006c  Rev 04:02  (VoltageObjectInfo/VRAM_GPIO_DetectionInfo)
  0021:   -                          (PowerSourceInfo)
Next we will download the "More Power Tool" (Windows only) and load the
bios.rom file downloaded to get the PowerPlay values for our GPU model as shown the in the screenshots below.We will disable the
Zero RPM Enable setting in the Fan tab and tweak any values. These settings should then be saved as a MPPT file by selecting the Write SPPT option.Next we will download the "Red BIOS Editor" (Windows only) and open the
bios.rom file previously downloaded. We will load the MPTT file created and save our changes to the bios.rom file. Note - be careful to not write the updated BIOS to your GPU at this point unless you really want to do that and you know what you are doing !Now we will use our favourite hexadecimal editor to extract the updated PowerPlay definition by opening the updated
bios.rom file.Next we navigate to the
cc8c hexadecimal offset and select the data for a length of 068a as indicated in the hexadecimal editor. We copy and past this string as our PowerPlay table definition to be used in the next section. My definition which only includes disabling the Zero RPM Enable fan setting is shown below.Note - if you wish to use this you MUST have a Sapphire Pulse RX 5600 XT. Using this definition on other GPU card may have unintended consequences including causing the card to be permanently damaged !
Code:
8A 06 0C 00 01 E2 01 F4 08 00 00 3A 3C 00 00 7D 00 08 00 00 00 1B 00 00 00 00 00 00 00 00 00 00 76 00 00 00 00 00 00 00 00 00 00 00 00 00 01 00 00 00 0A 00 00 00 F4 06 00 00 F3 04 00 00 3E 04 00 00 F3 04 00 00 F3 04 00 00 EE 02 00 00 F3 04 00 00 04 05 00 00 04 05 00 00 2A 03 00 00 00 00 00 00 00 00 00 00 00 00 00 00 00 00 00 00 00 00 00 00 00 00 00 00 2C 01 00 00 64 00 00 00 64 00 00 00 64 00 00 00 FB 01 00 00 64 00 00 00 FB 01 00 00 34 01 00 00 2C 01 00 00 2C 01 00 00 00 00 00 00 00 00 00 00 00 00 00 00 00 00 00 00 00 00 00 00 00 00 00 00 80 00 00 00 0E 00 00 00 1E 00 00 00 01 01 01 01 01 01 01 01 01 01 01 01 01 01 00 00 00 00 00 00 00 00 00 00 00 00 00 00 00 00 00 00 1C 07 00 00 1C 07 00 00 1C 07 00 00 1A 04 00 00 1C 07 00 00 1A 04 00 00 1C 07 00 00 1A 04 00 00 A2 03 00 00 14 00 00 00 80 0C 00 00 80 0C 00 00 64 00 00 00 6E 00 00 00 02 00 00 00 00 00 00 00 01 00 00 00 01 00 00 00 01 00 00 00 64 00 00 00 64 00 00 00 64 00 00 00 64 00 00 00 64 00 00 00 64 00 00 00 64 00 00 00 64 00 00 00 64 00 00 00 64 00 00 00 00 00 00 00 00 00 00 00 00 00 00 00 20 03 00 00 20 03 00 00 20 03 00 00 20 03 00 00 20 03 00 00 20 03 00 00 20 03 00 00 20 03 00 00 71 02 00 00 32 00 00 00 BC 02 00 00 BC 02 00 00 19 00 00 00 32 00 00 00 00 00 00 00 00 00 00 00 00 00 00 00 00 00 00 00 00 00 00 00 19 00 00 00 14 00 00 00 19 00 00 00 14 00 00 00 19 00 00 00 14 00 00 00 19 00 00 00 14 00 00 00 19 00 00 00 14 00 00 00 00 00 00 00 00 00 00 00 00 00 00 00 08 00 00 00 FF AF DF A3 23 06 00 00 87 00 00 00 00 00 00 00 00 00 00 00 00 00 00 00 87 00 00 00 00 00 00 00 00 00 00 00 00 00 00 00 0E 00 00 00 80 00 00 00 64 00 6E 00 69 00 73 00 73 00 73 00 73 00 00 00 00 00 00 00 00 00 00 00 00 00 00 00 FE 70 00 00 01 00 00 00 64 00 64 00 00 00 00 00 00 00 00 00 1C 0C 1C 0C 80 0C 80 0C 68 10 68 10 4C 00 00 00 01 00 02 00 00 00 00 00 00 00 00 00 81 26 82 3E A4 70 5D BE B5 1A 32 3F 01 00 02 00 00 00 80 3F 00 00 00 00 F1 BA 5E 3E AB B2 6F BD 45 F5 36 3F 01 01 04 00 00 00 80 3F 00 00 00 00 F1 BA 5E 3E AB B2 6F BD 45 F5 36 3F 01 00 02 00 D8 F0 24 3F 35 EF 08 3F 00 00 00 00 D4 2B C5 3E 57 5B 11 3F 01 00 02 00 0A 68 02 3F 14 AE 17 3F 00 00 00 00 83 51 A9 3E 37 89 11 3F 01 00 02 00 9C C4 A0 3F 8E 06 B0 BE 00 00 00 00 E3 C7 08 3F EC 2F 7B 3E 01 00 02 00 61 54 52 3F D7 34 6F 3C 00 00 00 00 FD 87 F4 3E CA 54 81 3E 02 00 02 00 00 00 00 00 00 00 00 00 00 00 00 00 00 00 00 00 00 00 00 00 02 00 02 00 00 00 00 00 00 00 00 00 00 00 00 00 00 00 00 00 00 00 00 00 2C 01 F4 06 78 05 78 05 78 05 78 05 78 05 78 05 78 05 78 05 78 05 78 05 78 05 78 05 78 05 78 05 64 00 F3 04 F3 04 F3 04 F3 04 F3 04 F3 04 F3 04 64 00 3E 04 3E 04 3E 04 3E 04 3E 04 3E 04 3E 04 FB 01 F3 04 B6 03 B6 03 B6 03 B6 03 B6 03 B6 03 64 00 F4 01 71 02 EE 02 FB 01 F3 04 F3 04 F3 04 F3 04 F3 04 F3 04 F3 04 34 01 04 05 04 05 04 05 04 05 04 05 04 05 04 05 2C 01 04 05 A4 04 A4 04 A4 04 A4 04 A4 04 A4 04 2C 01 2A 03 2A 03 2A 03 2A 03 2A 03 2A 03 2A 03 D0 01 D0 01 D0 01 D0 01 D0 01 D0 01 D0 01 D0 01 D0 01 D0 01 D0 01 D0 01 D0 01 D0 01 D0 01 D0 01 D0 01 D0 01 D0 01 D0 01 D0 01 D0 01 D0 01 D0 01 D0 01 D0 01 D0 01 D0 01 D0 01 D0 01 D0 01 D0 01 F4 06 F3 04 EE 02 3E 04 F3 04 F3 04 04 05 04 05 2A 03 D0 01 00 03 03 03 30 01 FB 01 80 0C 80 0C 8C 0A 48 0D 48 0D 48 0D 88 13 18 15 18 15 18 15 20 03 20 03 20 03 00 00 00 00 D0 01 00 00 01 02 00 00 5B 00 00 0C 00 00 00 03 06 06 51 00 6B 02 00 00 00 00 00 00 00 00 32 00 3C 00 90 01 90 01 90 01 90 01 90 01 90 01 90 01 90 01 90 01 90 01 0F 00 20 03 54 0B 80 0C 53 00 20 03 01 00 00 02 00 00 00 00 00 00 00 00 00 00 00 00 47 E6 91 3C AC A8 41 BD 13 44 5D 3D 00 00 00 00 00 00 00 00 8F C2 F5 3C 00 00 00 00 00 00 00 00 00 00 00 00 4B C8 C7 3D 98 34 46 3D FF 04 97 BD AF 5A 19 3B 8C A1 1C BB F8 36 BD 3D 00 00 00 00 00 00 00 00 00 00 00 00 00 00 00 00 00 00 00 00 00 00 00 00 00 00 00 00 00 00 00 00 00 00 00 00 00 00 00 00 A0 00 A0 00 01 01 00 00 00 00 00 00 A0 00 A0 00 00 02 00 00 00 00 00 00 00 00 00 00 00 00 00 00 00 00 00 00 00 00 00 00 00 00 00 00 00 00 00 00 00 00 00 00 00 00 00 00 00 00 00 00 00 00 00 00 00 00 00 00 01 00 00 00 00 00 00 00 00 00 00 00 00 00 00 00 00 00 00 00 00 00 00 00 00 00 00 00 00 00 00 00 00 00 00 00 00 00 00 00 00 00 00 00 00 00 00 00 00 00 00 00 A9 01 87 00 87 00 00 00 00 00 00 00 00 00 00 00 00 00 00 00 19 00 19 00 6A 04 00 00 B9 05 00 00 18 06 00 00 00 00 00 00 00 00 00 00 00 00 00 00 00 00 00 00 00 00 00 00 00 00 00 00 00 00 00 00 00 00 00 00 00 00 00 00 00 00 00 00 00 00 00 00 00 00 00 00 00 00 00 00 00 00 00 00 00 00 00 00 00 00 00 00 00 00 00 00 00 00 00 00 00 00 00 00 00 00 00 00 00 00 00 00 00 00 00 00 00 00 00 00 00 00 00 00 00 00 00 00 00 00 00 00 00 00 00 00 00 00 00 00 00 00 00 00 00 00 00 00 00 00 00 00 00 00 00 00 00 00 00 00 00 00 00 00 00 00 00 00 00 00 00 00 00 00 00 00 00 00 00 00 00 00 00 00 00 00 00 00 00 00 00 00 00 00 00 00 00 00 00 00 00 00 00 00 00 00 00 00 00 00 00 00 00 00 00 00 00 00 00 00 00 00 00 00 00 00 00 00 00 00 00 00 00 00 00 00 00 00 00 00 00 00 00 00 00 00 00 00 00 00 00 00 00 00 00 00 00 00 00 00 00 00 00 00 00 00 00 00 00 00 00 00 00 00 00 00Adding PowerPlay Table Definitions
AMD GPU PowerPlay table settings can be added to your
config.plist in the DeviceProperties section as per the screenshot below for your graphics card address using the PP_PhmSoftPowerPlayTable key.Note that you should use either Xcode or PropertyTree to add these values as they are of a data type
You graphics card address will vary depending on the slot on the motherboard it is plugged into but can be determined using the
gfxutil utility which indicates my address as PciRoot(0x0)/Pci(0x1,0x0)/Pci(0x0,0x0)/Pci(0x0,0x0)/Pci(0x0,0x0)as shown below
Code:
gfxutil-1.80b-RELEASE milmber$ ./gfxutil -f GFX0
03:00.0 1002:731f /PCI0@0/PEG1@1/PEGP@0/pci-bridge@0/GFX0@0 = PciRoot(0x0)/Pci(0x1,0x0)/Pci(0x0,0x0)/Pci(0x0,0x0)/Pci(0x0,0x0)
The final entry for the
DeviceProperties section of your config.plist should look like the below.Note - if you wish to use this you MUST have a Sapphire Pulse RX 5600 XT. Using this definition on other GPU card may have unintended consequences including causing the card to be permanently damaged !
Code:
<key>DeviceProperties</key>
<dict>
   <key>Add</key>
   <dict>
      <key>PciRoot(0x0)/Pci(0x1,0x0)/Pci(0x0,0x0)/Pci(0x0,0x0)/Pci(0x0,0x0)</key>
      <dict>
         <key>PP_PhmSoftPowerPlayTable</key>
         <data>igYMAAHiAfQIAAA6PAAAfQAIAAAAGwAAAAAAAAAAAAB2AAAAAAAAAAAAAAAAAAEAAAAKAAAA9AYAAPMEAAA+BAAA8wQAAPMEAADuAgAA8wQAAAQFAAAEBQAAKgMAAAAAAAAAAAAAAAAAAAAAAAAAAAAAAAAAACwBAABkAAAAZAAAAGQAAAD7AQAAZAAAAPsBAAA0AQAALAEAACwBAAAAAAAAAAAAAAAAAAAAAAAAAAAAAAAAAACAAAAADgAAAB4AAAABAQEBAQEBAQEBAQEBAQAAAAAAAAAAAAAAAAAAAAAAABwHAAAcBwAAHAcAABoEAAAcBwAAGgQAABwHAAAaBAAAogMAABQAAACADAAAgAwAAGQAAABuAAAAAgAAAAAAAAABAAAAAQAAAAEAAABkAAAAZAAAAGQAAABkAAAAZAAAAGQAAABkAAAAZAAAAGQAAABkAAAAAAAAAAAAAAAAAAAAIAMAACADAAAgAwAAIAMAACADAAAgAwAAIAMAACADAABxAgAAMgAAALwCAAC8AgAAGQAAADIAAAAAAAAAAAAAAAAAAAAAAAAAAAAAABkAAAAUAAAAGQAAABQAAAAZAAAAFAAAABkAAAAUAAAAGQAAABQAAAAAAAAAAAAAAAAAAAAIAAAA/6/foyMGAACHAAAAAAAAAAAAAAAAAAAAhwAAAAAAAAAAAAAAAAAAAA4AAACAAAAAZABuAGkAcwBzAHMAcwAAAAAAAAAAAAAAAAAAAP5wAAABAAAAZABkAAAAAAAAAAAAHAwcDIAMgAxoEGgQTAAAAAEAAgAAAAAAAAAAAIEmgj6kcF2+tRoyPwEAAgAAAIA/AAAAAPG6Xj6rsm+9RfU2PwEBBAAAAIA/AAAAAPG6Xj6rsm+9RfU2PwEAAgDY8CQ/Ne8IPwAAAADUK8U+V1sRPwEAAgAKaAI/FK4XPwAAAACDUak+N4kRPwEAAgCcxKA/jgawvgAAAADjxwg/7C97PgEAAgBhVFI/1zRvPAAAAAD9h/Q+ylSBPgIAAgAAAAAAAAAAAAAAAAAAAAAAAAAAAAIAAgAAAAAAAAAAAAAAAAAAAAAAAAAAACwB9AZ4BXgFeAV4BXgFeAV4BXgFeAV4BXgFeAV4BXgFZADzBPME8wTzBPME8wTzBGQAPgQ+BD4EPgQ+BD4EPgT7AfMEtgO2A7YDtgO2A7YDZAD0AXEC7gL7AfME8wTzBPME8wTzBPMENAEEBQQFBAUEBQQFBAUEBSwBBAWkBKQEpASkBKQEpAQsASoDKgMqAyoDKgMqAyoD0AHQAdAB0AHQAdAB0AHQAdAB0AHQAdAB0AHQAdAB0AHQAdAB0AHQAdAB0AHQAdAB0AHQAdAB0AHQAdAB0AHQAfQG8wTuAj4E8wTzBAQFBAUqA9ABAAMDAzAB+wGADIAMjApIDUgNSA2IExgVGBUYFSADIAMgAwAAAADQAQAAAQIAAFsAAAwAAAADBgZRAGsCAAAAAAAAAAAyADwAkAGQAZABkAGQAZABkAGQAZABkAEPACADVAuADFMAIAMBAAACAAAAAAAAAAAAAAAAR+aRPKyoQb0TRF09AAAAAAAAAACPwvU8AAAAAAAAAAAAAAAAS8jHPZg0Rj3/BJe9r1oZO4yhHLv4Nr09AAAAAAAAAAAAAAAAAAAAAAAAAAAAAAAAAAAAAAAAAAAAAAAAAAAAAKAAoAABAQAAAAAAAKAAoAAAAgAAAAAAAAAAAAAAAAAAAAAAAAAAAAAAAAAAAAAAAAAAAAAAAAAAAAAAAAAAAAAAAAAAAQAAAAAAAAAAAAAAAAAAAAAAAAAAAAAAAAAAAAAAAAAAAAAAAAAAAAAAAAAAAAAAAAAAAKkBhwCHAAAAAAAAAAAAAAAAAAAAGQAZAGoEAAC5BQAAGAYAAAAAAAAAAAAAAAAAAAAAAAAAAAAAAAAAAAAAAAAAAAAAAAAAAAAAAAAAAAAAAAAAAAAAAAAAAAAAAAAAAAAAAAAAAAAAAAAAAAAAAAAAAAAAAAAAAAAAAAAAAAAAAAAAAAAAAAAAAAAAAAAAAAAAAAAAAAAAAAAAAAAAAAAAAAAAAAAAAAAAAAAAAAAAAAAAAAAAAAAAAAAAAAAAAAAAAAAAAAAAAAAAAAAAAAAAAAAAAAAAAAAAAAAAAAAAAAAAAAAAAAAAAAAAAAAAAAAAAAAAAAAAAAAAAAAAAAAAAAAAAAAAAAAAAAAAAAAAAAAAAAAAAAAAAAAA</data>
      </dict>
      <key>PciRoot(0x0)/Pci(0x1b,0x0)</key>
      <dict>
         <key>layout-id</key>
         <data>AQAAAA==</data>
      </dict>
      <key>PciRoot(0x0)/Pci(0x2,0x0)</key>
      <dict>
         <key>AAPL,ig-platform-id</key>
         <data>AwDImw==</data>
      </dict>
      <key>PciRoot(0x0)/Pci(0x1C,0x1)/Pci(0x0,0x0)</key>
      <dict>
         <key>device-id</key>
         <data>8hUAAA==</data>
      </dict>
   </dict>
   <key>Delete</key>
   <dict/>
</dict>
GeekBench Scores
Attachments

Last edited: