- Joined
- Sep 18, 2011
- Messages
- 492
- Motherboard
- Gigabyte GA-X99-UD4
- CPU
- i7-5820K
- Graphics
- GTX 1080 Ti
- Mac
- Classic Mac
- Mobile Phone
***Updated 03/17/2016***
Introduction:
Here is a temporary working guide to install OS X Yosemite 10.10.x on your custom built Haswell E X99 Computer! I made this guide from using instructions from about 5 of the current builds on TonyMac forums. This is a *temp* guide since Haswell E and X99 are not fully supported, so as soon as full support comes out you will want to use a newer guide. This will work for now though if your like me and bought the newest technology.
Disclaimer:
This guide is based on the guide from Colton328 which can be found @ http://www.tonymacx86.com/yosemite-...x-gtx-970-ga-x99-ud4-yosemite-hackintosh.html I used his guide as the basis to make this complete guide.
What's working:
CPU performance, Ethernet, GTX 970 recognized, USB, Drives, Audio, everything!
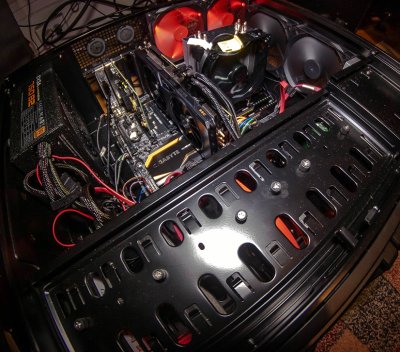
The build:
GIGABYTE GA-X99-UD4 (Motherboard)
Intel Core i7 5820k Haswell E Processor (Cpu)
16GB Corsair Vengence DDR4 2400 RAM (Memory)
EVGA GTX 970 SSC 4GB (Graphics Card)
Sandisk Extreme ii 120GB SSD (El Capitan drive)
Samsung 840 Evo 120GB SSD (Windows Drive for dual boot)
(3) Western Digital Caviar Black 1 TB (Hard Drives)
Old Maxtor 500gb Drive (still works)
Antec DF-85 (Computer Case)
EVGA SuperNOVA 750 B2 (Power Supply)
Cooler Master Hyper 212 Evo (Cpu Cooler)
Samsung CD / DVD-RW Burner With LightScribe (for when I rarely need a cd/dvd drive)
Requirements for this install:
Unibeast, 2 Empty Hard drives, A usb flash drive (at least b8gb), an already working copy of osx to create the unibeast usb installer
Pre installation bios setings:
Go into bios, use "load optimized defaults" , enable EHCI Hand Off (not required but recommended)
Save.
Thats it.
Highly Recommended for this install:
USB Audio Device (I have bought a Sarbent USB Audio Device for 7.99 to enable audio on this build, incase there is a problem with onboard audio down the road, the normal onboard audio output can go out at random, if you use spdif it should work fine)
Link to buy a usb audio adapter: http://www.amazon.com/dp/B00IRVQ0F8/?tag=tonymacx86com-20
USB Ethernet Device (Incase you experience freezing while using the internet, disable onboard LAN in the bios and use this instead) (Credit goes to Tonymacx86 member: mascarponi for finding the fix!) Link to buy a usb ethernet adapter: http://www.amazon.com/dp/B00E9655LU/?tag=tonymacx86com-20
How to Overclock your 5820k / ddr4 Memory (easy guide):
Go into bios under frequency settings set "cpu boost 5820k to 4.3 ghz"
set memory settings xmp memory profile to "profile 1" or "profile 2" (depending on your memory speed)
this will overclock your cpu and memory, you may or may not want to do that. since this is haswell e and it's all about performance, i reccommend it. computer definetly runs better smoother and much faster with overclocking. It's automatic and the motherboard takes care of all the voltage settings. CPU (for me) performs best at "cpu boost 5820k to 4.3ghz" and "Profile 1" was best setting for my memory, computer ran smoothest with those settings. it's best to clock the memory to the frequency it was designed to operate at. For example if you buy 2400mhz memory (like me) use "profile 1" since it tunes the board to that frequency. Easy overclocking!
Step 1, Creating a Unibeast Drive:
You will need an already working Mac setup to make the USB drive so if you are already on an older hackintosh use that or borrow someones Mac or hackintosh!
Follow this video tutorial:
If you are installing 10.10-10.10.1:
Once Unibeast is installed to USB, halfway through the video, This guy says to use TWO lines of code to patch the kernel on the USB installer, that is outdated info. Check Here for the updated version of that, other than that follow his guide:
http://www.tonymacx86.com/yosemite-...motherboard-temporary-guide-os-x-10-10-a.html
If you are installing 10.10.2-10.10.5:
You no longer need to patch the kernel. You do need the kexts as shown in the video, but the kernel patching is not required from 10.10.2 on so you can skip that step!
Step 2, Installing OSX from Unibeast:
Once Unibeast installer is made, boot the installation drive using
npci=0x2000 nv_disable=1 -f -x -v
Install OSX Following the tonymacx86 guide Step 4:
http://www.tonymacx86.com/yosemite-...-x-yosemite-any-supported-intel-based-pc.html
Step 3, Booting your install, and cloning your drive:
After installing, boot to your OS X install (from usb stick), you need to use npci=0x2000, nv_disable=1, -f -v.
If your using a similar gtx 9xx series graphics card like me, Install NVIDIA web drivers for 10.10.5 from here: http://www.nvidia.com/download/driverResults.aspx/89538/en-us (for another version just search nvidia web drivers 10.10.x (x for version your using) on google)
You can then reboot with npci=0x2000 nvda_drv=1 -f (still from usb stick).
***Important****
This is where you must clone OSX from a GUID formatted drive to an MBR formatted drive or it won't boot after a while. I have updated this guide to include this step as it is required. I learned the hard way, had my system fully running, and suddenly couldn't boot. Cloning to MBR eliminates this problem. Use a program called "Carbon Copy Cloner" to clone your mac install to a second hard drive.
How to format for MBR:
Open Disk Utility, Select drive you will be cloning your install to.
Go to "Partition" Section and in the "Partition" subsection drop down menu select 1 partition.
Under "format" subsection select "Mac OSX Extended (Journaled)" from the drop down menu
Then click on the "Options" button at the bottom under the white box, change from "GUID Partition Table" to "Master Boot Record". Click Apply.
Now you have formatted your drive for MBR and you are ready to clone OSX (Also Covered in the video)
Now Use Carbon Copy Cloner:
Under Souce Select your Current OSX Install Drive
Under Destination Select your new MBR Formatted Drive
In the "Clone" Dropdown menu select "All Files"
Turn SafetyNet Off
Then press Clone
After clone completes you have now successfully cloned OSX To an MBR Formatted drive! Now reboot the MBR formatted drive from your usb stick (with same boot flags) and get ready to install multibeast!
Step 3, Installing Multibeast
What worked for me:
DSDT Free (Sets a lot of settings, don't change them)
Drivers Disk - 3rd party sata / intel generic AHCI Sata
Drivers Misc - USB 3.0 Generic / NullCpuPowerManagement (Enables CPU @ Full Speed!) / Voodoo TSync 6 core (For it to detect all 6 cores)
Drivers Network - AppleIntelE1000e (Latest Version) (You don't need this driver if using usb ethernet device)
Customize > Boot Options - IGPEnabler=No (Since you won't be using Intel Graphics, there is none with x99!)
Customize > System Definitions - Mac Pro > Mac Pro 6,1 (Might as well!)
*** Important, don't reboot yet! ***
If you are using Mac Pro 6,1 definition don't reboot right away after installing multibeast! In order to use mac pro 6.1 as a system definition you need to do 1 more step:
Patch AppleGraphicsControl.kext by applying fix #4 in the following post (otherwise it will boot to a black or white screen with 6,1 definition):
http://www.tonymacx86.com/graphics/...ver-install-loading-problems.html#post1016777
Last is step is to go into your Chameleon.boot.plist also in the "extra" folder and open it up. under kernel flags add this "npci=0x2000 nvda_drv=1" (without the quotes) just leave a space in between the existing kernel flags and these two, no need to use a comma. npci=0x2000 is required to boot correctly (i don't know why) and nvda_drv=1 is so your nvidia web drivers will load your graphics card automatically. nvidia web drivers are required at this point to use the gtx 970 or any 900 series card. if you have a different card then search up what you need for that.
After doing all this when you restart and boot up it should boot automatically with no extra kernel flags required and you will have working Hackintosh.
Step 4, Installing Audio:
For Audio you will just use your USB Audio Device if you followed this guide, however if you insist on onboard audio:
1. Copy My attatched AppleHDA.Kext (in zip file) to /system/library/extensions/ (This is the kext from the original mavericks 10.9.5 installer)
2. Download Multibeast for Mavericks Here: http://www.tonymacx86.com/downloads.php?do=file&id=255
3. Install Realtek ALC 1150 audio from that version of multibeast
4. Download Toleda's ssdt from here: https://github.com/toleda/audio_ALCInjection/blob/master/ssdt_hdef/ssdt_hdef-1-x99_alza.zip and copy it to /Extra/ Folder if an ssdt is already present rename it to ssdt-1.aml if there is no ssdt then just call it ssdt.aml. if there is already an ssdt.aml and ssdt-1.aml name it to ssdt-2.aml (leave no spaces between ssdt's) (it is explained in the guide file downloaded from that link)
5. Restart
6. Use audio_alc_x99-hda-100_patch.command (In zip file attatched)
7. Restart
8. Audio works now (Really works!)
Guide Thanks to Toleda! (My version is his guide, just showing how I did it in simpler language)
Notes:
Now system should be fully working with graphics, internet, usb, and audio!
If your system ever freezes while using the internet buy a USB Ethernet Adapter. Disable your onboard LAN in the bios and system will be fully working without any freezing.
To Enable HW Monitor to monitor cpu temps install "Fake CPU Plugins" and "HW Monitor" App from Misc section of multibeast (Yosemite). After that, just use HW Monitor App in Applications, should work fine!
Post install things to do:
1. Go to Applications > Utilities > Terminal enter 'sudo trimforce enable' this will enable Trim if using an SSD Drive (Highly recommended, SSD only)
Windows Dual Booting Information:
If you are dual booting with Windows here are a few things I like to do:
1. Follow post 2 of this page, it's a guide on how to hide any unwanted partitions showing up on the chimera bootloader: http://www.tonymacx86.com/chimera-a...n-hide-rename-boot-menu-doesnt-want-work.html
2. Install "Instant Menu" from "Customize" Section in Multibeast Yosemite version, it will automatically boot to chimera and let you choose which drive to boot without automatically booting!
If you have problems booting windows from chimera, select the "System Reserved" Partition in Chimera, sometimes it shows your windows drives as 2 partitions and won't boot from the drive unless you boot from the "System Reserved" Partition. You can rename this partition in OSX and it will reflect the changes in chimera. I ususally rename it to "Windows" and hide the other partition, so when my computer boots up it shows a "Mac" drive and a "Windows" drive I can select from.
If you can't rename an NTFS Drive I suggest getting "Paragon NTFS" It's great for accessing windows drives in OSX.
How To Optimize OS X!
Go to system Preferences > Mission Control, untick all check boxes. turn dashboard off (may require log out / log back in)
Go to system preferences > Security & Privacy, Under General > untick all check boxes (may require clicking lock at bottom left of box), fill in bubble on allow apps downloaded from anywhere (now system boots to desktop and auto logs in without needing password) Under Privacy tab > Untick enable location services
Go To system preferences > spotlight, untick all check boxes in search results tab, then go to privacy tab, drag all drives into that tab. This will turn spotlight off, so you can't search, but will make computer faster. If you want to keep search function, don't do this, but if you want faster computer. Turn it all off!
Go to system preferences > notifications, untick everything, then go to notification panel on the top right of screen, and click the grey box at the bottom. Drag any apps with the red coicon next to them to the green icon section. That will turn off all notifications for apps (speeds up computer a bit)
Go To System Preferences > Energy Saver, turn display off after: Never (drag bar all the way to right) untick all check boxes, especially untick put hard drives to sleep
Go to System Preferences > Bluetooth, turn bluetooth off (unless you need it then turn bluetooth on)
Go to System Preferences > App Store, untick automatically check for updates
Thats about the extent of it,
Good luck!!!!
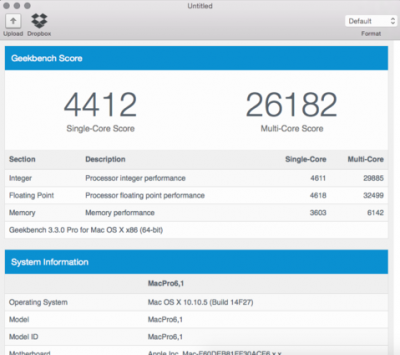
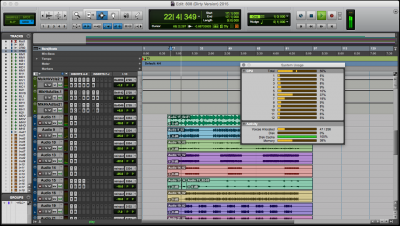
This comp is super fast. Faster than on windows. I just hit 26k+ on my geek bench latest benchmark. Full CPU usage in Pro Tools HD, Running better in OSX than in Windows! Incredibly smooth computer!
Introduction:
Here is a temporary working guide to install OS X Yosemite 10.10.x on your custom built Haswell E X99 Computer! I made this guide from using instructions from about 5 of the current builds on TonyMac forums. This is a *temp* guide since Haswell E and X99 are not fully supported, so as soon as full support comes out you will want to use a newer guide. This will work for now though if your like me and bought the newest technology.
Disclaimer:
This guide is based on the guide from Colton328 which can be found @ http://www.tonymacx86.com/yosemite-...x-gtx-970-ga-x99-ud4-yosemite-hackintosh.html I used his guide as the basis to make this complete guide.
What's working:
CPU performance, Ethernet, GTX 970 recognized, USB, Drives, Audio, everything!
The build:
GIGABYTE GA-X99-UD4 (Motherboard)
Intel Core i7 5820k Haswell E Processor (Cpu)
16GB Corsair Vengence DDR4 2400 RAM (Memory)
EVGA GTX 970 SSC 4GB (Graphics Card)
Sandisk Extreme ii 120GB SSD (El Capitan drive)
Samsung 840 Evo 120GB SSD (Windows Drive for dual boot)
(3) Western Digital Caviar Black 1 TB (Hard Drives)
Old Maxtor 500gb Drive (still works)
Antec DF-85 (Computer Case)
EVGA SuperNOVA 750 B2 (Power Supply)
Cooler Master Hyper 212 Evo (Cpu Cooler)
Samsung CD / DVD-RW Burner With LightScribe (for when I rarely need a cd/dvd drive)
Requirements for this install:
Unibeast, 2 Empty Hard drives, A usb flash drive (at least b8gb), an already working copy of osx to create the unibeast usb installer
Pre installation bios setings:
Go into bios, use "load optimized defaults" , enable EHCI Hand Off (not required but recommended)
Save.
Thats it.
Highly Recommended for this install:
USB Audio Device (I have bought a Sarbent USB Audio Device for 7.99 to enable audio on this build, incase there is a problem with onboard audio down the road, the normal onboard audio output can go out at random, if you use spdif it should work fine)
Link to buy a usb audio adapter: http://www.amazon.com/dp/B00IRVQ0F8/?tag=tonymacx86com-20
USB Ethernet Device (Incase you experience freezing while using the internet, disable onboard LAN in the bios and use this instead) (Credit goes to Tonymacx86 member: mascarponi for finding the fix!) Link to buy a usb ethernet adapter: http://www.amazon.com/dp/B00E9655LU/?tag=tonymacx86com-20
How to Overclock your 5820k / ddr4 Memory (easy guide):
Go into bios under frequency settings set "cpu boost 5820k to 4.3 ghz"
set memory settings xmp memory profile to "profile 1" or "profile 2" (depending on your memory speed)
this will overclock your cpu and memory, you may or may not want to do that. since this is haswell e and it's all about performance, i reccommend it. computer definetly runs better smoother and much faster with overclocking. It's automatic and the motherboard takes care of all the voltage settings. CPU (for me) performs best at "cpu boost 5820k to 4.3ghz" and "Profile 1" was best setting for my memory, computer ran smoothest with those settings. it's best to clock the memory to the frequency it was designed to operate at. For example if you buy 2400mhz memory (like me) use "profile 1" since it tunes the board to that frequency. Easy overclocking!
Step 1, Creating a Unibeast Drive:
You will need an already working Mac setup to make the USB drive so if you are already on an older hackintosh use that or borrow someones Mac or hackintosh!
Follow this video tutorial:
[video=youtube;cx_RD7CduDM]https://www.youtube.com/watch?v=cx_RD7CduDM[/video]
If you are installing 10.10-10.10.1:
Once Unibeast is installed to USB, halfway through the video, This guy says to use TWO lines of code to patch the kernel on the USB installer, that is outdated info. Check Here for the updated version of that, other than that follow his guide:
http://www.tonymacx86.com/yosemite-...motherboard-temporary-guide-os-x-10-10-a.html
If you are installing 10.10.2-10.10.5:
You no longer need to patch the kernel. You do need the kexts as shown in the video, but the kernel patching is not required from 10.10.2 on so you can skip that step!
Step 2, Installing OSX from Unibeast:
Once Unibeast installer is made, boot the installation drive using
npci=0x2000 nv_disable=1 -f -x -v
Install OSX Following the tonymacx86 guide Step 4:
http://www.tonymacx86.com/yosemite-...-x-yosemite-any-supported-intel-based-pc.html
Step 3, Booting your install, and cloning your drive:
After installing, boot to your OS X install (from usb stick), you need to use npci=0x2000, nv_disable=1, -f -v.
If your using a similar gtx 9xx series graphics card like me, Install NVIDIA web drivers for 10.10.5 from here: http://www.nvidia.com/download/driverResults.aspx/89538/en-us (for another version just search nvidia web drivers 10.10.x (x for version your using) on google)
You can then reboot with npci=0x2000 nvda_drv=1 -f (still from usb stick).
***Important****
This is where you must clone OSX from a GUID formatted drive to an MBR formatted drive or it won't boot after a while. I have updated this guide to include this step as it is required. I learned the hard way, had my system fully running, and suddenly couldn't boot. Cloning to MBR eliminates this problem. Use a program called "Carbon Copy Cloner" to clone your mac install to a second hard drive.
How to format for MBR:
Open Disk Utility, Select drive you will be cloning your install to.
Go to "Partition" Section and in the "Partition" subsection drop down menu select 1 partition.
Under "format" subsection select "Mac OSX Extended (Journaled)" from the drop down menu
Then click on the "Options" button at the bottom under the white box, change from "GUID Partition Table" to "Master Boot Record". Click Apply.
Now you have formatted your drive for MBR and you are ready to clone OSX (Also Covered in the video)
Now Use Carbon Copy Cloner:
Under Souce Select your Current OSX Install Drive
Under Destination Select your new MBR Formatted Drive
In the "Clone" Dropdown menu select "All Files"
Turn SafetyNet Off
Then press Clone
After clone completes you have now successfully cloned OSX To an MBR Formatted drive! Now reboot the MBR formatted drive from your usb stick (with same boot flags) and get ready to install multibeast!
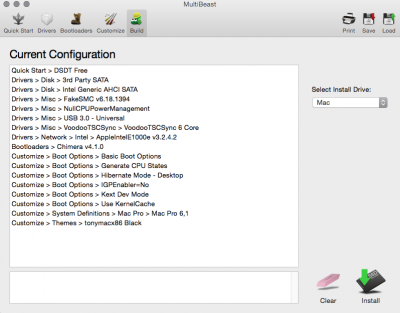
Step 3, Installing Multibeast
What worked for me:
DSDT Free (Sets a lot of settings, don't change them)
Drivers Disk - 3rd party sata / intel generic AHCI Sata
Drivers Misc - USB 3.0 Generic / NullCpuPowerManagement (Enables CPU @ Full Speed!) / Voodoo TSync 6 core (For it to detect all 6 cores)
Drivers Network - AppleIntelE1000e (Latest Version) (You don't need this driver if using usb ethernet device)
Customize > Boot Options - IGPEnabler=No (Since you won't be using Intel Graphics, there is none with x99!)
Customize > System Definitions - Mac Pro > Mac Pro 6,1 (Might as well!)
*** Important, don't reboot yet! ***
If you are using Mac Pro 6,1 definition don't reboot right away after installing multibeast! In order to use mac pro 6.1 as a system definition you need to do 1 more step:
Patch AppleGraphicsControl.kext by applying fix #4 in the following post (otherwise it will boot to a black or white screen with 6,1 definition):
http://www.tonymacx86.com/graphics/...ver-install-loading-problems.html#post1016777
Last is step is to go into your Chameleon.boot.plist also in the "extra" folder and open it up. under kernel flags add this "npci=0x2000 nvda_drv=1" (without the quotes) just leave a space in between the existing kernel flags and these two, no need to use a comma. npci=0x2000 is required to boot correctly (i don't know why) and nvda_drv=1 is so your nvidia web drivers will load your graphics card automatically. nvidia web drivers are required at this point to use the gtx 970 or any 900 series card. if you have a different card then search up what you need for that.
After doing all this when you restart and boot up it should boot automatically with no extra kernel flags required and you will have working Hackintosh.
Step 4, Installing Audio:
For Audio you will just use your USB Audio Device if you followed this guide, however if you insist on onboard audio:
1. Copy My attatched AppleHDA.Kext (in zip file) to /system/library/extensions/ (This is the kext from the original mavericks 10.9.5 installer)
2. Download Multibeast for Mavericks Here: http://www.tonymacx86.com/downloads.php?do=file&id=255
3. Install Realtek ALC 1150 audio from that version of multibeast
4. Download Toleda's ssdt from here: https://github.com/toleda/audio_ALCInjection/blob/master/ssdt_hdef/ssdt_hdef-1-x99_alza.zip and copy it to /Extra/ Folder if an ssdt is already present rename it to ssdt-1.aml if there is no ssdt then just call it ssdt.aml. if there is already an ssdt.aml and ssdt-1.aml name it to ssdt-2.aml (leave no spaces between ssdt's) (it is explained in the guide file downloaded from that link)
5. Restart
6. Use audio_alc_x99-hda-100_patch.command (In zip file attatched)
7. Restart
8. Audio works now (Really works!)
Guide Thanks to Toleda! (My version is his guide, just showing how I did it in simpler language)
Notes:
Now system should be fully working with graphics, internet, usb, and audio!
If your system ever freezes while using the internet buy a USB Ethernet Adapter. Disable your onboard LAN in the bios and system will be fully working without any freezing.
To Enable HW Monitor to monitor cpu temps install "Fake CPU Plugins" and "HW Monitor" App from Misc section of multibeast (Yosemite). After that, just use HW Monitor App in Applications, should work fine!
Post install things to do:
1. Go to Applications > Utilities > Terminal enter 'sudo trimforce enable' this will enable Trim if using an SSD Drive (Highly recommended, SSD only)
Windows Dual Booting Information:
If you are dual booting with Windows here are a few things I like to do:
1. Follow post 2 of this page, it's a guide on how to hide any unwanted partitions showing up on the chimera bootloader: http://www.tonymacx86.com/chimera-a...n-hide-rename-boot-menu-doesnt-want-work.html
2. Install "Instant Menu" from "Customize" Section in Multibeast Yosemite version, it will automatically boot to chimera and let you choose which drive to boot without automatically booting!
If you have problems booting windows from chimera, select the "System Reserved" Partition in Chimera, sometimes it shows your windows drives as 2 partitions and won't boot from the drive unless you boot from the "System Reserved" Partition. You can rename this partition in OSX and it will reflect the changes in chimera. I ususally rename it to "Windows" and hide the other partition, so when my computer boots up it shows a "Mac" drive and a "Windows" drive I can select from.
If you can't rename an NTFS Drive I suggest getting "Paragon NTFS" It's great for accessing windows drives in OSX.
How To Optimize OS X!
Go to system Preferences > Mission Control, untick all check boxes. turn dashboard off (may require log out / log back in)
Go to system preferences > Security & Privacy, Under General > untick all check boxes (may require clicking lock at bottom left of box), fill in bubble on allow apps downloaded from anywhere (now system boots to desktop and auto logs in without needing password) Under Privacy tab > Untick enable location services
Go To system preferences > spotlight, untick all check boxes in search results tab, then go to privacy tab, drag all drives into that tab. This will turn spotlight off, so you can't search, but will make computer faster. If you want to keep search function, don't do this, but if you want faster computer. Turn it all off!
Go to system preferences > notifications, untick everything, then go to notification panel on the top right of screen, and click the grey box at the bottom. Drag any apps with the red coicon next to them to the green icon section. That will turn off all notifications for apps (speeds up computer a bit)
Go To System Preferences > Energy Saver, turn display off after: Never (drag bar all the way to right) untick all check boxes, especially untick put hard drives to sleep
Go to System Preferences > Bluetooth, turn bluetooth off (unless you need it then turn bluetooth on)
Go to System Preferences > App Store, untick automatically check for updates
Thats about the extent of it,
Good luck!!!!
This comp is super fast. Faster than on windows. I just hit 26k+ on my geek bench latest benchmark. Full CPU usage in Pro Tools HD, Running better in OSX than in Windows! Incredibly smooth computer!