- Joined
- Nov 15, 2011
- Messages
- 79
- Motherboard
- ASRock Z390 Phantom Gaming ITX/ac
- CPU
- i9-9900K
- Graphics
- RX 6800 XT
- Mac
- Mobile Phone
[Success] Guide Yosemite 10.10.1 Clover UEFI Guide - Gigabyte GA-Z77X-UD5H
I decided to upgrade to Yosemite 2 days ago and have spent some time getting my Hack to run smoothly.
As I could not find a dedicated guide to the Z77X-UD5H I thought I would post this in the hope that it helps others with issues…
I have been running 2 Hack’s over the last 2.5 years with great success using unibeast and multibeast. After trying a unibeast Yosemite install I found several issues and then decided to head down the rabbit hole into the world of clover…
This installation is for a clean install as I prefer not to upgrade from previous versions and assumes that you have access to another mac
I have used and modified sections of Tonymac’s guide here (BIG THANKS AS ALWAYS)
http://www.tonymacx86.com/yosemite-desktop-guides/144426-how-install-os-x-yosemite-using-clover.html
*** the front USB 3 will not work at first - use rear sockets ***
My Hardware list:
GA-Z77X-UD5H (Rev1.0)
i7-3770k
32GB RAM
2 x GIGABYTE GeForce GTX 670 OC's
Corsair AX 860
Corsair H80i
2 x Samsung 830 256 Gb
TP-Link 4800
Mac Pro 2009 Case
Step 1: Download OS x Yosemite
1. Open Mac App Store
2. Log in with your Apple ID
3. Download OS X Yosemite
Step 2: Prepare Bootable USB Drive
This step extracts the OS X Installer contents, then installs Clover bootloader to the USB stick.
1. Insert the USB drive
2. Open /Applications/Utilities/Disk Utility
3. Highlight the USB drive in left column
The Application Install OS X Yosemite will appear in /Applications.
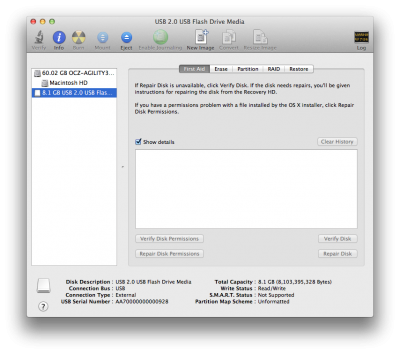
4. Click on the Partition tab5. Click Current and choose 1 Partition
6. Click Options...
7. Choose GUID Partition Table
8. Under Name: type USB (You can rename it later)
9. Under Format: choose Mac OS Extended (Journaled)
10. Click Apply then Partition
11. Open /Applications/Utilities/Terminal
12. Type the following, enter password and hit enter. This command completely erases the USB, then creates native OS X installer media from the Install OS X Yosemite Application.
Code:
sudo /Applications/Install\ OS\ X\ Yosemite.app/Contents/Resources/createinstallmedia --volume /Volumes/USB --applicationpath /Applications/Install\ OS\ X\ Yosemite.app --no interaction
Upon completion, the USB will be renamed Install OS X Yosemite.

13. Download the latest version of Clover from sourceforge
14. Open Clover package installer
15. Hit Continue, Continue, Change Install Location...
16. Choose the USB, now called Install OS X Yosemite
17. Hit Customize and install Clover to the same USB with the following Custom Install settings:
(note these are slightly different to Tonymac’s guide - UEFI Boot not Lagacy)
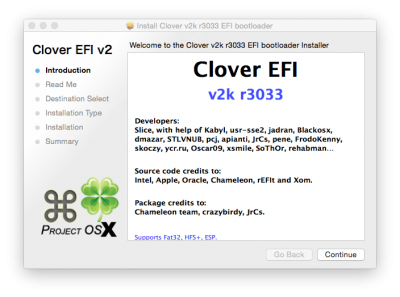
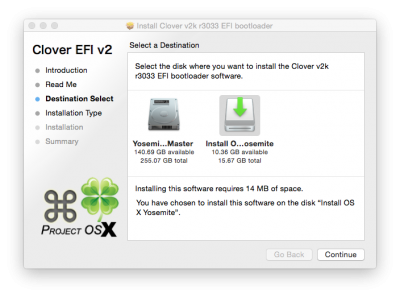
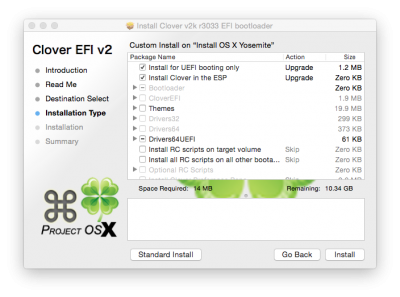
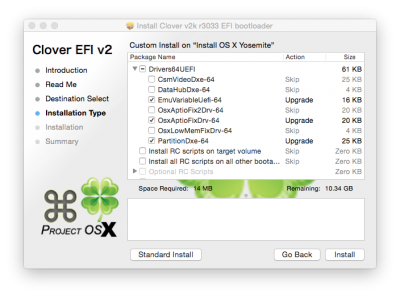
18. Navigate to /EFI/CLOVER/ and replace default config.plist with this one config.plist
19. Navigate to /EFI/CLOVER/kexts/10.10/ and add FakeSMC.kext
11. Navigate to /EFI/CLOVER/kexts/10.10/ and add AtherosL1cEthernet.kext + AppleIntelE1000e.kext
21. Navigate to /EFI/CLOVER/kexts/10.10/ and add NullCPUPowerManagement.kext
22. Navigate to /EFI/CLOVER/drivers64UEFI/ remove VBoxHfs-64.efi and add HFSPlus.efi
23. Create a folder called Utilities on your Install OS X Yosemite USB and copy the following:
Step 3: Going back to basics
(This might not be necessary , you can try the installer with your build 'as is' - If you get issues I suggest doing the below)
When I first started building hacks back in the days of Snow Leopard this was the norm…
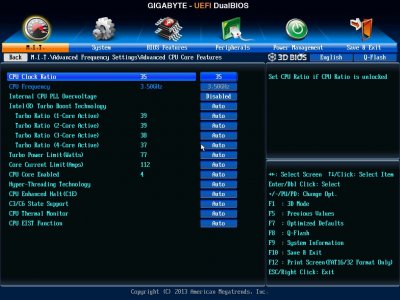
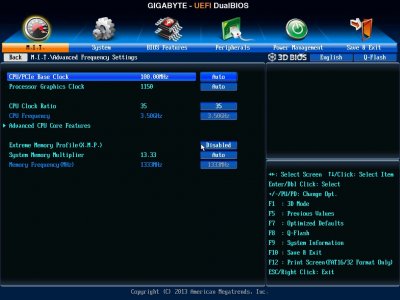
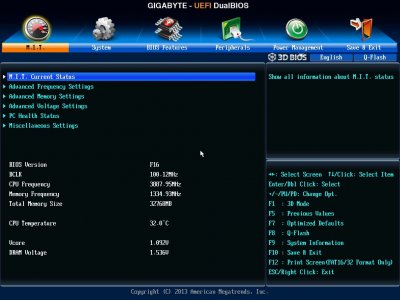

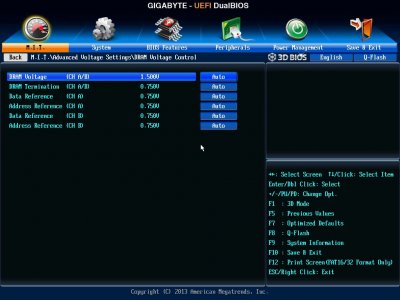
STEP 4: Install OS X Yosemite
Unlike UniBeast, this is a 3 part installation process. The system will reboot twice in order to finish the installation and the recovery partition.
1. Turn on the computer
2. Press the F12 to choose boot device
3. Choose UEFI USB
4. When Clover boot screen is visible, choose Boot OS X Install from OS X Install OS X Yosemite
5. The system will then boot into OS X Installer
6. For a new installation of OS X, you MUST erase and format the destination drive according to the following steps before continuing.
a. Choose Disk Utility
b. Highlight your target hard drive for the Yosemite installation in left column.
c. Click Partition tab
d. Click Current and choose 1 Partition
e. Click Options...
f. Choose GUID Partition Table
g. Under Name: type Yosemite (You can rename it later)
h. Under Format: choose Mac OS Extended (Journaled)
i. Click Apply then Partition
j. Close Disk Utility
7. When the installer asks you where to install, choose Yosemite
8. Upon completion, system will restart a 1st time
*** NB it takes along time to install and might stop on ‘1 second remaining’ it is still running be patient ***
9. Press the F12 to choose boot device
10. Choose USB
11. When Clover boot screen is visible, choose Boot OS X Install from OS X Install OS X Yosemite
The system will boot into the new drive, create the recovery partition, and complete the installation. Upon completion, system will restart a 2nd time.
12. Press F12 to choose USB device
13. When Clover boot screen is visible, choose Yosemite
14. The system will launch OS X Setup
15. Complete setup, do not be concerned it you ethernet or sound does not work
Step 5: Post Installation
1. Navigate to your Utilities folder of the Install OS X Yosemite USB you made in Step 2 part 23
2. Run Clover Installer and chose Yosemite HDD as the installation location
3. Use the following custom settings:
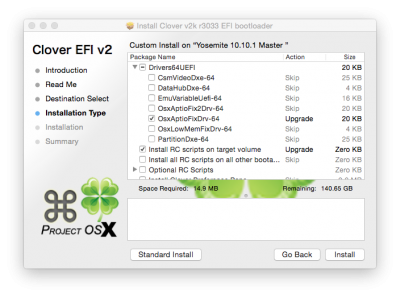
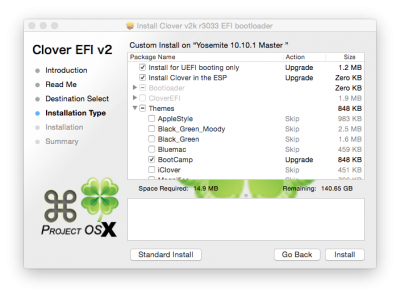
These settings will install the bootloader to the system drive's EFI partition automatically as part of the scripting. After completion, the system drive's EFI partition will automatically mount.
A few more changes need to be made to the default Clover installation:
6. Navigate to /Volumes/EFI/EFI/CLOVER/ and delete config.plist and replace with the standard one from your Utilities folder on the USB
7. Navigate to /Volumes/EFI/EFI/CLOVER/kexts/10.10/ and add FakeSMC.kext
from your Utilities folder on the USB
8. Navigate to /Volumes/EFI/EFI/CLOVER/kexts/10.10/ and add AtherosL1cEthernet.kext & AppleIntelE1000e.kext from your Utilities folder on the USB
9. Run Clover Configurator Yosemite edition from your Utilities folder on the USB
10. Click File then Import Configuration
11. Navigate to EFI drive under devices
12. Click on EFI folder
13. Click on Clover folder
14. Click on config.plist
15. Click on Import at the bottom of the screen
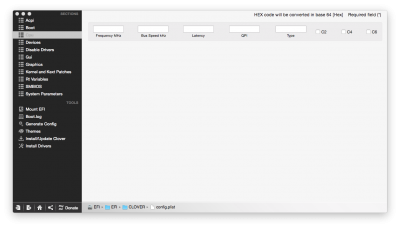
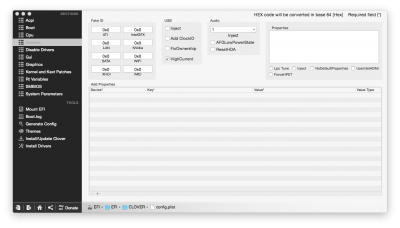
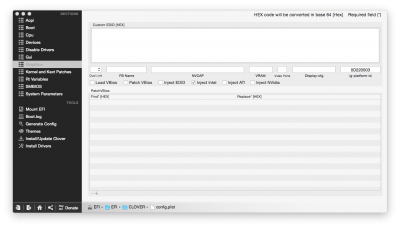
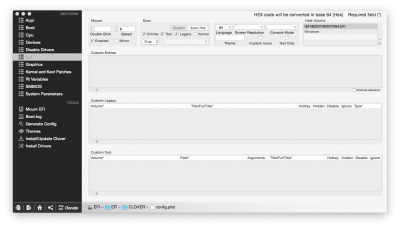
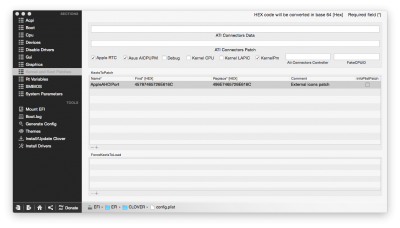
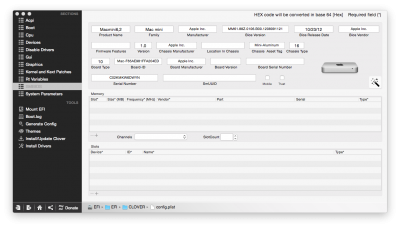
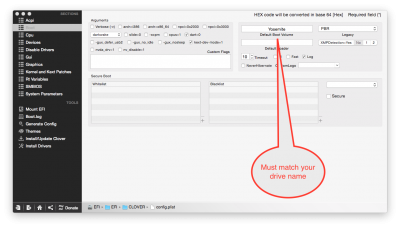
16. Match the following screens
*** NB. your model identifier will most likely be Mac Mini Server 6.2 it may also be iMac 27 13.2 - do not change this at this stage ***
*** ignore this serial number just stay with the one that is already there for the moment ***
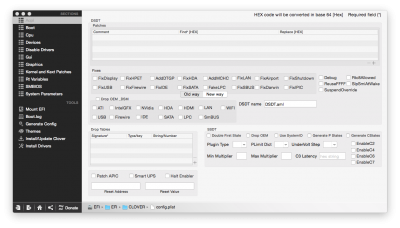



17. Click File then Export Configuration
18. Exit Configurator
19. Remove USB
20. Restart
Step 6: Getting things to work
You should now have a system that boots from the main drive into Yosemite 10.10 and thinks it is a mac mini server… if not you need to retrace your steps back previously
*** NB. the following is specific to my hardware - your mileage my vary***
*** the front USB 3 header is not yet working - looking for a soution***
19. Remove USB
20. Reboot
Your Hack should now boot into Yosemite and think it is a Mac Pro (click ‘about this mac’ to check)
21. Shutdown
22. Install additional graphics cards and wifi card
23. Connect additional monitors (I have 3)
24. Reboot
25. Install 10.10.1 update http://support.apple.com/kb/DL1779
26. Reboot
27. Run Multibeast 7.1.1
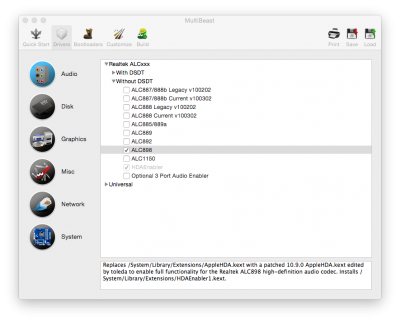
28. Click on drivers tab only and select as below
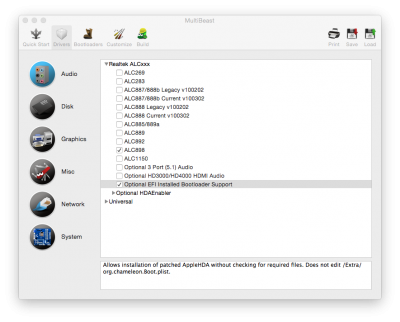
29. Reboot
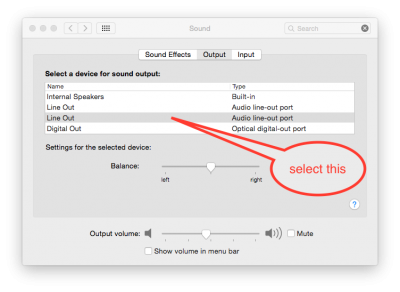
30. Go to System Preferences and click on sound
31. Click on ‘Play sound effects through’ Line out (Second one - Black connector)
32. Click Output tab and select second line out.

33. If your front USB 3 is not working copy GenericUSBXHCI.kext to your desktop
34. Download KextBeast from here and run
35. Reboot - Front USB 3 should now work (Credit due to Rehabman)
36. If HW monitor is only seeing hard drive temps then you need to install the latest plugins from here
to your FakeSMC.kext which is in /Volumes/EFI/EFI/CLOVER/kexts/10.10/
Step 6: Backup your system!
Conclusions
Good Luck!
I decided to upgrade to Yosemite 2 days ago and have spent some time getting my Hack to run smoothly.
As I could not find a dedicated guide to the Z77X-UD5H I thought I would post this in the hope that it helps others with issues…
I have been running 2 Hack’s over the last 2.5 years with great success using unibeast and multibeast. After trying a unibeast Yosemite install I found several issues and then decided to head down the rabbit hole into the world of clover…
This installation is for a clean install as I prefer not to upgrade from previous versions and assumes that you have access to another mac
I have used and modified sections of Tonymac’s guide here (BIG THANKS AS ALWAYS)
http://www.tonymacx86.com/yosemite-desktop-guides/144426-how-install-os-x-yosemite-using-clover.html
*** the front USB 3 will not work at first - use rear sockets ***
My Hardware list:
GA-Z77X-UD5H (Rev1.0)
i7-3770k
32GB RAM
2 x GIGABYTE GeForce GTX 670 OC's
Corsair AX 860
Corsair H80i
2 x Samsung 830 256 Gb
TP-Link 4800
Mac Pro 2009 Case
Step 1: Download OS x Yosemite
1. Open Mac App Store
2. Log in with your Apple ID
3. Download OS X Yosemite
Step 2: Prepare Bootable USB Drive
This step extracts the OS X Installer contents, then installs Clover bootloader to the USB stick.
1. Insert the USB drive
2. Open /Applications/Utilities/Disk Utility
3. Highlight the USB drive in left column
The Application Install OS X Yosemite will appear in /Applications.

4. Click on the Partition tab5. Click Current and choose 1 Partition
6. Click Options...
7. Choose GUID Partition Table
8. Under Name: type USB (You can rename it later)
9. Under Format: choose Mac OS Extended (Journaled)
10. Click Apply then Partition
11. Open /Applications/Utilities/Terminal
12. Type the following, enter password and hit enter. This command completely erases the USB, then creates native OS X installer media from the Install OS X Yosemite Application.
Code:
sudo /Applications/Install\ OS\ X\ Yosemite.app/Contents/Resources/createinstallmedia --volume /Volumes/USB --applicationpath /Applications/Install\ OS\ X\ Yosemite.app --no interaction
Upon completion, the USB will be renamed Install OS X Yosemite.

13. Download the latest version of Clover from sourceforge
14. Open Clover package installer
15. Hit Continue, Continue, Change Install Location...
16. Choose the USB, now called Install OS X Yosemite
17. Hit Customize and install Clover to the same USB with the following Custom Install settings:
(note these are slightly different to Tonymac’s guide - UEFI Boot not Lagacy)


18. Navigate to /EFI/CLOVER/ and replace default config.plist with this one config.plist
19. Navigate to /EFI/CLOVER/kexts/10.10/ and add FakeSMC.kext
11. Navigate to /EFI/CLOVER/kexts/10.10/ and add AtherosL1cEthernet.kext + AppleIntelE1000e.kext
21. Navigate to /EFI/CLOVER/kexts/10.10/ and add NullCPUPowerManagement.kext
22. Navigate to /EFI/CLOVER/drivers64UEFI/ remove VBoxHfs-64.efi and add HFSPlus.efi
23. Create a folder called Utilities on your Install OS X Yosemite USB and copy the following:
- AtherosL1cEthernet.kext (from above)
- AppleIntelE1000e.kext (from above)
- FakeSMC.kext (from Above)
- Clover_v2k_Installer (in my case r3033) (from above)
- Clover Configurator (Yosemite Edition)
- config.plist-Standard (from above)
- Multibeast 7.1.1 (for installing ALC 898 sound)
- Multibeast 6.0.1 (for fixing sound after sleep issue)
Step 3: Going back to basics
(This might not be necessary , you can try the installer with your build 'as is' - If you get issues I suggest doing the below)
When I first started building hacks back in the days of Snow Leopard this was the norm…
- Backup any important data
- Remove all drives apart from the SSD/HDD you wish to install OS X on
- Remove all graphics cards/adapter cards/wifi cards (you just want the motherboard with memory/CPU - with cooler/PSU + SSD/HDD
- Reset CMOS
- Connect only wired mouse and keyboard to the rear USB 3 ports
- Connect 1 monitor only to the integrated graphics of the motherboard (I used Display Port)
- Download F16 mod11 from TweakTown: F16 Mod11
- Prepare a formatted Fat 32 usb stick and place the Bios update on the USB
- Put USB stick in one of the USB 2 slots (the non-blue ones)
- Boot pressing Del to enter Bios
- Press F8 to enter Qflash utility
- Backup old Bios to USB stick
- Update Bios from USB stick (F16 mod11)
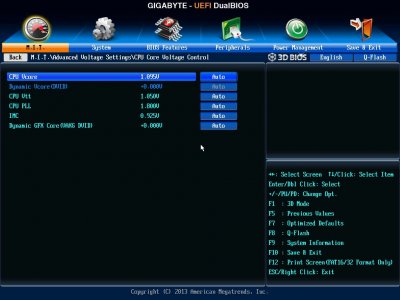
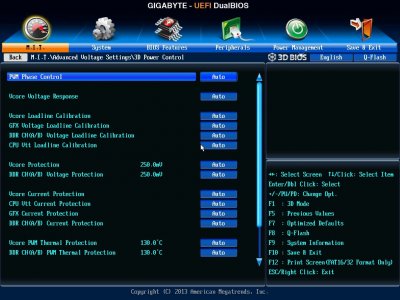
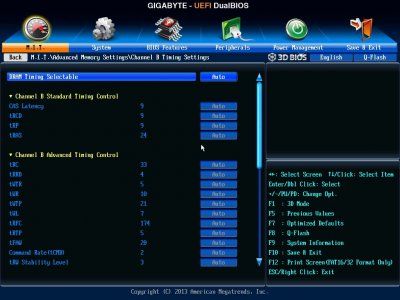
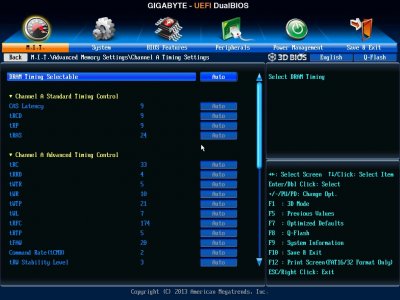
- Reboot and adjust Bios to match the following:


STEP 4: Install OS X Yosemite
Unlike UniBeast, this is a 3 part installation process. The system will reboot twice in order to finish the installation and the recovery partition.
1. Turn on the computer
2. Press the F12 to choose boot device
3. Choose UEFI USB
4. When Clover boot screen is visible, choose Boot OS X Install from OS X Install OS X Yosemite
5. The system will then boot into OS X Installer
6. For a new installation of OS X, you MUST erase and format the destination drive according to the following steps before continuing.
a. Choose Disk Utility
b. Highlight your target hard drive for the Yosemite installation in left column.
c. Click Partition tab
d. Click Current and choose 1 Partition
e. Click Options...
f. Choose GUID Partition Table
g. Under Name: type Yosemite (You can rename it later)
h. Under Format: choose Mac OS Extended (Journaled)
i. Click Apply then Partition
j. Close Disk Utility
7. When the installer asks you where to install, choose Yosemite
8. Upon completion, system will restart a 1st time
*** NB it takes along time to install and might stop on ‘1 second remaining’ it is still running be patient ***
9. Press the F12 to choose boot device
10. Choose USB
11. When Clover boot screen is visible, choose Boot OS X Install from OS X Install OS X Yosemite
The system will boot into the new drive, create the recovery partition, and complete the installation. Upon completion, system will restart a 2nd time.
12. Press F12 to choose USB device
13. When Clover boot screen is visible, choose Yosemite
14. The system will launch OS X Setup
15. Complete setup, do not be concerned it you ethernet or sound does not work
Step 5: Post Installation
1. Navigate to your Utilities folder of the Install OS X Yosemite USB you made in Step 2 part 23
2. Run Clover Installer and chose Yosemite HDD as the installation location
3. Use the following custom settings:


These settings will install the bootloader to the system drive's EFI partition automatically as part of the scripting. After completion, the system drive's EFI partition will automatically mount.
A few more changes need to be made to the default Clover installation:
6. Navigate to /Volumes/EFI/EFI/CLOVER/ and delete config.plist and replace with the standard one from your Utilities folder on the USB
7. Navigate to /Volumes/EFI/EFI/CLOVER/kexts/10.10/ and add FakeSMC.kext
from your Utilities folder on the USB
8. Navigate to /Volumes/EFI/EFI/CLOVER/kexts/10.10/ and add AtherosL1cEthernet.kext & AppleIntelE1000e.kext from your Utilities folder on the USB
9. Run Clover Configurator Yosemite edition from your Utilities folder on the USB
10. Click File then Import Configuration
11. Navigate to EFI drive under devices
12. Click on EFI folder
13. Click on Clover folder
14. Click on config.plist
15. Click on Import at the bottom of the screen
16. Match the following screens
*** NB. your model identifier will most likely be Mac Mini Server 6.2 it may also be iMac 27 13.2 - do not change this at this stage ***
*** ignore this serial number just stay with the one that is already there for the moment ***


17. Click File then Export Configuration
18. Exit Configurator
19. Remove USB
20. Restart
Step 6: Getting things to work
You should now have a system that boots from the main drive into Yosemite 10.10 and thinks it is a mac mini server… if not you need to retrace your steps back previously
*** NB. the following is specific to my hardware - your mileage my vary***
*** the front USB 3 header is not yet working - looking for a soution***
- Shutdown
- Disconnect monitor from internal graphics
- Install GPU card (1 only to start) and connect to monitor (I used Display port)
- Restart
- Boot into OS X 10.10
- Run Clover Configurator form your Install OS X Yosemite USB
- Click Mount EFI under the tools section
- Click Mourt EFI Partition in the bottom right corner
- Enter Password
- EFI partition should mount (If it finds multiple partitions then try disk0s1) you can see if it is the right one by clicking on the EFI hard drive icon on your desktop and making sure it has the EFI folder in it
- Follow parts 10 through 15 from part 5 to load your config.plist file
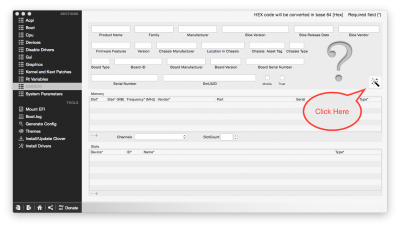
- Click on the SMBIOS tab
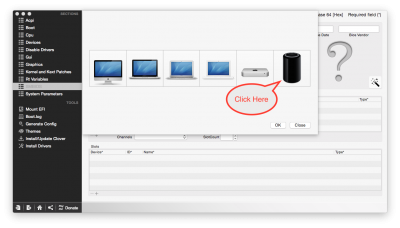
- Click on the wand next to the model image
- Click on the new mac pro Icon
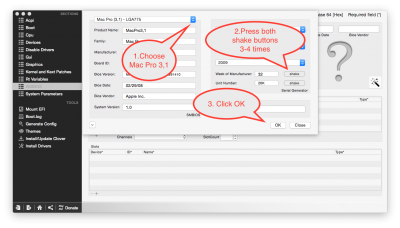
- Select Mac Pro (3,1) - LGA775 from the top
- Press the week and unit shake buttons several times (generates a random serial)
- Click OK
- Click File then Export Configuration


19. Remove USB
20. Reboot
Your Hack should now boot into Yosemite and think it is a Mac Pro (click ‘about this mac’ to check)
21. Shutdown
22. Install additional graphics cards and wifi card
23. Connect additional monitors (I have 3)
24. Reboot
25. Install 10.10.1 update http://support.apple.com/kb/DL1779
26. Reboot
27. Run Multibeast 7.1.1
28. Click on drivers tab only and select as below

29. Reboot
30. Go to System Preferences and click on sound
31. Click on ‘Play sound effects through’ Line out (Second one - Black connector)
32. Click Output tab and select second line out.


33. If your front USB 3 is not working copy GenericUSBXHCI.kext to your desktop
34. Download KextBeast from here and run
35. Reboot - Front USB 3 should now work (Credit due to Rehabman)
36. If HW monitor is only seeing hard drive temps then you need to install the latest plugins from here
to your FakeSMC.kext which is in /Volumes/EFI/EFI/CLOVER/kexts/10.10/
Step 6: Backup your system!
Conclusions
- If you only use 1 or 2 screens you can stay with the Mac Mini Server identifier 6,2 - If you want to use 3 screens or 2 GPU’s you need to use the Mac Pro 3,1 identifier
- If you get the USB device is Disabled due to power warning make sure XHCI is set to AUTO not SMART AUTO in the Bios
- To fix iMessage: http://www.tonymacx86.com/general-help/110471-how-fix-imessage.html (there are issues still)
- If you are losing your sound after sleep then use Multibeast 6.0.1 to fix the issue:

Good Luck!
