- Joined
- May 21, 2011
- Messages
- 405
- Motherboard
- Lenovo m90q Tiny
- CPU
- i7-10700
- Graphics
- UHD 630
- Mac
October 10, 2018 : Clean installed Mojave 10.14 and everything is flawless if not better.
Misc : Clover Configurator->System Parameters->InjectKexts->Yes. For some reason it doesn't work on detect. Kexts in Other are being ignored.
September 14 2019 : Mojave 10.14.6 works flawlessly. Added instruction for F12+ BIOS below.
October 22, 2019 : Catalina 10.15.0 Upgrade was flawless. At some point during the install, there was a pink glitch in verbose mode, HDD activity was gone, I have waited 10 minutes and it went good. Just be patient
Hi,
I just wanted to post my successful installations, and also the step I had to go through.
Full specs list
1x Intel - Core i7-8700 3.2GHz 6-Core Processor
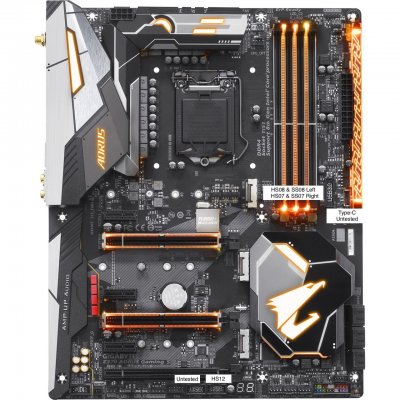
1x Gigabyte - Z370 AORUS Gaming 5 (rev. 1.0) ATX LGA1151 Motherboard
1x Kingston - FURY 8GB (1 x 8GB) DDR4-2400 Memory
2x Samsung - 960 EVO 500GB M.2-2280 Solid State Drive
1x Gigabyte - Radeon RX 580 8GB Gaming 8G Video Card
1x Gigabyte - AC300W ATX Mid Tower Case
1x Corsair - TXM Gold 650W 80+ Gold Certified Semi-Modular ATX Power Supply
1x TP-Link - Archer T9E PCI-Express x1 802.11a/b/g/n/ac Wi-Fi Adapter
What works
iMessage/Facetime (Needs proper SMBIOS)
Audio (Needs kexts)
Display Port & HDMI Audio (Needs a small patch, see below)
Graphics RX 580 (Out of the box)
Sleep & Deep Sleep (Out of the box, including FANs turned off)
Shutdown (motherboard leds turn off as well)
Wifi Adapter (out of the box)
Ethernet (Needs kext)
Bluetooth
USB 2.0 & 3.0 & 3.1 & Type-C
What does not work
Wifi from the Motherboard
Steps :
Installation
BIOS SETTINGS
Installation
Prepare USB key with UniBeast. Nothing much here. Boot & install.
Installation went flawless with APFS.
POST Installation
Ethernet : IntelMausiEthernet in MultiBeast
iMessage/Facetime: All I had to do, was edit Clover config using Clover Configurator :
SMBIOS : iMac 18.3, Generate new serial number and make sure it doesn't exists.
System Parameters : Generate new Custom UUID
Rt Variables : From SMBIOS, Generate. My MLB is blank. CsrActive = 0x67 to fully disable SIP.
Shutdown:Enable ACPI-->Fix Shutdown in Clover Configurator. Bug: Motherboard leds stay powered on after shutdown. Leave Fix Shutdown disabled in Clover Configurator and enable ErP in Bios. Shutdown will work fine and motherboard leds will turn off as well.
Wifi Fix After Sleep: Wifi becomes extremely slow after sleep. Fix: Preference System -> Power Saver -> Disable wake for network access.
Audio:
The only way I got it to work was by doing the following:
3. Run MultiBeast : Install ALC1220 & 100 / 200 / 300 Series Audio Support. After installation, reopened it and installed "200 / 300 Series / X299 Audio Device ID Patch.
4. Reboot
I don't know why, MultiBeast patches without AppleALC & Lilu didn't work, and AppleALC & Lilu without MultiBeast patches didn't work neither. Needed both.
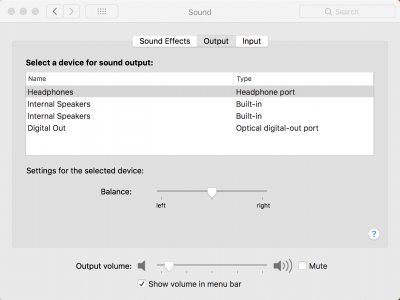
DisplayPort & HDMI Audio : Run the script here and reboot. My 4K monitor is recognized now in Sound Output. https://github.com/toleda/audio_CloverHDMI
USB 3.0
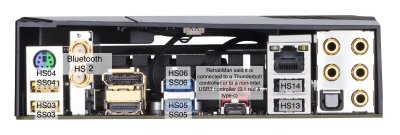
I built a SSDT to get all the USB ports working. The current SSDT I made currently enables all 15 USB ports (15 is the limit anyway) but does not include the left USB 2.0 header on motherboard & USB Type-C Header (for front case). So basically, it currently enables all the USB ports on the back of the motherboard + 2xUSB 3.0 for front PC case ports + the Bluetooth.
I have identified everything I could test, you can always adjust the SSDT for your needs.


Miscs :
")
Misc : Clover Configurator->System Parameters->InjectKexts->Yes. For some reason it doesn't work on detect. Kexts in Other are being ignored.
September 14 2019 : Mojave 10.14.6 works flawlessly. Added instruction for F12+ BIOS below.
October 22, 2019 : Catalina 10.15.0 Upgrade was flawless. At some point during the install, there was a pink glitch in verbose mode, HDD activity was gone, I have waited 10 minutes and it went good. Just be patient
Hi,
I just wanted to post my successful installations, and also the step I had to go through.
Full specs list
1x Intel - Core i7-8700 3.2GHz 6-Core Processor
1x Gigabyte - Z370 AORUS Gaming 5 (rev. 1.0) ATX LGA1151 Motherboard
1x Kingston - FURY 8GB (1 x 8GB) DDR4-2400 Memory
2x Samsung - 960 EVO 500GB M.2-2280 Solid State Drive
1x Gigabyte - Radeon RX 580 8GB Gaming 8G Video Card
1x Gigabyte - AC300W ATX Mid Tower Case
1x Corsair - TXM Gold 650W 80+ Gold Certified Semi-Modular ATX Power Supply
1x TP-Link - Archer T9E PCI-Express x1 802.11a/b/g/n/ac Wi-Fi Adapter
What works
iMessage/Facetime (Needs proper SMBIOS)
Audio (Needs kexts)
Display Port & HDMI Audio (Needs a small patch, see below)
Graphics RX 580 (Out of the box)
Sleep & Deep Sleep (Out of the box, including FANs turned off)
Shutdown (motherboard leds turn off as well)
Wifi Adapter (out of the box)
Ethernet (Needs kext)
Bluetooth
USB 2.0 & 3.0 & 3.1 & Type-C
What does not work
Wifi from the Motherboard
Steps :
Installation
BIOS SETTINGS
- Save & Exit → Load Optimized Defaults
- BIOS → Fast Boot : Disabled
- BIOS → CSM Support : Disabled (You might get a blackscreen otherwise with RX 580)
- Peripherals → Trusted Computing → Security Device Support : Disable
- Peripherals → Network Stack Configuration → Network Stack : Disabled
- Peripherals → USB Configuration → Legacy USB Support : Auto
- Peripherals → USB Configuration → XHCI Hand-off : Enabled (Extremely important)
- Chipset → Vt-d : Disabled
- Chipset → Internal Graphics : Enabled. (Reboot BIOS then next options will appear)
- Chipset → DMVT Pre-Allocated : 128M
- Chipset → DMVT Total Gfx Mem : 256M
- Chipset → Wake on LAN Enable : Disabled
- Chipset → IOAPIC 24-119 Entries : Enabled
- Power → Erp : Enabled (Fix shutdown & motherboard leds not powering off)
Installation
Prepare USB key with UniBeast. Nothing much here. Boot & install.
Installation went flawless with APFS.
POST Installation
Ethernet : IntelMausiEthernet in MultiBeast
iMessage/Facetime: All I had to do, was edit Clover config using Clover Configurator :
SMBIOS : iMac 18.3, Generate new serial number and make sure it doesn't exists.
System Parameters : Generate new Custom UUID
Rt Variables : From SMBIOS, Generate. My MLB is blank. CsrActive = 0x67 to fully disable SIP.
Shutdown:
Wifi Fix After Sleep: Wifi becomes extremely slow after sleep. Fix: Preference System -> Power Saver -> Disable wake for network access.
Audio:
The only way I got it to work was by doing the following:
- Install kexts : https://github.com/vit9696/AppleALC and https://github.com/vit9696/Lilu in /EFI/Clover/Kexts/Other
- Open Clover Configurator --> Device --> Inject 11. (Better sound quality for me than 1). Reset HDA is not selected, I don't know what it does.
- Reboot
4. Reboot
I don't know why, MultiBeast patches without AppleALC & Lilu didn't work, and AppleALC & Lilu without MultiBeast patches didn't work neither. Needed both.
DisplayPort & HDMI Audio : Run the script here and reboot. My 4K monitor is recognized now in Sound Output. https://github.com/toleda/audio_CloverHDMI
USB 3.0
I built a SSDT to get all the USB ports working. The current SSDT I made currently enables all 15 USB ports (15 is the limit anyway) but does not include the left USB 2.0 header on motherboard & USB Type-C Header (for front case). So basically, it currently enables all the USB ports on the back of the motherboard + 2xUSB 3.0 for front PC case ports + the Bluetooth.
I have identified everything I could test, you can always adjust the SSDT for your needs.
- Fixing USB using my SSDT
- Download USBInjectAll.kext & XHCI-300-series-injector.kext (see attachment)
- Copy my SSDT-UIAC.aml (see attachment) to /EFI/Clover/ACPI/patched
- Reboot
- Generating your own SSDT to enable different ports
- If you install the USB patch limit using MultiBeast, you must know that as of MultiBeast 10.2.0, it installs the 15 ports limit patch that works for 10.13.0 to 10.13.3. However, it doesn't work anymore in 10.13.4. (Update: MultiBeast 10.4.0 has the following USB port limit patch 10.13.4-6.) Follow the steps to apply the patch for 10.13.4 before following the tutorial.
- Open Clover Configurator --> Kernel and Kext Patches.
- Edit the disable port limit patch to :
- Name (IMPORTANT it changed ! Notice, there is no PCI at the end) : com.apple.driver.usb.AppleUSBXHCI
- FIND (Hex) : 837D940F 0F839704 0000
- Replace (HEX) : 837D940F 90909090 9090
- 4. Reboot
- PS: Kext patches are all listed here. It is where I found the one for 10.13.4 https://github.com/RehabMan/OS-X-USB-Inject-All/blob/master/config_patches.plist
- The tutorial is right here https://www.tonymacx86.com/threads/guide-creating-a-custom-ssdt-for-usbinjectall-kext.211311/ You will not need the patches for EHC1->EH01 or EHC2->EH02 or XHCI->XHC for this board. Once the USBInjectAll & 15 ports patch are installed you can skip to Port discovery step.
- Currently attached compiled SSDT code:
-
Code:
DefinitionBlock ("", "SSDT", 2, "hack", "UIAC", 0)
{
Device(UIAC)
{
Name(_HID, "UIA00000")

Name(RMCF, Package()
{
"8086_a2af", Package()
{
"port-count", Buffer() { 26, 0, 0, 0 },
"ports", Package()
{
"HS02", Package() // Bluetooth
{
"UsbConnector", 255,
"port", Buffer() { 2, 0, 0, 0 },
},
"HS03", Package() // Yellow USB 3.0 Left
{
"UsbConnector", 3,
"port", Buffer() { 3, 0, 0, 0 },
},
"HS04", Package() // Yellow USB 3.0 Right
{
"UsbConnector", 3,
"port", Buffer() { 4, 0, 0, 0 },
},
"HS05", Package() // Blue USB 3.0 Left
{
"UsbConnector", 3,
"port", Buffer() { 5, 0, 0, 0 },
},
"HS06", Package() // Blue USB 3.0 Right
{
"UsbConnector", 3,
"port", Buffer() { 6, 0, 0, 0 },
},
"HS07", Package() // Case USB 3.0 Right
{
"UsbConnector", 3,
"port", Buffer() { 7, 0, 0, 0 },
},
"HS08", Package() // Case USB 3.0 Left
{
"UsbConnector", 3,
"port", Buffer() { 8, 0, 0, 0 },
},
"HS13", Package() // Black USB 2.0 Left
{
"UsbConnector", 0,
"port", Buffer() { 13, 0, 0, 0 },
},
"HS14", Package() // Black USB 2.0 Right
{
"UsbConnector", 0,
"port", Buffer() { 14, 0, 0, 0 },
},
"SS03", Package() // Yellow USB 3.0 Left
{
"UsbConnector", 3,
"port", Buffer() { 19, 0, 0, 0 },
},
"SS04", Package() // Yellow USB 3.0 Right
{
"UsbConnector", 3,
"port", Buffer() { 20, 0, 0, 0 },
},
"SS05", Package() // Blue USB 3.0 Left
{
"UsbConnector", 3,
"port", Buffer() { 21, 0, 0, 0 },
},
"SS06", Package() // Blue USB 3.0 Right
{
"UsbConnector", 3,
"port", Buffer() { 22, 0, 0, 0 },
},
"SS07", Package() // Case USB 3.0 Right
{
"UsbConnector", 3,
"port", Buffer() { 23, 0, 0, 0 },
},
"SS08", Package() // Case USB 3.0 Left
{
"UsbConnector", 3,
"port", Buffer() { 24, 0, 0, 0 },
},
},
},
})
}
}
 //EOF
- If you install the USB patch limit using MultiBeast, you must know that as of MultiBeast 10.2.0, it installs the 15 ports limit patch that works for 10.13.0 to 10.13.3. However, it doesn't work anymore in 10.13.4. (Update: MultiBeast 10.4.0 has the following USB port limit patch 10.13.4-6.) Follow the steps to apply the patch for 10.13.4 before following the tutorial.
As of 10.14.4, previous method results in a Kernel Panic / Blackscreen and reboots.
10.14.4+ :
- Make sure WhateverGreen & Lilu is installed.
- In Clover Configurator, make sure Graphics->InjectIntel is enabled, Graphics->ig-platform-id and Devices->IntelGFX is empty.
- Reboot.
- If a 4k sample video such as this one plays smoothly and CPU usage stays low, it is working. https://4kmedia.org/sony-bravia-uhd-hdr-4k-demo/
- BIOS: Chipset : Internal Graphics: Enabled. DVMT Pre-Allocated : 128M
- Clover Configurator: Graphics -> Enable Inject Intel and set ig-platform-id: 0x59120003 (use 0x59120000 if you don't have NVidia/AMD GPU)
- Clover Configurator: Devices -> IntelGFX: 0x59128086
- Clover Configurator: Enable Boot -> -disablegfxfirmare
Miscs :
- I hid the volumes "Preboot" and "Recovery" in Clover, because I find it annoying to have these volumes showing.
- I used the standalone Clover UEFI with NVRAM installer and I had to add apfs.efi in drivers64UEFI folder of EFI/Clover to get my drives recognized. Don't forget FakeSMC.kext !
Attachments
Last edited by a moderator: