Contribute
Register

[SOLVED] Missing SDD/HDD Disks on Fresh High Sierra Installs

Status
Not open for further replies.
All,

I had a few posts on here and through searching I am seeing several other people sharing the issue. The proposed fixes were complex, conflicting and not working. I came across this page here from Crucial regarding Initializing disks in High Sierra. The fix is amazingly stupid LOL
Reference: http://forums.crucial.com/t5/Crucial-SSDs/Initialize-an-SSD-in-OS-X-El-Capitan-and-later/ta-p/171942

Summary,
  1. Boot into Clover and begin the MacOS High Sierra Install
  2. Enter Disk Utility (and note missing drives)
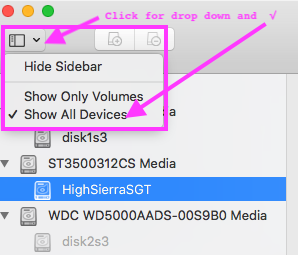
  3. Under View, select "Show All Devices" - nothing will change
  4. Exist Disk Utility
  5. Re-enter Disk Utility - the new setting will load and all devices will now be shown
  6. Select the missing disk and click Erase, set your name, format and scheme as normal
From there, create partitions and proceed as normal.

Chris
Hey, there is no such option to show or hide devices..
 
Hey, there is no such option to show or hide devices..
Click Disk Utility >View>drop-down option and then [√] Show All Devices [See image for visual aid]

Edit to add one more thing as a reminder:
Please click and edit Personal Details to add your System hardware in the appropriate boxes for Motherboard|CPU|Graphics
 

Attachments

  • 1.Disk Utility_ View>√ShowAllDevices.png
    1.Disk Utility_ View>√ShowAllDevices.png
    39.2 KB · Views: 151
Found something, very simple but I think this could help some other users ^^' Tried the solution given in this thread however it didn't change anything. But then I remembered something... My BIOS has its "Sata Mode" configured in RAID rather than in AHCI, which is why MacOS wasn't seeing any other drive than my USB stick and its own disk image. Setting Sata mode in AHCI for one boot allowed MacOS installer to access the drives, and once MacOS in installed you can set up your RAID again (but haven't done this yet, I will update my post once I manage to get both RAID and MacOS simultaneously :) )
 
Unfortunately, one thing fixed, lead to another set of issues.

Having spent two (2) entire days looking through other threads for solutions (but to no avail) - the drive seems to always gets stuck at "creating partition map". Eventually if waited it out for 15 or so minutes = got an error "Unable to write last block of the device".

393840


Tried formatting either HFS+ or APFS didn't work both stuck at creating partition map before spewing out the last block error.

The weird thing is - putting the drive in an 3.5" EXTERNAL enclosure had no problems formatting/reformatting to anything within disk utility. I can even proceed / continue with the high sierra install, but then again 10/10 chances came back with a "Macos cannot be installed on your computer" by the 2nd reboot.

All the above problems persists not just one but two (2) drives I have as spares. I am using Unibeast method, but I have also tried to manually adding in other drivers via clover configurator - HFSplus, NTFS-64, VboxHFS-64, PartitionDXE-64, EmuVariableUEFI....anything I could suspect it would help.. but so far not a chance. I have also tried "preparing" the drive in Windows 10's disk management, ensuring it's GPT not MBR.

Can someone help?
 
Just an update for anyone in the future needing help, the situation is resolved by me having to:
  1. For H77M motherboard users you must use ICH patch by Vit9696. To do this, open your EFI’s config.plistclover configurator and make a new entry (+) or name enter “AppleAHCIPort”. Under “Find” enter “40600200”. Under “Replace” enter “00000000” (eight zero’s).
  2. reformat USB installer (for each fresh Unibeast attempt) and the target drive (once you've reached Disk Utility) at at the DEVICE level, NOT JUST Volume level.
  3. DISCONNECT ALL PHYSICAL cablings from all windows drives.
  4. NVIDIA cards owners - Do not use "Inject NVIDIA". Apparently this is for old cards < GTX750 era. Remove the nvda_disable 1 boot tag. Install the Nvidiagraphicsfixup and Lilu kexts by going to clover configurator -> mount the USB installer EFI partition, and open the config.plist. Go down to the Kexts Installer (bottom left), drag and drop the .kext files into the window. The "OS Version" drop down selector (top right) determines where the files go. Choose "10.13" and "Other" to ensure the kext files go to these two folders.
 

Brebo,

Thank you for this. My apologies for a stupid question - I've downloaded the zip file and could not find the kext anywhere. There are Manual, Prebuilt, ResourceConverter, etc among other folders.

Searched through them all and no kext is found.

Why is it that they do not include what is most needed (the kext files)? Is it because there are supposed to be other steps involved?
 
In case if anyone is wondering yes I have read the Readme.md. There was no indication on how to actually *get* the kext file.

Read [FAQs](https://github.com/acidanthera/WhateverGreen/blob/master/Manual/) and avoid asking any questions. No support is provided for the time being.

Quite frankly I am finding the above instruction condescending and unhelpful. I went to the URL, and had to guesstimate what I'm looking for (presumably this file called "FAQ.GeForce.en.md". Helpful series of FAQs, yet ironically, still no kext download anywhere given)

Is it really that difficult to just publish the kext file? Give to the public what they only need. Most likely they would have no idea what to do with all these surrounding folders.
 
In case if anyone is wondering yes I have read the Readme.md. There was no indication on how to actually *get* the kext file.


Quite frankly I am finding the above instruction condescending and unhelpful. I went to the URL, and had to guesstimate what I'm looking for (presumably this file called "FAQ.GeForce.en.md". Helpful series of FAQs, yet ironically, still no kext download anywhere given)

Is it really that difficult to just publish the kext file? Give to the public what they only need. Most likely they would have no idea what to do with all these surrounding folders.
Prebuilt kexts are available in the Downloads link at the top of this page.
 
Prebuilt kexts are available in the Downloads link at the top of this page.

P1lGRIM,

Thank you for the reply. Much appreciated, the download button indeed took me to what I just need - the kext file itself.

I've replaced NVIDIA graphicsfixup kext (deleted, that is) with Whatevergreen Kext in both my UEFI boot disk (Kexts folder) as well as the target installation Library/Extensions folder. I was hoping this would improve the somewhat disappointing performance of the 1060 on Cinebench (only 57FPS with Intel i5 3570k, where as my mid2012 MacBook pro with 650M gives 49 FPS). But no did not improve at all.

Thank you for the help, and apologies if I seem hijacking OP's original thread.
 
Status
Not open for further replies.
Back
Top