
- Joined
- Dec 13, 2013
- Messages
- 117
- Motherboard
- Gigabyte Z390 Designare
- CPU
- i9-9900K
- Graphics
- RX 6900 XT
- Mac
- Mobile Phone
[SUCCESS] Haswell Thunderbolt Frankintosh: GA-Z87X-UD5 TH - i7-4770K - GTX770
Gigabyte GA-Z87X-UD5 TH
http://www.amazon.com/dp/B00GEUX9SU
Intel Core i7-4770K Haswell Quad-Core 3.5 GHZ
http://www.amazon.com/dp/B00CO8TBQ0
Corsair Hydro Extreme Performance Liquid CPU Cooler H100i
http://www.amazon.com/gp/product/B009ZN2NH6
G.Skill Trident X Series 16GB DDR3 2400MHz
http://www.amazon.com/gp/product/B0080FFZ8E
ASUS GTX770-DC2OC-2GD5 GeForce GTX770 2GB
http://www.amazon.com/dp/B00D3F7CFK
PRIMARY DRIVE: Samsung Electronics 840 Pro Series 2.5-Inch 256 GB
http://www.amazon.com/dp/product/B009NB8WRU
SECONDARY DRIVES: (2) Western Digital Black 2 TB Hard Drive
http://www.amazon.com/dp/B00FJRS628
Optiarc SATA DVD RW Burner
http://www.amazon.com/dp/product/B0086ZU8XK
OGEAR Bluetooth 4.0 USB Micro Adapter
http://www.amazon.com/gp/product/B007GFX0PY
Corsair HX Professional Series 850-Watt
http://www.amazon.com/dp/B0029F21LA
Already Owned
Seagate Backup Plus 3TB Thunderbolt Desktop Hard Drive for Mac
http://www.amazon.com/dp/B009HPGBNY
Corsair Obsidian Series 800D Full Tower Case
http://www.corsair.com/en-us/obsidian-series-800d
30" Dell UltraSharp U3014
http://accessories.us.dell.com/sna/productdetail.aspx?c=us&l=en&s=dhs&cs=19&sku=225-4429
24” Dell UltraSharp U2412M
http://accessories.us.dell.com/sna/productdetail.aspx?c=us&l=en&s=dhs&cs=19&sku=320-2676
Apple Bluetooth Wireless Keyboard
http://www.amazon.com/dp/product/B005DLDO4U
Apple Magic Mouse
http://www.amazon.com/dp/product/B002TLTGM6
TP-Link PCI Express Wifi Adapter
http://www.amazon.com/dp/B007GMPZ0A
Logitech HD Pro Webcam C920
http://www.amazon.com/dp/B006JH8T3S
Comments
Although this was my first hackintosh, I have been building computers for over 18 years. While I would have liked to buy the new Mac Pro (AKA trashcan), it’s hard to justify the $4K price tag. This rig will be used as my main desktop for running development virtual machines, some photo/video editing, and general everyday tasks.
Installation
Assembling the hardware was straightforward, but here is how I did it.
Once everything was assembled, I updated the BIOS to F3 from USB and loaded the default settings. I then booted from a Linux Mint 16 Live to verify all the hardware and to run Prime95 24 hours to burn in the processor and memory. I haven't noticed many of the posts mention a burn-in, but I still feel it is an essential part of the build process.
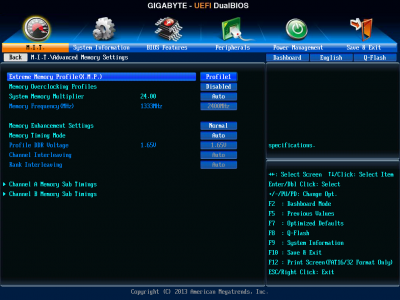
UEFI Settings
After reboot enter the BIOS again (Delete key) and select the following options:


OS X (Mavericks) Install
Boot from your UniBeast USB, use the Disk Utility to partition your boot volume and continue with the Mavericks install. Once Mavericks boots, immediately update to 10.9.2 (both wired and wireless NICs will be working), and reboot.
MultiBeast 6.2.1 Settings
Post installation is easy, as this board doesn't require a DSDT. Use the following settings, with the Mac Pro 6,1 being optional, and reboot following a successful installation.

Once you have rebooted, be sure to open Disk Utility and run a Repair Permissions on your OS X volume.
Getting iMessage to Work
Download FileNVRAM 1.1.2 from here, unzip the file, and place FileNVRAM.dylib into the /Extra/Modules folder located at the root of your OS X volume. I then used Chameleon Wizard 4.3.2 to make sure the module was being loaded. (I'm sure there is a way to do this with MultiBeast, but I went the easy route after reading a ton of other posts.)

Getting Thunderbolt to Work in Mavericks
IMPORTANT NOTE: As mentioned in other posts, Thunderbolt devices are not hot-plugable! They must be connected before you boot into OS X and if you disconnect them while OS X is running the OS will likely freeze.
Benchmarks


Some other system images:


Wrap Up
What Works:
Almost everything including my Seagate drive connected to the Thunderbolt port.
What Doesn't Work:
Facetime and Thunderbolt hot-plug.
This was a really fun project. Truth be told, it took me about 3 days to completely build, burn-in, install, test, reinstall, retest, and then do my final install of OS X. I plan to move the OS to a pair of Samsung EVO 840 SSD's in a RAID 1 set in the near future. I'll be sure to post some updated benchmarks once I do.
UPDATE: 9 March 2014
I decided not to wait and pulled two 250GB EVO SSD's from another computer. I installed them into the rig and created a RAID 0 (Striped) then used CarbonCopyCloner to move Mavericks over to the new "drive". Holy cow this thing is fast!!

I'm ordering another 16GB of RAM to see just how good I can get the benchmarks without overclocking. I'm really impressed at this point.
jjsenecal's Haswell Frankintosh:
GA-Z87X-UD5 TH - i7-4770K - GTX770

ComponentsGA-Z87X-UD5 TH - i7-4770K - GTX770
Gigabyte GA-Z87X-UD5 TH
http://www.amazon.com/dp/B00GEUX9SU
Intel Core i7-4770K Haswell Quad-Core 3.5 GHZ
http://www.amazon.com/dp/B00CO8TBQ0
Corsair Hydro Extreme Performance Liquid CPU Cooler H100i
http://www.amazon.com/gp/product/B009ZN2NH6
G.Skill Trident X Series 16GB DDR3 2400MHz
http://www.amazon.com/gp/product/B0080FFZ8E
ASUS GTX770-DC2OC-2GD5 GeForce GTX770 2GB
http://www.amazon.com/dp/B00D3F7CFK
PRIMARY DRIVE: Samsung Electronics 840 Pro Series 2.5-Inch 256 GB
http://www.amazon.com/dp/product/B009NB8WRU
SECONDARY DRIVES: (2) Western Digital Black 2 TB Hard Drive
http://www.amazon.com/dp/B00FJRS628
Optiarc SATA DVD RW Burner
http://www.amazon.com/dp/product/B0086ZU8XK
OGEAR Bluetooth 4.0 USB Micro Adapter
http://www.amazon.com/gp/product/B007GFX0PY
Corsair HX Professional Series 850-Watt
http://www.amazon.com/dp/B0029F21LA
Already Owned
Seagate Backup Plus 3TB Thunderbolt Desktop Hard Drive for Mac
http://www.amazon.com/dp/B009HPGBNY
Corsair Obsidian Series 800D Full Tower Case
http://www.corsair.com/en-us/obsidian-series-800d
30" Dell UltraSharp U3014
http://accessories.us.dell.com/sna/productdetail.aspx?c=us&l=en&s=dhs&cs=19&sku=225-4429
24” Dell UltraSharp U2412M
http://accessories.us.dell.com/sna/productdetail.aspx?c=us&l=en&s=dhs&cs=19&sku=320-2676
Apple Bluetooth Wireless Keyboard
http://www.amazon.com/dp/product/B005DLDO4U
Apple Magic Mouse
http://www.amazon.com/dp/product/B002TLTGM6
TP-Link PCI Express Wifi Adapter
http://www.amazon.com/dp/B007GMPZ0A
Logitech HD Pro Webcam C920
http://www.amazon.com/dp/B006JH8T3S
Comments
Although this was my first hackintosh, I have been building computers for over 18 years. While I would have liked to buy the new Mac Pro (AKA trashcan), it’s hard to justify the $4K price tag. This rig will be used as my main desktop for running development virtual machines, some photo/video editing, and general everyday tasks.
Installation
Assembling the hardware was straightforward, but here is how I did it.
- PSU into chassis
- Motherboard into the chassis
- Removed built-in Wi-Fi/Bluetooth from motherboard
- CPU into the motherboard
- Memory into motherboard
- CPU water cooler into chassis
- CPU water cooler onto processor
- Video card into motherboard
- Wi-Fi into motherboard
- SSD & hard drives into chassis
- Cable and wire components
Once everything was assembled, I updated the BIOS to F3 from USB and loaded the default settings. I then booted from a Linux Mint 16 Live to verify all the hardware and to run Prime95 24 hours to burn in the processor and memory. I haven't noticed many of the posts mention a burn-in, but I still feel it is an essential part of the build process.
UEFI Settings
- To access UEFI Setup, press and hold Delete on a USB Keyboard while the system is booting up
- Hit F2 to get to the classic menu.
- Set to Optimized Defaults.
- Set X.M.P. Memory Profile to Profile1
- Save & Exit
After reboot enter the BIOS again (Delete key) and select the following options:
OS X (Mavericks) Install
Boot from your UniBeast USB, use the Disk Utility to partition your boot volume and continue with the Mavericks install. Once Mavericks boots, immediately update to 10.9.2 (both wired and wireless NICs will be working), and reboot.
MultiBeast 6.2.1 Settings
Post installation is easy, as this board doesn't require a DSDT. Use the following settings, with the Mac Pro 6,1 being optional, and reboot following a successful installation.
Once you have rebooted, be sure to open Disk Utility and run a Repair Permissions on your OS X volume.
Getting iMessage to Work
Download FileNVRAM 1.1.2 from here, unzip the file, and place FileNVRAM.dylib into the /Extra/Modules folder located at the root of your OS X volume. I then used Chameleon Wizard 4.3.2 to make sure the module was being loaded. (I'm sure there is a way to do this with MultiBeast, but I went the easy route after reading a ton of other posts.)
Getting Thunderbolt to Work in Mavericks
- Disconnect all of your OS X hard drives
- Install a hard drive for Windows 7 (Win7 is an easier install as Win8 requires you to change you UEFI settings)
- Install Win7, the Gigabyte drivers, and then ALL the Windows Updates
- With Windows running, plug in you Thunderbolt device and then WAIT PATIENTLY!! Windows will take some time to download and install all the required drivers.
- Verify your device is working in Windows, and shut 'er down.
- Reconnect your OS x hard drives, and boot up with your Thunderbolt device still connected.
- OS X will take significantly longer to boot, but it will eventually get there.
- Now your Thunderbolt device(s) should be working in Mavericks
IMPORTANT NOTE: As mentioned in other posts, Thunderbolt devices are not hot-plugable! They must be connected before you boot into OS X and if you disconnect them while OS X is running the OS will likely freeze.
Benchmarks
Some other system images:
Wrap Up
What Works:
Almost everything including my Seagate drive connected to the Thunderbolt port.
What Doesn't Work:
Facetime and Thunderbolt hot-plug.
This was a really fun project. Truth be told, it took me about 3 days to completely build, burn-in, install, test, reinstall, retest, and then do my final install of OS X. I plan to move the OS to a pair of Samsung EVO 840 SSD's in a RAID 1 set in the near future. I'll be sure to post some updated benchmarks once I do.
UPDATE: 9 March 2014
I decided not to wait and pulled two 250GB EVO SSD's from another computer. I installed them into the rig and created a RAID 0 (Striped) then used CarbonCopyCloner to move Mavericks over to the new "drive". Holy cow this thing is fast!!
I'm ordering another 16GB of RAM to see just how good I can get the benchmarks without overclocking. I'm really impressed at this point.
 Thanks