Contribute
Register

High Five | superpantoufle's PowerHack G5 (work in progress)

Status
Not open for further replies.
Joined
Nov 8, 2013
Messages
72
Motherboard
Gigabyte Z690M Aorus Elite AX DDR4
CPU
i7-12700K
Graphics
RX 6600 XT
Mac
  1. MacBook Air
Classic Mac
  1. 128K
  2. Color Classic
  3. Portable
  4. Power Mac
  5. PowerBook
  6. SE/30
Mobile Phone
  1. iOS
I've been lurking through this particular forum for years. I received a dead PowerMac G5 a long time ago, and immediately knew that some day it would become my first Hackintosh. And that day has finally come, thanks to the awesome builds I saw around here.
My PowerMac G5 was a 2004 dual 2.0 GHz. It wasn't in particularly good shape, but it was almost complete. It missed an optical drive, a hard drive and RAM, and some internal cables had been cut. But I got it for free!

The goal
I once had a dual 1.8 GHz G5 for a while at work, and it was a delight to use. I have fond memories of that machine. So my goal with this build is to simply "upgrade" the G5 to a usable state in 2018, and not to excessively mod its case. No paint job, minimal cutting, keeping the layout as original as possible and recycling a maximum of parts from the G5.
The case has its share of scratches, and it's ok because even as a Hackintosh, it'll still be a 14 year old PowerMac G5!

The two builds that inspired me the most are @ThinkClever PowerHack i5 and Jafingi's simple PowerMac G5 to mATX mod. Thanks, guys!

The parts
It'll mostly be a CustoMac mATX. I chose the parts thanks to the Buyer's Guide, and some online reading a few nights of searching te internet…
  • CPU: i7-8700K | It’s certainly a bit overkill for my needs, but I’d like to future-proof the build to some degree.
  • GPU: EVGA GeForce GTX 1070 SC | I’m not a gamer anymore, but I hope to get back at X-Plane.
  • PSU: Silverstone SX600-G Modular | SFX form factor for the original G5 PSU enclosure
  • Motherboard: Gigabyte Z370M D3H
  • RAM: 2x8 GB Corsair Vengeance LPX DDR4
  • Storage: Samsung EVO 500 GB (macOS) & 250 GB (Windows); WD Green 3 TB HDD I have lying around for « cold files »
  • Wi-Fi / Bluetooth: TP-Link Archer T9E PCIe for Wi-Fi & Asus BT400 USB dongle for Bluetooth | Is it just me, or the Buyer’s Guide is misleading in stating the TP-Link Archer supports Bluetooth?
  • CPU Cooler: Be quiet! Dark Rock Advanced C1
  • Fans: Be quiet! Silent Wings 80mm, 92mm & 120mm
  • The LaserHive G5 mATX 120 Kit & Grill because they look good!
  • BackCH Front panel to ATX Adapter cable because the front of the G5 is beautiful!
  • CD/DVD/BD optical drive because the G5 has an optical bay that I can’t let empty…
IMG_0902.jpg


Well… Everything was supposed to just fit!
 
The build
Here are a few pictures of the build process.

fullsizeoutput_5a.jpeg
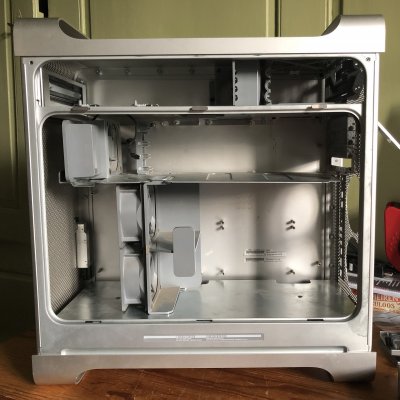
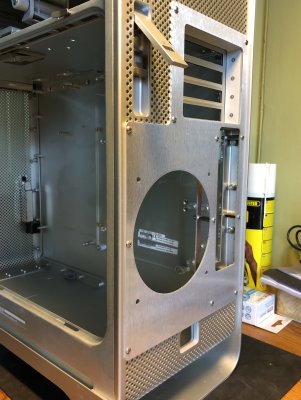
This is what I intend to keep from the G5.

IMG_0872.JPG
And this had to go…

FkK1Fkt6RLujtDcRiuZEhA.jpg
I did all the cutting with a jigsaw. I started with a Dremel, but quickly realised it would have taken a long, long time to complete…

fullsizeoutput_1b.jpeg
The LaserHive mATX 120 Kit is in place, and looks good!

fullsizeoutput_3.jpeg
The mobo / Ram / SSDs / cooler / 120mm exhaust fan are in place, and it boots to the UEFI! (Note to self: turn off those leds ASAP!)

IMG_0920.jpg
IMG_0921.jpg
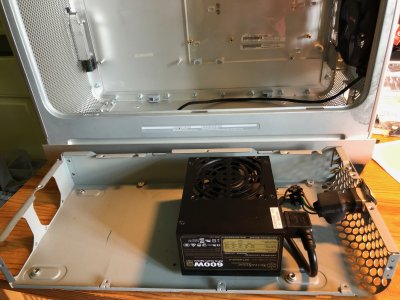
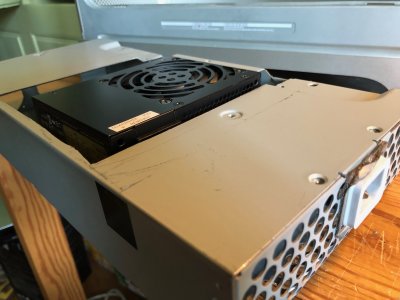
The PSU is velcroed to the bottom of the original PSU enclosure and rewired to the original power plug. I cut a square in the original PSU enclosure top and in the bottom shelf with enough room for the power cables. I debated wether I should keep all the original PSU enclosure or only the rear part, or even only the rewired plug connector. In the end I kept the whole enclosure, thinking it would give me more rigidity and stability for the bottom shelf, ans allowing me to hide some cables inside it.
 
And this is where I'm at right now. Hardware-wise, it's mostly finished. I didn't think to take pictures while I was expermimenting with ways to hide that big mess of cables… I screwed an aluminium plate in 3 of the original standoffs that allowed me to hide the BlackCH front panel cable and the power cables from the PSU (thanks @ThinkClever for the idea!). I cut too much and scratched it while cutting, so I may well give it another try some time…

IMG_0959.jpg

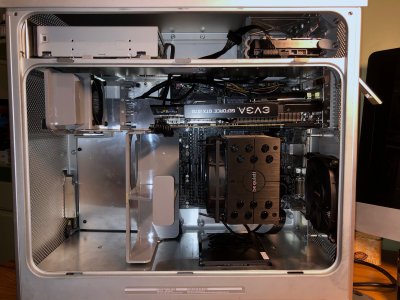
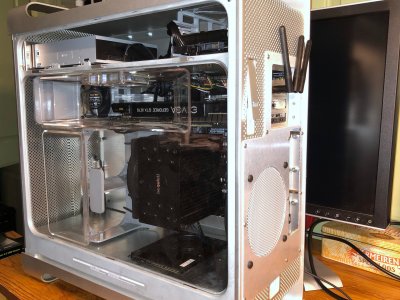
I was afraid the transparent air deflector wouldn't fit because of the GPU power cable, as I saw in other threads that it was an issue. In fact it did fit with the middle shelf removed, by slightly pushing down on the GPU. It didn't fit at all with the middle shelf in place. Then I cut the middle shelf in two, keeping only the front part that holds both fan assemblies.

I mounted a 80mm fan to the original speaker+fan assembly, that pushes fresh air to the GPU. I bought a 92mm fan that I intended to put in the lower fan assembly. I didn't mount it yet because I'm not sure it's needed. What do you guys think? Aren't the 120mm fan of the CPU cooler and the 80mm upper fan enough?

IMG_0960.jpg
With the transparent air deflector in place. It's mostly finished!

What's left to do
  • The SATA power cable that came with my PSU is too short. The first section is 30cm long, so the first connector is approximately at the height of the GPU, behind the aluminium plate. As of yet I can either plug in the optical drive or the HDD, but I don't have enough length to plug both at the same time. I may also need a 2.5" drive bay beneath the original drive bay for future expansion, so I definitely need more power connectors up there.
  • Better cable management. It's not that bad, but I'll eventually have to think a bit about how to do better.
  • Putting back the two G5 alu plates that were on the original coolers. I'm not sure there's enough room between the cooler and the air deflector, but I'll have to find a solution!
  • Fix a couple of software issues, with your help in other threads!
That's it for now. Thanks a lot for this great community and the invaluable ressources I found around here!
 
Putting back the two G5 alu plates that were on the original coolers. I'm not sure there's enough room between the cooler and the air deflector, but I'll have to find a solution!

Hi! Thanks for your shoutouts! I have an update for you on the air deflector problem. I noticed the same thing as you did, which is that the deflector does fir, when pushing the GPU slightly down. There is a fix for this however. I haven't tried yet, but there are 90 degree cable adapters that would most likely work perfectly with the cable to the GPU. Since it's the wires and not the plug that's in the way. I will most likely buy one of those cables and test it out. They seem to be handmade most of the time, but if you find one, it will most definitely work! :D
 
Last edited:
There is a fix for this however.
Well... I fixed it by cutting the middle shelf in two and keeping only the left part that support the fan assemblies. The other part didn’t serve any obvious purpose apart from blocking the airflow of the GPU.
 
Last edited:
Quick update: while searching for my parts this summer I went for a GTX 1070 GPU. Now I'm selling it and I just bought a relatively cheap RX 580 so I could upgrade to Mojave without waiting for Nvidia to eventually upgrade their drivers. I could have lived with the onboard graphics for a while, but I have a couple of projects waiting in Final Cut Pro…
 
Status
Not open for further replies.
Back
Top