Success report 
Hardware:
- Samsung 960 Pro 1TB
(MZ-V6P1T0BW)
- old HDD Raptor 73GB Sata 1 !!!
- Ballistix Sport LT 64GB Kit (16Gox4) DDR4 2400 MT/s (PC4-19200) Memory
- i7 6700K Skylake
- Motherboard GA-Z170X-UD5 TH
Software:
- Motherboard Bios F5 then F20 (aferter issues with multiple boot entry with NMVe)
- Tonymac user guide for 10.12.1 install
- Download software you can found
here the Guide to understand & build
- Ioregistry (at the end of the post)
- Xcode
- MaciASL
- And of course Rehabman's patchnvme (thank's to him

)
+ EFI mounter V3
+ Kext Utility
+ Onyx (used to launch
Directory Utility (for enable root acces in terminal)Dont start on my buid ...
My tool Box
 Install process i used:
- Setup the original Bios F5 rev. First boot drive is HDD (not NVMe) + install like describe Tonymac and i show in
this video
- On this fresh install i folowed
this
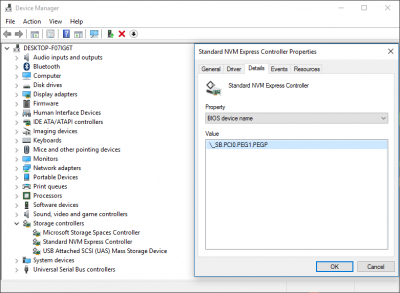
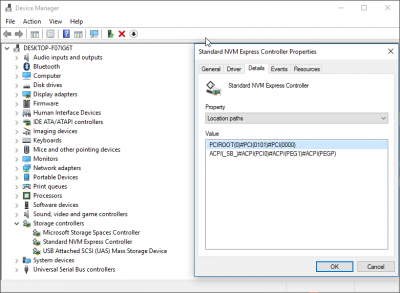
- to go faster use Ioregistry explorer to verify you Samsung NVMe is _SB.PCI0.RP09.PXSX (normaly it should be)

- Make My
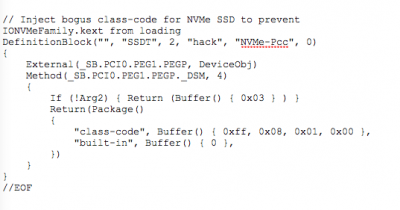
SSDT-NVMe-Pcc.aml (if you have the same motherboard & NVMe and use the same process you can use this file)
In most case to write your text file read the
RehabMan post about why it's better to add "
built-in", Buffer() { 0 },
not mentioned in
the Guide to understand & build i started to work with
AND
because text edit is not a true text editor
the right way is open the page of your browser to the page with text code
Copy the text from first / to last O
and past directy to your new emtpy file
Modify BY TYPING WITH YOU KEYBOARD the right value
and compile it
then save as
Name: SSDT-NVMe-Pcc.aml
Location: Desktop
Format: ACPI Machine Language Binary
To see all files (Show Hidden Files on macOS Sierra, OS X El Capitan & Yosemite)
Launch Terminal
Code:
defaults write com.apple.finder AppleShowAllFiles YES;killall Finder /System/Library/CoreServices/Finder.app
then
copy it to ==> my toolbox
+ (used UEFI mounter V3) in
HDD/EFI/Clover/ACPI/Patched
+ (used UEFI mounter V3) in
USBinstaller/EFI/Clover/ACPI/Patched
- Make My HackrNVMeFamily-10_12_1.kext
then
copy it to
==> my toolbox
+ (used UEFI mounter V3) in
USBinstaller/EFI/Clover/Kexts/Other
+ (used Kext Utility) for install into
HDD/System/Library/Extensions
(i like this tools for fast install Kext and rebuild cache & permission)
- Reboot on HDD & use disk utility to see your NVMe

- Reboot and disable in Bios the HDD success installed 10.12.1

Enable NVMe primaty Bootable UEFI
At this point i had a problem with the bios rev. F5 how show me mant NVMe duplicated after may install test of course

The clue worked fine for me is upgrading with the Last Bios Rev. F20 from this Motherbord
(this rev. could'nt be downgradable

) ==> but everything is fine now !!!

- Continue... Boot on USBinstaller (it's slow to boot but arrrive to Install / use Disk Utility / Format HFS + GUID part = Install)
- After the first part install (before configuring your new hack) like 10.12.1 need reboot with the USBinstaller IN
(because you don't have installed clover with multibeast at this point)
- Finish to Install 10.12.1 process part 2
DO NOT REBOOT
- Launch Multibeast (thank's TonyMac) and configure all like you see in the
vidéo (thank's
Cmfusco11)
DO NOT REBOOT
- Install HackrNVMeFamily-10_12_1.kext (used Kext Utility) for install into
NVMe/System/Library/Extensions (&/or L/E)
- Copy (used UEFI mounter V3 select the right EFI boot disk) in
NVMe/EFI/Clover/ACPI/Patched
- REBOOT

(without the USBinstaller) and Enjoy
Bench:
Because
Disk Speed Test give me 2000 Mb in read and Write

i used

AJA Benchmarck
(google it)