Important note:
Read here for major recent updates to the files used by this guide:
https://www.tonymacx86.com/threads/...tops-with-clover.148093/page-325#post-1501951
Overview
One of the first challenges you'll face in installing OS X to your laptop will involve getting the OS X installer to boot from USB. This guide is for those wishing to use Clover. Both installing using Clover UEFI and Clover legacy are described. If you have a computer capable of booting UEFI, use the UEFI instructions. If your computer does not have UEFI there are not as many advantages to using Clover, although there are still enough to warrant trying it.
Using Clover has several advantages over older legacy bootloaders:
- faster UEFI boot (in the case of UEFI)
- simpler bootloader configuration in normal files away from "boot records"
- no boot0 problems with 4k/AF HDDs
- no issues with BIOS implementations that refuse to boot legacy to GPT drives
- no wierd issues with bootloader lockups when large drives are connected
- central location for bootloader configuration files (less confusion with multiple partitions)
- automatic patching for common kernel problems (XCPM, "Local APIC")
- automatic patching for common kext problems (AppleIntelCPUPowerManagement)
- ability to provide custom patches for any kext
- ability to update to major versions by running the app from the App Store
- ability to setup the system such that little or no post-upgrade tasks need to be done
- updates are easier (and more like a real Mac) because of all of the above
- support for creating the Recovery partition during installation
- support for booting the Recovery partition
- pure GPT, so no hassles associated with hybrid GPT/MBR schemes used in dual-boot scenarios
- ability to boot UEFI installs of Windows (very common on new computers)
- even Windows can be installed UEFI on computers without UEFI capability (boot Windows installer via Clover)
- active development
That said, Clover is new and almost always in a state of change. It is also complex and more difficult to setup when you are not familiar with all the components and the abundance of options that can be used to configure the bootloader.
The purpose of this guide is to show how to install Clover and the OS X installer to a USB which can be used to install OS X. In addition, the same instructions apply to installing to your HDD after installation. In addition, Clover configurations are provided for common laptop hardware with Intel graphics capability.
Note: If you have config.plist files that are good for other graphics configurations, feel free to contribute.
Note: DO NOT use a VM to create your USB. VMs are known to create invalid/corrupt USB installers. Use real hardware to create your USB installer.
Know your hardware
There is almost no chance of success if you don't know the main components inside your laptop. And when asking for help, the critical components should be listed in your profile.
This guide is primarily focused on Intel or Intel+Nvidia or Intel+AMD. Personally, I don't have any Radeon or Nvidia hardware, so I don't know much about booting the installer on those systems.
Make sure your profile/signature reflects your hardware details.
Please provide complete details
in your profile. If your profile is already used, use the
signature. DO NOT use the signature if your profile is currently unused. That is, use the signature only if you have multiple systems.
To edit your profile:
https://www.tonymacx86.com/account/personal-details
The profile has 3 fields which are visible with each post you make. The three fields should be filled out as follows:
Mobo: manufacturer/model + bootloader(Clover/Chameleon/Chimera)
CPU: detailed CPU model + motherboard chipset
Graphics: all graphics devices + laptop internal screen resolution
For example, typical Ivy laptop:
Mobo: HP ProBook 4540s (Clover)
CPU: i5-3320m/HM76
Graphics: HD4000, 1366x768
As mentioned above, if you have multiple systems, use the signature to place details for the second system. It is best to have your profile represent the primary system you are working with.
To edit your signature:
https://www.tonymacx86.com/account/signature
Please keep your signature details for each system within a single line.
For example, same system as was mentioned for the profile, but represented in the signature:
HP ProBook 4540s (Clover), i5-3320m/HM76, HD4000 1366x768
Note: When specifying your bootloader, if using Clover legacy, please be sure to specify "Clover legacy"). Specifying "Clover" will be assumed as "Clover UEFI"
Obviously, you can use programs other than CPU-Z, but it does work for four of the five details above. And your screen resolution is easily discovered from graphics properties on Windows. Please do everyone a favor and update your profile prior to asking a question.
Installing Clover to USB
It is best to use a simple USB2 drive for this purpose. If a USB2 stick doesn't work, try USB3. The ports which will be working without patching (post install process) is hardware dependent.
Note: Versions prior to 10.11 fit on an 8GB drive. 10.11 and later can require a larger drive.
Clover and the OS X installer are placed on separate partitions on the USB. There are two options as is relates to USB partitioning:
- Option 1: MBR with a FAT32 partition for Clover and a separate HFS+J partition for the OS X installer.
- Option 2: GPT with a single HFS+J partition for the OS X installer (hidden EFI partition automatically created)
Although you can use Disk Utility to partition your USB, this guide will use 'diskutil' in Terminal. Disk Utility in 10.11 cannot be used for MBR partitioning.
Before you can partition the USB, you must determine what the disk identifier is. With the USB plugged in to the computer, use 'diskutil list':
In Terminal:
In my case, it provides this output:
Code:
/dev/disk0 (internal, physical):
   #:                       TYPE NAME                    SIZE       IDENTIFIER
   0:      GUID_partition_scheme                        *500.1 GB   disk0
   1:                        EFI EFI                     209.7 MB   disk0s1
   2:                  Apple_HFS 10.10.x                 80.0 GB    disk0s2
   3:                  Apple_HFS 10.11.gm1               80.0 GB    disk0s3
   4:       Microsoft Basic Data Win10_TP                79.4 GB    disk0s4
   5:                  Apple_HFS 10.10.test              80.0 GB    disk0s5
[B]/dev/disk1 (external, physical):
   #:                       TYPE NAME                    SIZE       IDENTIFIER
   0:                                                   *8.0 GB     disk1[/B]
So I can see that the USB is at /dev/disk1. Be careful with diskutil as you can lose data without a mechanism for recovery if you repartition the wrong disk.
Option 1 (MBR, two partitions):
Code:
# repartition /dev/disk1 MBR, two partitions
# first partition, "CLOVER EFI" FAT32, 200MiB
# second partition, "install_osx", HFS+J, remainder
diskutil partitionDisk /dev/disk1 2 MBR FAT32 "CLOVER EFI" 200Mi HFS+J "install_osx" R
The output of the operation looks like this:
Code:
Started partitioning on disk1
Unmounting disk
Creating the partition map
Waiting for the disks to reappear
Formatting disk1s1 as MS-DOS (FAT32) with name CLOVER EFI
512 bytes per physical sector
/dev/rdisk1s1: 403266 sectors in 403266 FAT32 clusters (512 bytes/cluster)
bps=512 spc=1 res=32 nft=2 mid=0xf8 spt=32 hds=32 hid=2 drv=0x80 bsec=409600 bspf=3151 rdcl=2 infs=1 bkbs=6
Mounting disk
Formatting disk1s2 as Mac OS Extended (Journaled) with name install_osx
Initialized /dev/rdisk1s2 as a 7 GB case-insensitive HFS Plus volume with a 8192k journal
Mounting disk
Finished partitioning on disk1
/dev/disk1 (external, physical):
   #:                       TYPE NAME                    SIZE       IDENTIFIER
   0:     FDisk_partition_scheme                        *8.0 GB     disk1
   1:                 DOS_FAT_32 CLOVER EFI              209.7 MB   disk1s1
   2:                  Apple_HFS install_osx             7.8 GB     disk1s2
Option 2 (GPT, one partition):
Code:
# repartition /dev/disk1 GPT, one partition
# EFI will be created automatically
# second partition, "install_osx", HFS+J, remainder
diskutil partitionDisk /dev/disk1 1 GPT HFS+J "install_osx" R
The output of the operation looks like:
Code:
Started partitioning on disk1
Unmounting disk
Creating the partition map
Waiting for the disks to reappear
Formatting disk1s2 as Mac OS Extended (Journaled) with name install_osx
Initialized /dev/rdisk1s2 as a 7 GB case-insensitive HFS Plus volume with a 8192k journal
Mounting disk
Finished partitioning on disk1
/dev/disk1 (external, physical):
   #:                       TYPE NAME                    SIZE       IDENTIFIER
   0:      GUID_partition_scheme                        *8.0 GB     disk1
   1:                        EFI EFI                     209.7 MB   disk1s1
   2:                  Apple_HFS install_osx             7.7 GB     disk1s2
Note: If you're using Clover legacy, the USB should definitely be MBR.
Note: Some BIOS implementations require GPT, some require MBR (many allow both). If you can't get BIOS to recognize your USB for booting, try GPT instead of MBR.
The plist files in this guide require Clover v3330 or newer.
Download the Clover installer. Current builds are available on sourceforge:
http://sourceforge.net/projects/cloverefiboot/
Personally, I build my own:
http://www.insanelymac.com/forum/to...cript-to-build-standard-clover-or-customized/
After obtaining the Clover installer, first task is to install to the USB "CLOVER EFI" partition.
For Clover UEFI, run the Clover Installer package:
- if using MBR, select the target of the install to "CLOVER EFI" using "Change Install Location"
- if using GPT, select the target of the install to "install_osx" using "Change Install Location"
- select "Customize" (the default is a legacy install -- we need to change it)
- check "Install for UEFI booting only", "Install Clover in the ESP" will automatically select
- check "BGM" from Themes (the config.plist files I provide use this theme)
- check "OsxAptioFixDrv-64" from Drivers64UEFI
- most systems will work without DataHubDxe-64.efi, but some may require it
For Clover legacy, run the Clover Installer package:
- select the target of the install to "CLOVER EFI" using "Change Install Location"
- select "Customize" (we need to change some of the default options)
- "Install for UEFI booting only" will be unchecked
- "Install Clover in the ESP" will be unchecked
- in "Bootloader", check "Install boot0af in MBR" ("Install boot0ss in MBR" for HDD install if dual-boot Windows)
- "CloverEFI" should be checked
- check "BGM" from Themes (the config.plist files I provide use this theme)
Installing to the HDD/SSD after installation is very similar to installing to the USB. Refer back to this section when you get to that stage.
Notes on HDD install:
- you might want "EmuVariableUefi-64.efi", but it would depend on whether native NVRAM works for you (most Skylake hardware has non-functional native NVRAM with OS X/macOS)
- select "Install RC scripts on target volume" and/or "Install all RC scripts on all other boot volumes", but not for USB
- selecting "Install Clover Preference Pane" is optional
- there are also some "Optional RC Scripts" you might want to read about
- if you're installing Clover legacy, check "Install Clover in the ESP"
After making your selections you can continue to "Install" the Clover bootloader to your USB.
Finally, we need one EFI driver not included in the Clover installer, HFSPlus.efi:
- it can be downloaded from here:
https://github.com/JrCs/CloverGrowerPro/raw/master/Files/HFSPlus/X64/HFSPlus.efi.
- copy it to /EFI/Clover/drivers64UEFI
Note: Please,
DO NOT forget HFSPlus.efi. Without it, you won't see any HFS+ partitions, including the HFS+ partition that the OS X installer is on.
Note: For Clover legacy, HFSPlus.efi is built-in (Clover legacy loads no drivers from drivers64UEFI anyway)
Now you have the Clover bootloader on the USB, but you still need to configure it correctly.
The resulting drivers64UEFI should look something like this:
View attachment 152775
Note: You may have VboxHfs-64.efi there too. But it doesn't matter. It will be disabled by the config.plist. If you want to use VboxHfs-64.efi you will need to remove the disabler entry for it in config.plist/DisableDrivers.
Preparing essential kexts
Remove EFI/CLOVER/kexts/10.6, 10.7, 10.8, 10.9, 10.10, leaving just 'Other'
Copy essential kexts to the 'Other' directory (FakeSMC, VoodooPS2Controller). You only need the kexts that allow you to boot and operate the installer. Other kexts that you might use in the final installation can wait.
I always use my own versions of these kexts:
FakeSMC.kext:
https://github.com/RehabMan/OS-X-FakeSMC-kozlek
VoodooPS2Controller.kext:
https://github.com/RehabMan/OS-X-Voodoo-PS2-Controller
GenericUSBXHCI.kext:
https://github.com/RehabMan/OS-X-Generic-USB3
For 10.12.5 and HD515/HD520/HD530/HD615/HD620/HD630, you will likely need Lilu.kex and IntelGraphicsFixup.kext:
Lilu.kext:
https://bitbucket.org/RehabMan/lilu/downloads/
IntelGraphicsFixup.kext:
https://bitbucket.org/RehabMan/intelgraphicsfixup/downloads/
Note: Please
READ the README at each link so you know where pre-built binaries are located. Copy
only the kext to Clover/kexts/Other (usually the kext is found in the
Release folder inside the ZIP).
Note: GenericUSBXHCI.kext is optional if USB3 ports work with AppleUSBXHCI.kext. GenericUSBXHCI.kext is not compatible with 10.11+. The current version has been modified to do nothing on 10.11+.
Note: The FakeSMC package includes FakeSMC "plugins" (FakeSMC_ACPISensors.kext, FakeSMC_CPUSensors.kext, FakeSMC_LPCSensors.kext, FakeSMC_GPUSensors.kext). You do not need these kexts for installation, although you may wish to try them for getting sensor data to HWMonitor.app after you install. Note: FakeSMC_CPUSensors.kext may have issues on Kaby Lake hardware.
Unlike installing kexts to /System/Library/Extensions, where a kext installer (such as Kext Wizard) must be used, for EFI/Clover/kexts/Other, it is simple copy/paste with Finder.
If your SATA is in RAID mode, you'll need an injector kext. I built one a while back, but it is attached to this post SATA-RAID-unsupported.kext (was SATA-100-unsupported-282a.kext, before that... HPRAIDInjector.kext).
Also, some Skylake SATA controller device-ids are not in the AppleAHCIPort.kext Info.plist (yet). If you have an unsupported SATA controller (8086:a103, 8086:9d03), use SATA-100-series-unsupported.kext. It is also attached to the bottom of this post.
If your main SSD is NVMe, make sure you read important NVMe information in the FAQ:
http://www.tonymacx86.com/el-capita...faq-read-first-laptop-frequent-questions.html
If you want to have Ethernet (note Ethernet is wired networking, and is not the same as WiFi), you can also install your Ethernet kext.
For example:
RealtekRTL8111.kext:
https://github.com/RehabMan/OS-X-Realtek-Network
RealtekRTL8100.kext:
http://www.insanelymac.com/forum/topic/296190-driver-for-realteks-rtl810x-fast-ethernet-series/
AppleIntelE1000e.kext:
http://www.insanelymac.com/forum/topic/205771-appleintele1000ekext-for-108107106105/
IntelMausiEthernet.kext:
https://github.com/RehabMan/OS-X-Intel-Network
A typical EFI/Clover/kexts would look like this:
View attachment 152776
Choosing a config.plist
The Clover installer places a default config.plist at /EFI/Clover/config.plist. It is almost universally wrong and most likely will not work at all for most laptops.
You should choose one that matches your hardware from this repository:
https://github.com/RehabMan/OS-X-Clover-Laptop-Config. As you can tell by looking at the listing of files, the configs vary by graphics hardware configuration. If your screen is 1366x768, pick one of those. If your system is mixed (eg. HD3000 on 7-series, or HD4000 on 6-series) be sure to take that into account. If your screen is 1600x900 (or greater) use one of the 1600x900 config files. Haswell graphics are not dependent on screen resolution.
Note: Clover cannot read HTML (config.plist is a plist/xml), so make sure to download from the "Raw" link or download the entire ZIP to get all files:
https://github.com/RehabMan/OS-X-Clover-Laptop-Config/archive/master.zip
In any case you may need to change the ig-platform-id that is used at /Graphics/ig-platform-id. But these configurations work most of the time.
Common ig-platform-ids:
0x01660003: HD4000 1366x768
0x01660004: HD4000 1600x900, 1920x1080
0x01660008, 0x01660009: HD4000 1600x900, 1920x1080
0xa260006: HD4400/HD4600/HD5000
Other Haswell ig-platform-id values: 0xa260005, 0xa260000, 0xa160000, 0xa2e0008, 0xa2e000a
Always use a plist editor (such as Xcode or PlistEdit Pro) when making changes to config.plist.
Note: HD4200, HD4400, and HD4600 on 10.10+ needs special patches/injections, thus the separate config_HD4600_4400_4200.plist. If you're installing Mavericks, use the
config_HD5000_5100_5200.plist instead even for HD4200, HD4400 and HD4600. Actually, either one will work, but there is less work arounds (FakeID) required in 10.9.x. Of course, if you ever update beyond 10.9.x, you will need the appropriate changes to FakeID.
Note: HD5600 on 10.11+ needs special patches/injections, thus the separate config_HD5600.plist. If you're installing Yosemite (not recommended with Broadwell), use config_HD5300_5500_6000.plist.
Copy your selected configuration file, and paste it to /EFI/Clover,
make sure it is re-named as config.plist. Clover will only load configurations from /EFI/Clover/config.plist.
DVMT-prealloc on Broadwell/Skylake/Kaby Lake
The Broadwell and Skylake graphics kexts provided by Apple require DVMT-prealloc to be set 64mb or larger. Many laptops set it by default to 32mb, which is not large enough and will cause a KP (kernel panic).
There are ways to set it even if your BIOS does not provide the option, but they are somewhat risky. You can find links to these methods in the laptop FAQ.
If you can't set DVMT-prealloc as required or don't wish to risk it, you can use the minStolenSize patch. The patch is already present in the relevant plists provided by this guide, but it is disabled. Read post #2 of this guide to understand how to enable patches which are disabled.
Also, read here for an alternative to the minStolenSize patch:
https://www.tonymacx86.com/threads/...lensize-patch-with-32mb-dvmt-prealloc.221506/
Note: The alternative patch is already present and enabled in the applicable plists. The alternate patch is definitely recommended over the minStolenSize patch.
Also, once you enable the patch, you still may have panic... It is because Clover cannot patch a kext that loads outside of kernel cache, and these graphics kexts may not be in cache. To work around this problem, use an invalid ig-platform-id (0x12345678). DO NOT use a bogus FakeID, as that will defeat the purpose. Once you are able to boot with the invalid ig-platform-id, rebuild cache, then boot normally with your intended ig-platform-id.
You can rebuild cache in Terminal:
Code:
sudo touch /System/Library/Extensions && sudo kextcache -u /
Or shorthand in 10.11+
Note regarding CPU power management and SSDTs
If you're getting a panic in AppleIntelCPUPowerManagement and/or SMC_ACPI_PlatformPlugin it may be related to your OEM CPU power management related SSDTs.
Some systems may need to drop some of the OEM SSDTs. This happens most frequently with Sandy Bridge systems (but not all). There are two configurations for DropTables in the provided config.plist files. The default is minimal. The alternate is named #DropTables and is a bit more aggressive. Each configuration resides in config.plist/ACPI. You can use the alternate by renaming DropTables->##DropTables and renaming #DropTables->DropTables (in that order). Depending on how the OEM labels the tables, this may or may not work. If you still have issues, set config.plist/ACPI/SSDT/DropOem=true. You will need to set config.plist/ACPI/SSDT/Generate=true (or the individual CStates/PStates=true) to use DropOem=true or the alternate DropTables.
Always use a plist editor (such as Xcode or PlistEdit Pro) to edit config.plist.
Building the OS X installer
There are two ways to copy the OS X installer to USB:
- 'createinstallmedia' method (recommended)
- BaseBinaries clone method (use when 'createinstallmedia' is not available)
createinstallmedia method
This is the same mechanism you would use to create a USB installer for a real Mac.
It is a single line, executed in Terminal:
Code:
# copy installer image
sudo "/Applications/Install OS X El Capitan.app/Contents/Resources/createinstallmedia" --volume  /Volumes/install_osx --applicationpath "/Applications/Install OS X El Capitan.app" --nointeraction
Then change the name to be less unwieldy...
Code:
# rename
sudo diskutil rename "Install OS X El Capitan" install_osx
You can copy the Yosemite installer in the same way:
Code:
# copy installer image
sudo "/Applications/Install OS X Yosemite.app/Contents/Resources/createinstallmedia" --volume  /Volumes/install_osx --applicationpath "/Applications/Install OS X Yosemite.app" --nointeraction

# rename
sudo diskutil rename "Install OS X Yosemite" install_osx
You can also copy the Mavericks installer in the same way:
Code:
# copy installer image
sudo "/Applications/Install OS X Mavericks.app/Contents/Resources/createinstallmedia" --volume  /Volumes/install_osx --applicationpath "/Applications/Install OS X Mavericks.app" --nointeraction

# rename
sudo diskutil rename "Install OS X Mavericks" install_osx
Or macOS Sierra 10.12:
Code:
# copy installer image
sudo "/Applications/Install macOS Sierra.app/Contents/Resources/createinstallmedia" --volume  /Volumes/install_osx --applicationpath "/Applications/Install macOS Sierra.app" --nointeraction

# rename
sudo diskutil rename "Install macOS Sierra" install_osx
This method is not available in ML, Lion, SL.
Using 'createinstallmedia' is the only method that results in the creation of a Recovery partition.
BaseBinaries clone method
You can do the following steps manually via Disk Utility and the Finder, but it is slightly more concise and clear when written in Terminal:
Code:
# temporary directory
mkdir /tmp/install_esd

# mount InstallESD.dmg in installer package
hdiutil attach "/Applications/Install OS X El Capitan.app/Contents/SharedSupport/InstallESD.dmg" -readonly -mountpoint /tmp/install_esd -nobrowse

# restore it to target
sudo asr restore --source /tmp/install_esd/BaseSystem.dmg  --target /Volumes/install_osx -erase --format HFS+ --noprompt

# rename the target to be less unwieldy
diskutil rename "OS X Base System" install_osx

# remove Packages symlink
rm /Volumes/install_osx/System/Installation/Packages

# copy Packages as folder
cp -a /tmp/install_esd/Packages /Volumes/install_osx/System/Installation

# copy BaseSystem.dmg
cp -a /tmp/install_esd/BaseSystem.dmg /tmp/install_esd/BaseSystem.chunklist /Volumes/install_osx

# unmount InstallESD.dmg
hdiutil detach /tmp/install_esd

# remove temporary directory
rmdir /tmp/install_esd
You are now ready to eject your USB device.
BIOS settings
In order to boot the Clover from the USB, you should visit your BIOS settings:
- "VT-d" (virtualization for directed i/o) should be disabled if possible (the config.plist includes dart=0 in case you can't do this)
- "DEP" (data execution prevention) should be enabled for OS X
- "secure boot " should be disabled
- "legacy boot" optional (recommend enabled, but boot UEFI if you have it)
- "CSM" (compatibility support module) enabled or disabled (varies) (recommend enabled, but boot UEFI)
- "fast boot" (if available) should be disabled.
- "boot from USB" or "boot from external" enabled
Note: If you get a "garbled" screen when booting the installer in UEFI mode, enable legacy boot and/or CSM in BIOS (but still boot UEFI). Enabling legacy boot/CSM generally tends to clear that problem.
Arrandale/1st gen Intel HD
First generation Intel HD graphics are not well supported, and as far as I know it is not possible to boot the installer without removing the Intel graphics kexts (AppleIntelSNB*, AppleIntelHD*, AppleIntelFrame*). In order to remove these kexts, you will need to use the BaseBinaries method, since /System/Library/Extensions is not directly accessible if you use createinstallmedia.
See this link for more information:
http://www.insanelymac.com/forum/topic/286092-guide-1st-generation-intel-hd-graphics-qeci/
Booting the Installer
After you create you USB, it is ready to go... Read post #2 for more details on using the USB.
Generally, you will need to use a special button to turn the laptop on or press some special keys to access the boot menu, where you can choose to boot the USB.
Note that you may see it listed twice (depending on setting of legacy boot). Choose the listing that is UEFI or legacy depending on what type of USB you opted for. Of course, if your computer doesn't have UEFI, you'll see no such listing and will boot the device in legacy mode in order to boot Clover.
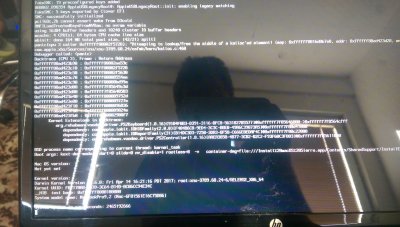
You can press the spacebar in Clover to select various options. It is a good idea to use this to boot verbose (the config.plist files I provide do not have verbose turned on by default). In verbose mode you have a better idea of the booting process and get better information in the case of a crash.
Clover Resources
It is a good idea to become familiar with the software you are using and read the documentation.
Clover wiki:
http://clover-wiki.zetam.org/Home
Clover instructions thread:
http://www.insanelymac.com/forum/topic/282787-clover-v2-instructions/
Clover discussion:
http://www.insanelymac.com/forum/topic/284656-clover-general-discussion/
Clover patch/bug reports:
http://www.insanelymac.com/forum/topic/306156-clover-bugissue-report-and-patch/
Clover changes:
http://www.insanelymac.com/forum/topic/304530-clover-change-explanations/
Providing Feedback
Do not treat this thread as your private troubleshooting thread. If you have a specific problem with your specific laptop, open a separate thread. If you see something here that is in error, or wish to make a contribution, please reply to this thread.
Installation and Post Installation
Please read post #2 of this thread for additional information on how to use the USB installer and some post-install tips.
SATA injectors attached below
The SATA injector kexts as detailed in the guide are available in the attachments below...