Why I use clover
I use Clover because it allows me to create an OS X recovery partition, and it allows UEFI booting (Faster boot times). Also, when I update the software for minor revisions, the kexts stay installed, so there are no steps to install drivers post upgrade. In addition, Clover is installed to the EFI partition, so there is no need to reinstall the bootloader after a major upgrade. To upgrade to OS X 10.11, for example, one would just need to download and run the updater from the Mac App Store. Easy peasy! This is how I installed it.
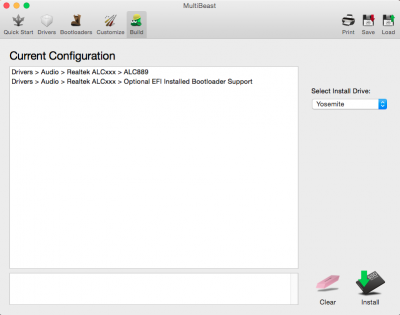
So Basically Install OSX using tonys guide however when you install drivers and boot loader its a bit different so here is the options used in multibeast you install all the drivers and when installing audio u have one extra thing select optional efi bootloader support
How to install clover bootloader
First download the latest version of clover:
http://sourceforge.net/projects/cloverefiboot/
First, reformat the EFI partition on your hard drive. This won’t erase any data that you have on your computer. To do this:
Open /Applications/Utilities/Terminal
Type: diskutil list to list your partitions. Find the EFI partition, which is on your boot drive. For me, this was
disk0s1.
Type the following, making sure to replace disk0s1 with your EFI identifier found in step 2, enter password, and hit return:
Code: sudo newfs_msdos -v EFI -F 32 /dev/rdisk0s1
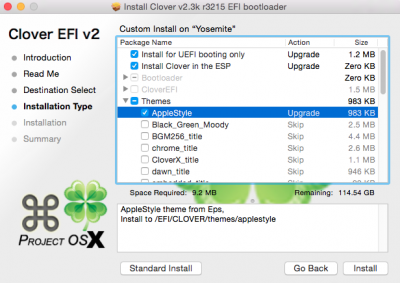
once this is done you can exit terminal and install clover via the downloaded file
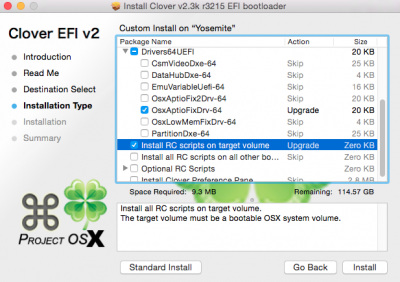
open it and choose the options i have selected.. also the theme part u can pick which ever u wish
")
once you have installed clover you are not done yet
there are some files that need to be placed in some folders
Navigate to /Volumes/EFI/EFI/CLOVER/ and replace the config.plist file with the one attached to this post. This is a custom built configuration file for this build.
Next Copy the following 3 kexts from /System/Library/Extensions/ FakeSMC.kext,AppleHDA.kext,RealtekRTL8111.kext to /Volumes/EFI/EFI/CLOVER/kexts/10.10/ (Note 10.10 folder if its not there create one)
I have attached these in the attachments below
or you can use ur own from your computer
once you have done all of this your finally done
reboot you can go to the bios and you may set priority drive to boot via UEFI if you want
Here's what you need to do to get the right smbios and proper definitions for your machine and to get messages working:
I recommend downloading Clover Configurator to do all the following changes.
Step 1) Open my config.plist file in Clover Configurator.
Step 2) Under SMBIOS click the magic wand to change system definitions.
Step 3) Click magic wand. Click the logo of the definition you want. Select which ever definition is closest to your specs. I have chosen iMac (14,2) system definition as random and "shake" the two values under serial generator. Click okay. Copy serial number to this
https://getsupport.apple.com/ProductSelector.action and make sure it isn't in use. It should identify as an iMac and give two options for support but that's it. Generate another serial if it's in use. Save and restart.
Step 4) Download this from my attachments iMessageDebugv2.zip to find out your ROM (en0) and MLB (Board Serial Number) values.
Step 5) Copy and paste your generated board serial number into the "Board Serial Number" in the SMBIOS and under the MLB box in the Rt Variables section. Copy and paste ROM value into ROM box under Rt Variables Section.
Step 6) Open the terminal and generate a new UUID using the uuidgen command. Copy and paste this in the SmUUID box in the SMBIOS section. Replace the last 12 digits with your ROM value. Also make sure "Inject System ID" is checked in the System parameters section. Save and reboot.
Step 7) You should be good to go! Try logging into iMessage and it should work flawlessly. If it doesn't, go back and double check to make sure your numbers were copied correctly.
NOTE:
Also, as others have pointed out. Ethernet MUST be en0 and wifi must be en1. Under About This Mac>System Report...>Ethernet Cards>BSD name: en0. Wifi interface must be en1. If they aren't then remove all networking interfaces in network preferences, apply settings, and delete Library>Preferences>System Configuration>NetworkInterfaces.plist. Empty trash and reboot. , please follow these steps to a t and they should work.