
You are using an out of date browser. It may not display this or other websites correctly.
You should upgrade or use an alternative browser.
You should upgrade or use an alternative browser.
Gigabyte Z68MA-D2H-B3+EVGA GTX650 (working DSDT FREE)
- Thread starter Elite2k
- Start date
- Status
- Not open for further replies.
- Joined
- Mar 9, 2013
- Messages
- 3
- Motherboard
- Mini
- CPU
- i5 2500K
- Graphics
- HD6450
- Mac
- Classic Mac
- Mobile Phone
Hi, what are the advantages, other than the boot loader being on the EFI partition? Thanks.
Anil K Solanki
Anil K Solanki
- Joined
- Jul 23, 2012
- Messages
- 798
- Motherboard
- GA-Z77N-WIFI-F3-Clover
- CPU
- E3-1225 v2
- Graphics
- GT 640 | P4000
- Mac
Hi, what are the advantages, other than the boot loader being on the EFI partition? Thanks.
Anil K Solanki
http://www.tonymacx86.com/yosemite-desktop-guides/144426-how-install-os-x-yosemite-using-clover.html
Clover is a new and exciting open source EFI bootloader. Developed over the past 2 years by a group of developers at Project OS X led by Slice, Clover aims to solve problems inherent in existing OS X installation methods and legacy bootloaders:
Boots troublesome desktop and laptop BIOS/UEFI
Uses native OS X installation media
Ability to patch DSDT/kernel/kexts at boot time
Creates OS X Recovery partition
No boot0 error with 4K Advanced Format drives
Solves multi-boot issues with Linux and Windows 7/8
Solves traditional bootloader NVRAM issues related to iMessage/FaceTime
Clover has a completely different system of configuration with a decidedly steep learning curve. It can be confusing for those who have only ever used the more traditional Chameleon or Chimera.
- Joined
- Mar 9, 2013
- Messages
- 3
- Motherboard
- Mini
- CPU
- i5 2500K
- Graphics
- HD6450
- Mac
- Classic Mac
- Mobile Phone
Many thanks. Anil
- Joined
- Oct 22, 2010
- Messages
- 323
- Motherboard
- z68a-d3-b3
- CPU
- i7-3770k
- Graphics
- GTX 650
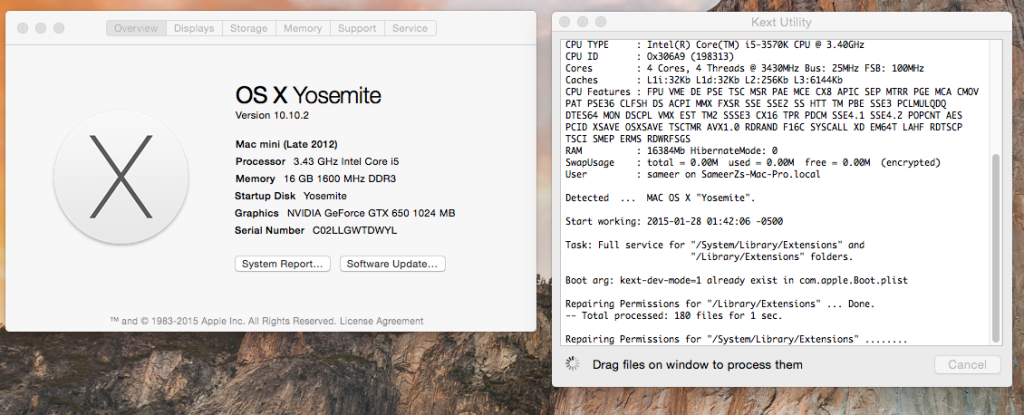
10.10.2 Works fine on Gigabyte Z68MA-D2H-B3 [Downloaded direct via Appstore]
-Repair permissions first either using “kext utility tool” or type following command in terminal “sudo diskutil repairPermissions /“ without quotes
-Update will auto install and Reboot PC
-install audio kext ALC889 DSDT FREE
-Re Enable TRIM on SSD using Multibeast
-RE- Repair permissions again first either using “kext utility tool” or type following command in terminal “sudo diskutil repairPermissions /“ without quotes
-Reboot and your done

Attachments
- Joined
- Mar 9, 2013
- Messages
- 3
- Motherboard
- Mini
- CPU
- i5 2500K
- Graphics
- HD6450
- Mac
- Classic Mac
- Mobile Phone
Many thanks.
There is a small typo in your Terminal command, it should be;
“sudo diskutil repairPermissions /“
diskutil, not disktuil.
Thankyou. Anil
There is a small typo in your Terminal command, it should be;
“sudo diskutil repairPermissions /“
diskutil, not disktuil.
Thankyou. Anil
- Joined
- Oct 22, 2010
- Messages
- 323
- Motherboard
- z68a-d3-b3
- CPU
- i7-3770k
- Graphics
- GTX 650
Many thanks.
There is a small typo in your Terminal command, it should be;
“sudo diskutil repairPermissions /“
diskutil, not disktuil.
Thankyou. Anil
Hey thanks for pointing that out the typo.. sorry it was like 3 am lol when i typed it.. been busy with university so havent had time to check up on my stuff here thanks
- Joined
- Oct 22, 2010
- Messages
- 323
- Motherboard
- z68a-d3-b3
- CPU
- i7-3770k
- Graphics
- GTX 650
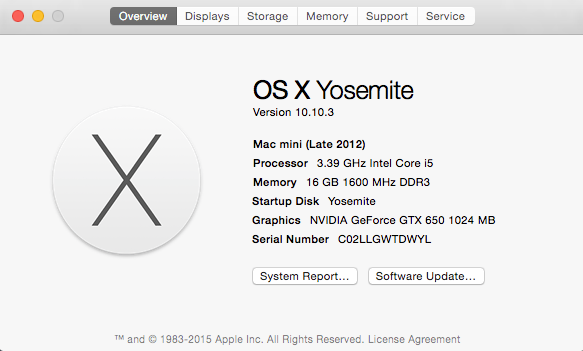
10.10.3 Works fine on Gigabyte Z68MA-D2H-B3 [Downloaded direct via Appstore]
-Repair permissions first either using “kext utility tool” or type following command in terminal “sudo diskutil repairPermissions /“ without quotes
-Update will auto install and Reboot PC
-install audio kext ALC889 DSDT FREE
-Re Enable TRIM on SSD using Multibeast
-RE- Repair permissions again first either using “kext utility tool” or type following command in terminal “sudo diskutil repairPermissions /“ without quotes
-Reboot and your done

- Joined
- Feb 13, 2011
- Messages
- 13
- Motherboard
- Z68MA UEFI
- CPU
- Core i5 2500K
- Graphics
- On-Board HD3000
- Mac
- Classic Mac
- Mobile Phone
Got my Z68-MA updated successfully to 10.10.2 AND installed EVGA GTX 960 video card. Important part is to have a stable hack before trying the GPU.
Had to upgrade Bios to U1C otherwise the GPU would delay boot for a good 5 minutes and prevented access to BIOS utility.
1- Download and install NVIDIA Graphics Driver and latest CUDA. See http://www.tonymacx86.com/graphics/...ate-graphics-drivers-10-10-2-343-02-02-a.html. I'm using 343.02.02f04
2- Shut down and install the Graphics card in PCI16X16 slot (other PCI (like Wireless and FireWire) can stay). I did not disable the on-board graphics card. Left it at AUTO.
3- Boot using -x (if you get erros or it freezes)
4- Use MultiBeast Yosemite Edition to set your parameter (as per Elite2K list)
5- Switch graphics source using NVIDIA utility.
This machine will also boot on Windows (double booth) and the GPU is recognized there also, using standard NVIDIA drivers (I game on Windows).
- Joined
- Oct 22, 2010
- Messages
- 323
- Motherboard
- z68a-d3-b3
- CPU
- i7-3770k
- Graphics
- GTX 650
Before doing this please backup and make sure u know how to use -x -f to boot in to safe mode incase if something went wrong
I have personally tested this on 4 haks so far it worked fine sleep wake etc all function. (if it doesnt work i am sorry)
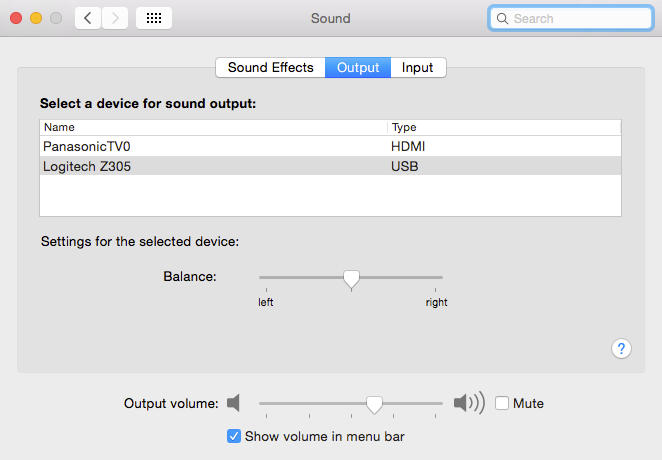
HDMI Audio (So far ive tested this on several nvidia machines with GTX 640 + GT 650 it worked)
This is by far the easiest way ive ever seen to get hdmi working "andrejkw" posted it so here is what you do?
here is the url where i found it:
http://forums.macrumors.com/showthread.php?t=1499797
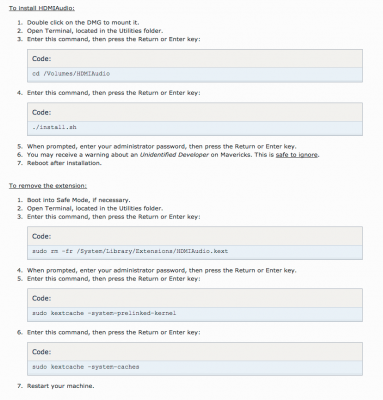
STEP1 -Download the .zip file in the attachment simply open it and let it mount
Step2 Open up Terminal and just type the following two commands
cd /Volumes/HDMIAudio Press Enter
Next Type this command in
./install.sh PRess Enter
it will ask you for your password enter it
Reboot
Go to settings and audio and see if your device thats plugged in to the hdmi shows up if so select it and to change back and forth simply switch
BTW I used the newest version of the audio codec 7.2 multibeast
I have personally tested this on 4 haks so far it worked fine sleep wake etc all function. (if it doesnt work i am sorry)
HDMI Audio (So far ive tested this on several nvidia machines with GTX 640 + GT 650 it worked)
This is by far the easiest way ive ever seen to get hdmi working "andrejkw" posted it so here is what you do?
here is the url where i found it:
http://forums.macrumors.com/showthread.php?t=1499797
STEP1 -Download the .zip file in the attachment simply open it and let it mount
Step2 Open up Terminal and just type the following two commands
cd /Volumes/HDMIAudio Press Enter
Next Type this command in
./install.sh PRess Enter
it will ask you for your password enter it
Reboot
Go to settings and audio and see if your device thats plugged in to the hdmi shows up if so select it and to change back and forth simply switch
BTW I used the newest version of the audio codec 7.2 multibeast

Attachments
- Status
- Not open for further replies.
Copyright © 2010 - 2024 tonymacx86 LLC