
- Joined
- Oct 10, 2016
- Messages
- 7
- Motherboard
- Gigabyte Z170X Ultra Gaming
- CPU
- i7 6700K
- Graphics
- HD 530 + GTX 980
- Mac
- Mobile Phone
Thread for a Skylake Hackintosh Build:
Specs:
Gigabyte Z170X Ultra Gaming Mobo
i7 6700K
Gigabyte Windforce GTX 980 OC
800W BeQuiet Power Supply
NXZT S340 Elite Case (white)
NOCTUA NH-L9x65 (cooler)
Crucial BX 500 SSD (Windows)
Samsung EVO 750 SSD (OSX)
Crucial Ballistic Sport 16GB DDR4 2400MHz Ram.
Wifi/bluetooth: Broadcom bcm94352z + M.2 NGFF PCIe Adapter (https://www.amazon.de/gp/product/B016RU3T6S/?tag=tonymacx8603-21)
PreRequirements:
- minimum F5a (beta) bios as F4 did not pick up DDR4 XMP profile, now tested and running on F21
- do a burn in test of the memory first as it seems from Amazon reviews that some of the DDR4 sticks have a higher initial failure rates; not related to this board or Sierra install, but wasted a day to find that large files were not being read properly, but small files worked fine
- Use Profile1 for Memory XMP
- Disable Intel VT-D
- Disable CSM Support
- Disable serial port
- Enable XHCI Hand-Off
- UEFI boot only (have Sierra and Windows 10 Anniversary installed successfully)
- Set Integrated Graphics allocated memory to 96Mb (less than this causes kernel panic if using onboard HD530; no need to adjust max)
PreInstall:
- Head to your existing Mac, or Hackintosh and Launch Disk Utility. Format your USB Drive 1 Partition OS X JOURNALED GUID
- Then launch Unibeast. For Boot choose UEFI and create the Install Media.
- Create a folder on the Install Media (do not do this in the EFI Labeled partition) and move Multicast, clover configurator, the DSDT's, Nvidia WebDrivers, Kextbeast and the Kexts in it
- Unplug the Usb drive and Insert it to your machine where you want to install OSX.
Install:
- Boot from your USB Stick
- In clover, choose Boot from "YourMediaName"
- When booted up, choose Utilities and launch Disk Utility, then format you HDD or SDD.
- Quit Disk Utility and proceed install.
Post Install:
- Boot from your USB Stick
- Finish the postInstall configuration steps (User Account, etc)
- Head to the folder you previously created, and Launch Multibeast
- In Quick Start Choose UEFI Boot Mode
- In Drivers:
- In Customized
- Click Build.
- Close Multibeast (you don't need to restart yet.
- copy the Kexts from your Folder on the USB Stick to the Desktop and Launch Kextbeast.
- choose for instal path /Library/Extensions
- Install and quit Kextbeast.
- Open the Nvidia WebDriver Install .pkg
- install and quit and reboot
- After Booting up open Clover Configurator and mount the EFI Partition of your Hard drive.
- Go to your EFI Partition and head to /EFI/Clover
- Open the config.plist with Clover Configurator
- in Acpi
- In Rt Variables set CrsActiveConfig to 0x67 (SIP disabled)
- Copy your SSDT files from your USB Drive Folder to /EFI/Clover/ACPI/Patched
- Save and close the config.plist file, then reboot.
- Open toledas AudioALC patch command and confirm your ALC (892)
- YES TO EVERYTHING
- Close Terminal and reboot.
- Apply pixel clock patch if output not higher than 1080P on 2K or 4K screen
Now you should have a working hackintosh build.
What Works:
- CPU
- Graphics
- Audio
- Network
- Wifi/Bluetooth
What doesn't work:
- USB 3.0 ports are flimsy (they tend to not work, but sometimes do.)
Specs:
Gigabyte Z170X Ultra Gaming Mobo
i7 6700K
Gigabyte Windforce GTX 980 OC
800W BeQuiet Power Supply
NXZT S340 Elite Case (white)
NOCTUA NH-L9x65 (cooler)
Crucial BX 500 SSD (Windows)
Samsung EVO 750 SSD (OSX)
Crucial Ballistic Sport 16GB DDR4 2400MHz Ram.
Wifi/bluetooth: Broadcom bcm94352z + M.2 NGFF PCIe Adapter (https://www.amazon.de/gp/product/B016RU3T6S/?tag=tonymacx8603-21)
PreRequirements:
- Min. 8GB USB Stick
- Unibeast
- Multibeats
- Kext Beast
- A Mac or a Hackintosh
- Toleda ALC Audio Patch
- (If you're using 4K or 2K screens with a Dedicated Graphics Card a pixel clock patch)
- A "Legal" copy of OS X 10.11
- Nvidia Web Driver
- (Clover Configurator)
- minimum F5a (beta) bios as F4 did not pick up DDR4 XMP profile, now tested and running on F21
- do a burn in test of the memory first as it seems from Amazon reviews that some of the DDR4 sticks have a higher initial failure rates; not related to this board or Sierra install, but wasted a day to find that large files were not being read properly, but small files worked fine
- Use Profile1 for Memory XMP
- Disable Intel VT-D
- Disable CSM Support
- Disable serial port
- Enable XHCI Hand-Off
- UEFI boot only (have Sierra and Windows 10 Anniversary installed successfully)
- Set Integrated Graphics allocated memory to 96Mb (less than this causes kernel panic if using onboard HD530; no need to adjust max)
PreInstall:
- Head to your existing Mac, or Hackintosh and Launch Disk Utility. Format your USB Drive 1 Partition OS X JOURNALED GUID
- Then launch Unibeast. For Boot choose UEFI and create the Install Media.
- Create a folder on the Install Media (do not do this in the EFI Labeled partition) and move Multicast, clover configurator, the DSDT's, Nvidia WebDrivers, Kextbeast and the Kexts in it
- Unplug the Usb drive and Insert it to your machine where you want to install OSX.
Install:
- Boot from your USB Stick
- In clover, choose Boot from "YourMediaName"
- When booted up, choose Utilities and launch Disk Utility, then format you HDD or SDD.
- Quit Disk Utility and proceed install.
Post Install:
- Boot from your USB Stick
- Finish the postInstall configuration steps (User Account, etc)
- Head to the folder you previously created, and Launch Multibeast
- In Quick Start Choose UEFI Boot Mode
- In Drivers:
- For Audio ALC892
- For Network (LAN) IntelMausiEthernet v2.1.0d3
- In Customized
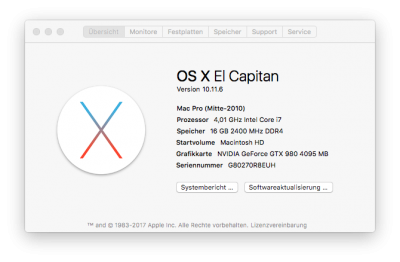
- Set the Mac Pro 5,1 in System Definitions (only if your planning to use a dedicated Graphics Card, if not set iMac 17,1)
- Click Build.
- Close Multibeast (you don't need to restart yet.
- copy the Kexts from your Folder on the USB Stick to the Desktop and Launch Kextbeast.
- choose for instal path /Library/Extensions
- Install and quit Kextbeast.
- Open the Nvidia WebDriver Install .pkg
- install and quit and reboot
- Enter BIOS settings and set your HDD or SSD where OS X is installed as Main Boot device.
- After Booting up open Clover Configurator and mount the EFI Partition of your Hard drive.
- Go to your EFI Partition and head to /EFI/Clover
- Open the config.plist with Clover Configurator
- in Acpi
- FixHDA
- NVidia (if using Graphics card)
- nvda_drv=1 (if using Graphics card)
- kext-dev-mode=1
- rootless=0
- open up terminal and execute the command "uuidgen". Then paste it into the SmUUID field
- add your memory (you have to fill every textfield, if not clover won't save it)
- In Rt Variables set CrsActiveConfig to 0x67 (SIP disabled)
- Copy your SSDT files from your USB Drive Folder to /EFI/Clover/ACPI/Patched
- Save and close the config.plist file, then reboot.
- Open toledas AudioALC patch command and confirm your ALC (892)
- YES TO EVERYTHING
- Close Terminal and reboot.
- Apply pixel clock patch if output not higher than 1080P on 2K or 4K screen
Now you should have a working hackintosh build.
What Works:
- CPU
- Graphics
- Audio
- Network
- Wifi/Bluetooth
What doesn't work:
- USB 3.0 ports are flimsy (they tend to not work, but sometimes do.)

") thanks again!
thanks again!