Contribute
Register

Ersterhernd's NUCiMac G4

Status
Not open for further replies.
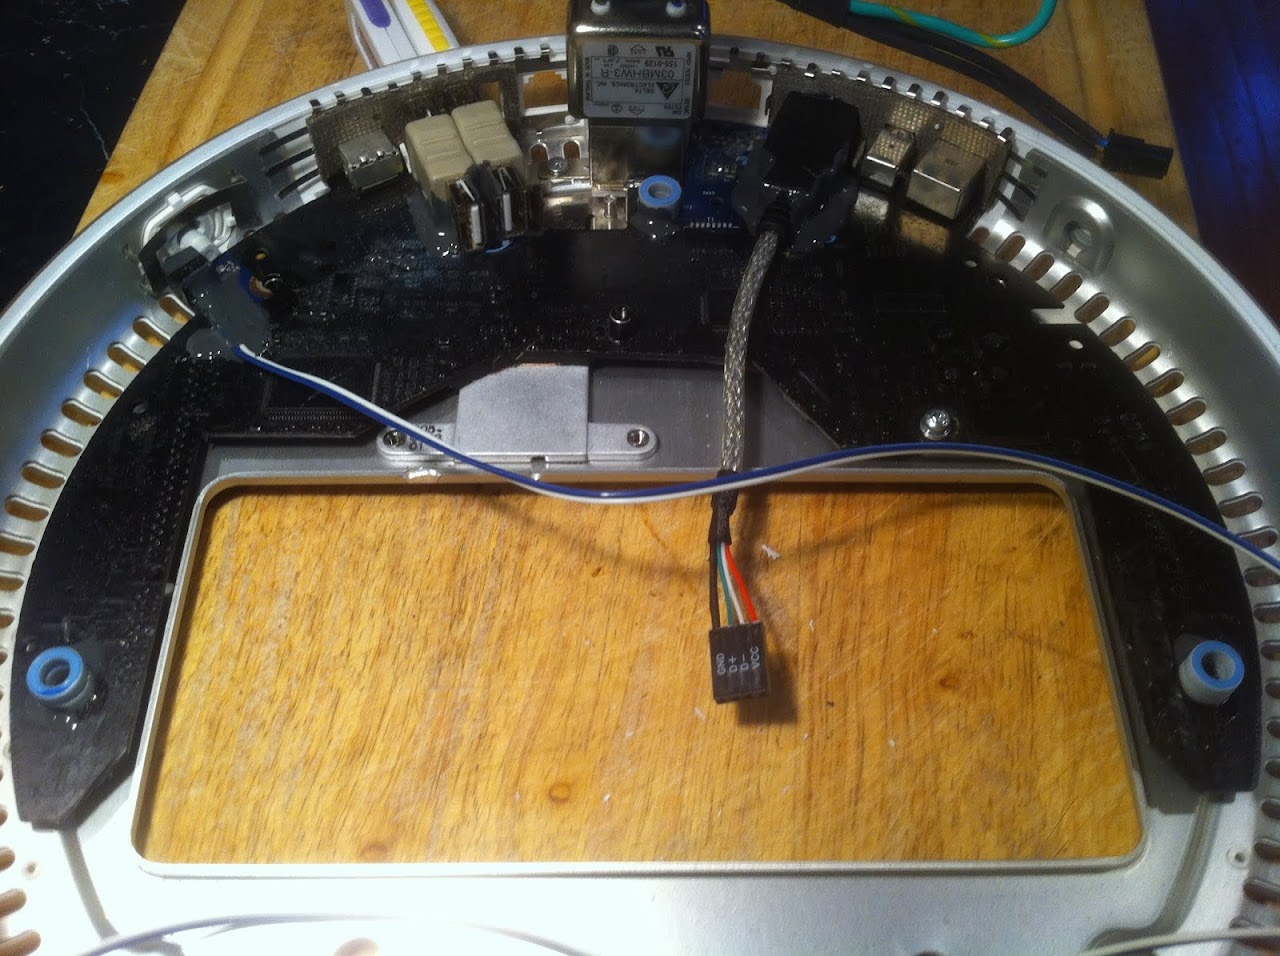
Build Log 3 - The Rear I/O

The photo below shows how effective it was to leave a piece of the original motherboard intact. It shows the re-purposed I/O with three USB 2.0 ports, and a power switch that will operate using the original iMac G4 power button on the rear. I used liberal amounts of JB Weld to secure the inner components to the original motherboard, as there could be significant force applied from the exterior when inserting USB devices. I haven't figured out the ethernet port yet, as there is VERY little space on the right side of the power plug. Two firewire ports were re-purposed into a horizontal USB port. The blue standoffs for the aluminum plate are from the LaserHive that I had leftover from a previous build. Two per hole gave a perfect height for the installation into the system. Did they look familiar, MiniHack? ;)

IMG_3940.JPG


There will likely be more re-purposing of the rear I/O to accomodate the ethernet jack and some form of audio jack in a clean presentation.


Ersterhernd

This may be a stupid question, but as I am not that knowledgeable in computer ports yet, I had one question. If this was an 800 MHz iMac G4, that came with USB 1.1 I believe. How did you make these USB 2.0?
 
Hi J, USB 1.1 and 2.0 used identical ports, it was the USB controller (on the PC motherboard or Apple Logic Board) that dictated the speed. USB 3.0 has extra pins in the connector and is backwards compatible if required.

Pictured in the photo are USB 2.0 ports, I removed the Apple G4 ports. It would have been great to re-use them by soldering to the leads on the G4 logic board, but that turned out to be a failure in my trials. I have successfully done it on my iMac G5 build though, as descrbed in this post.


Cheers!

So with this, I'm assuming you secured USB 2.0 headers in place, then connected the ends using double-sided USB 2.0 cables?
 
Yes thats exactly right. Theres several ways to do it. I found the F/F connectors that were fairly simple to JB Weld into position. Whatever way you do it, the bond to the G4 has to be strong enough that it doesn't fail when external USB devices are plugged in with any amount of force.


Cheers!
 
Hi again Ersterhernd,

I'm just gathering information on my future mod so that I can complete it effectively. How did you hook up the internal WiFi? I am getting an Intel NUC DC3217BY for the project (of course, in the summer when I start it), and I was wondering two things:

1. Will the internal WiFi card slot be picked up?
2. I did an HP ProBook 4540s hackintosh, and was wondering if the Broadcom BCM94322HM8L dual-band WiFi card used in there would also work in the slot on the Intel NUC (meaning OS X would pick it up).
3. How did you route the antennas/how would I route the antennas?


Hi again J,

I have used the BCM94322 in all my builds, Mavericks picks it up straight away. Btw, I did a ProBook 4530S last year with the LCD upgraded to Full HD 1920 x 1080. I love it.

In both my 17" G4's, I routed the antennas (supplied in the NUC) to a location along the bottom edge of the system, next to the G4 vent holes that circle the entire base. It works good but not great. About 7 to 8 mbps is all it can muster, good enough for web access but it is slow for network transfers. I did it this way because I didn't want to remove the white plastic dome from the steel faraday cage to run WiFi antenna wire in between.

With my 20" G4, it already had the WiFi antennas installed between the Steel Faraday Cage and the outer white plastic dome, so I didn't have to tear it apart. However, I did have to cut the older ends off the WiFi antenna wires and solder new ends (that will connect to current WiFi cards) onto the old wires. This was EXTREMELY TEDIOUS to do, but worked with excellent WiFi reception in the 20" build.

If you look at this link from MacTester's HemiMac G4, you'll see what is involved in proper installation of the WiFi for best reception in the 17" models. This was already done for me in the 20" build, so saved me a lot of painstaking work and the risk of damaging the plastic shell.

On another note, maybe you already have your NUC, but there's a vendor on eBay selling the DC3217BY NUC's right now, listing number 380645621820 and he's got a bunch left. I just bought one from him for my upcoming iMac G5 project. These are getting a lot harder to find as time presses on, it might be worth looking at. He took my offer of 150 dollars within minutes of the bid.

Hope all of this helps you out.


Cheers!

Would it be possible for me to route an antenna out of an empty rear IO port? I don't mind having an antenna sticking out the back of the computer. I figure I can just tape it to the base, so that it doesn't get in the way... Would this be possible? Also I'm not getting my NUC until July, so I'm not even thinking about that yet... I do not want to put down money on something I don't know that I can complete.
 
Just a quick note that after updating to 10.9.2 on my Haswell iMac, the system is experiencing random lockups several times per day. Testing it on a backup of 10.9.1 it runs solid. I think I'll restore the backup to my boot drive. Not sure what is causing the hangs, but its not acceptable as is. None of my other NUC builds (non-Haswell) are having any issue with 10.9.2 whatsoever.


EDIT: After 24 hours of testing on 10.9.1 without a single problem, I'm certain that its not a hardware issue, but rather some inconsistency with 10.9.2 of OSX. A quick Google search revealed that the lock-ups are a widespread problem. System is restored back to 10.9.1 now on the boot partition.


Ersterhernd
 
Hi Ersterhernd

Hmm... I've been thinking, if I should buy a Haswell NUC for my next project. I guess the answer is no, because I'm not a fan of patched kernels. By comparison, the DQ77KB with a patched BIOS is a dream, because it allows an almost vanilla OS X installation.

Good luck

MacTester
 
Hi Mactester, yes the kernel patch may be suspect, but with the amount of search results of seen for this on the net, it may not be specific to this patch. MBP's, iMacs etc are having similar issues with 10.9.2 so who knows.

My opinion, for these mods, the older proven i3/i5 NUC's are the way to go, at least for now. The Haswell (for me anyway) has proved too problematic in this type of application to be worth the extra money. Its nearly 3x the price of the DC3217BY in Canada. I installed one into my G5 20" project (in progress) and it was flawless out of the gate. Only paid 150 USD for it.


Cheers!
 
Status
Not open for further replies.
Back
Top