
You are using an out of date browser. It may not display this or other websites correctly.
You should upgrade or use an alternative browser.
You should upgrade or use an alternative browser.
Dell Optiplex 3060 MFF (micro) i3 8100T Mojave 10.14.6 install
- Thread starter fungcie
- Start date
- Status
- Not open for further replies.
- Joined
- May 26, 2020
- Messages
- 2
- Motherboard
- giga b85-d3h
- CPU
- core i3-4160
- Graphics
- hd4400
Help me pleaseyou have to boot with the bootx64.efi. It's a grub command. Not a terminal command.
Attachments
- Joined
- Dec 3, 2019
- Messages
- 16
- Motherboard
- Dell Optiplex 9020 SFF
- CPU
- i7-4790
- Graphics
- GT 710, Intel HD4600
- Mac
- Mobile Phone
If you are working with 1080p monitor, just stay away from this fix. Only do this if you really need 4k!
To make it work with 4K monitor you have to edit the BIOS by yourself. WARNING!!! DO IT ON YOUR OWN RISK. THIS METHOD IS FOR THE DELL OPTIPLEX 3060 MFF only (it might work with SFF or MT but check your BIOS before you do this). It might brick your machine.
After successfully boot, edit the config.plist with clover configurator delete the framebuffer-stolenmem, framebuffer-fbmem and the enable-hdmi20. Reboot again, and set your 4k display resolution in the display preference.
- Create a bootable USB with EFI Shell
- Format a USB 2.0 Stick as FAT32 with MBR named EFI
- Create /EFI/BOOT/
- copy BOOTX64.efi into that folder
- Boot with it
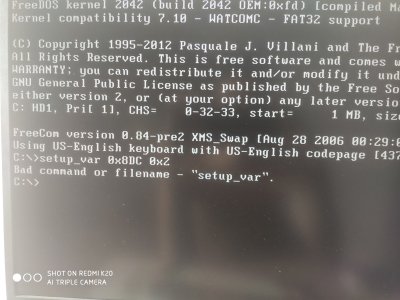
- on grub command type : setup_var 0x8DC to check the current value it should be 0x01
- Change to 0x02 by typing : setup_var 0x8DC 0x2
- Check the value again : setup_var 0x8DC make sure that it is 0x02
- Reboot!
You can have 4K @ 30Hz with the HDMI port and 4K @ 60Hz with the Display Port.
follow this instruction to the letter!!!
- Joined
- Jul 11, 2010
- Messages
- 8
- Motherboard
- H97N-Wifi
- CPU
- i5-4690
- Graphics
- GTX1050Ti
- Mac
- Classic Mac
- Mobile Phone
Hi,
Working on something a tiny bit different here: a 3070 Micro (10.5.5, my 6th or 7th hack, stopped counting), but I made great progress based on Fungcie’s steps here. For example bootx64.efi method from #2, went smooth although there is a typo in it:
Trying to make a media center thingy, and I will possibly try and summarize the result into a guide when I’m done, as it’s been tougher than usual
It’s giving me a hard time just at the end: I got everything set up on a DP display from DP port (DP-DP cable), 60Hz, UHD 630 acceleration (trying different SMBIOS/Framebuffers combos), ALC audio, sleep, etc… All good until I switched to HDMI, and then blank screen all over: not HDMI-HDMI even at 30Hz, not DP-DP cable + DP-HMDI adapter, not even direct DP-HDMI cable, only plain DP-DP cable works…
I started with my own EFI folder (iMac 19,1 or 19,2, iMac 18,1 or 18,2 or 18,3, combined with different Framebuffers) but no luck. Then I tried with your EFI folder (MacMini 8,1 no Intel Inject), and same thing: works in DP-DP but nothing with HDMI in it. I searched around here, couldn’t find anything, and yet, it feels I’m missing something obvious. Any idea?
Thanks all!
Working on something a tiny bit different here: a 3070 Micro (10.5.5, my 6th or 7th hack, stopped counting), but I made great progress based on Fungcie’s steps here. For example bootx64.efi method from #2, went smooth although there is a typo in it:
[I]setup_var 0x8DC 0x2[/I] should be [I]setup_var 0x8DC 0x02[/I] instead, but NBD. Some people say you can also do it with WEG settings, but I never could before I used setup_varTrying to make a media center thingy, and I will possibly try and summarize the result into a guide when I’m done, as it’s been tougher than usual
It’s giving me a hard time just at the end: I got everything set up on a DP display from DP port (DP-DP cable), 60Hz, UHD 630 acceleration (trying different SMBIOS/Framebuffers combos), ALC audio, sleep, etc… All good until I switched to HDMI, and then blank screen all over: not HDMI-HDMI even at 30Hz, not DP-DP cable + DP-HMDI adapter, not even direct DP-HDMI cable, only plain DP-DP cable works…
I started with my own EFI folder (iMac 19,1 or 19,2, iMac 18,1 or 18,2 or 18,3, combined with different Framebuffers) but no luck. Then I tried with your EFI folder (MacMini 8,1 no Intel Inject), and same thing: works in DP-DP but nothing with HDMI in it. I searched around here, couldn’t find anything, and yet, it feels I’m missing something obvious. Any idea?
Thanks all!
- Joined
- Dec 3, 2019
- Messages
- 16
- Motherboard
- Dell Optiplex 9020 SFF
- CPU
- i7-4790
- Graphics
- GT 710, Intel HD4600
- Mac
- Mobile Phone
First of all 0x2 and 0x02 is the same it only representation of number.
And about the hdmi, you should check if your hdmi output port number is different from mine. And change itu accordingly on the device properties. Use hackintool to check the port number of hdmi output.
And about the hdmi, you should check if your hdmi output port number is different from mine. And change itu accordingly on the device properties. Use hackintool to check the port number of hdmi output.
Last edited:
- Joined
- Oct 14, 2014
- Messages
- 2
- Motherboard
- Dell Inspiron 7548
- CPU
- i5-5200U
- Graphics
- HD 620
- Mac
Hi,My Optiplex 3060 micro spec is :
The only problem is you cannot set the DVMT value in the bios menu, so I just add some properties in the devices menu for the igpu to make it work.
- Processor i3 8100T,
- 8 GB DDR4 single channel memory
- 500GB samsung evo pro 970 SSD.
- 500GB Hdd for Windows 10
- Intel HD Graphics 630
- Internal audio : ALC3234
- Realtek RTL 8111HSD-CG Gigabit Ethernet LAN 10/100/1000 Mb/s
- Chipset : H370
- Dell DW1820A wifi and bluetooth card.
GPU acceleration is working
HDMI port is working
HDMI audio is working
All usb is working USB 3.0 and 2.0
Sound inject 13,18,27,30,31 choose base on what you need. Some ports are working some are not.
Internal speaker is working
Ethernet is working
Shutdown is working
Display sleep / wake is working
Dual Boot is working
4K is working with BIOS patch, 30Hz with HDMI, 60Hz with DP.
iCloud is working
iMessage is working
Apps Store is working
Wifi & Bluetooth is working flawlessly
unplug the HDD before you install the OS X to make sure that you install to the correct SSD
Setup Configuration BIOS Guide
BIOS version: 1.2.2
General
System Configuration
- Boot Sequence
- UEFI
- Check in the Disc OS “UEFI: Model SSD”
- Advanced Boot Options
- Check Box “Enable Legacy Option ROMs”
- UEFI Boot Path Security
- Make “Always, Except Internal HDD”
Video
- Integrated NIC
- Make “Enable”
- SATA Operation
- Make “AHCI”
- Drives
- Check “Sata-0” and remove check other boxes
- Smart Reporting
- Remove Check
- Audio
- Check all Box
Security
- Primary Display
- Make Intel HD Graphics
Security Boot
- TPM 2.0 Security
- Make box “TPM On” and remove check other boxes
- Computrace
- Deactivate
Performance
- Security Boot Enable
- Remove Check Box
- Security Boot Mode
- Audit Mode
- Intel Software Guard Extension
- Intel SGX Enable
- Disable
Post Behavior
- Multicore
- All
- Intel SpeedStep
- Remove Check
- C-States Control
- Check Box
- Intel TurboBoost
- Remove Check Box
- HyperThread Control
- Disable
Virtualization Support
- Fastboot
- Thorough
Wireless
- Virtualization
- Remove Check Box
- VT for Direct I/O
- Remove check box
- Wireless Device Enable
- Remove all check box
Download the mojave installer from Apps Store
make the USB installer (you can google how to make it)
Install Clover to the USB installer
Using clover configurator, mount the efi from usb
Download the EFI for optiplex 3060 MFF, extract it, and replace the EFI in the USB installer with it.
Boot the Dell Optiplex 3060 with the USB installer
Using the Disk Util erase the SSD with OSX Journaled format
Install the OS X Mojave
Create EFI partition for Hackintosh
before you login to the icloud make sure that you change the serial number by editing the config.plist by generating new serial and check it on the apple website.
- using terminal locate SSD & USB's disk no. by
- diskutil list
- Create EFI partition for Hackintosh :
- sudo mkdir /Volumes/efidisk
- sudo mount -t msdos /dev/disk{number} /Volumes/efidisk
- Mount USB's EFI partition
- sudo mkdir /Volumes/efiusb
- sudo mount -t msdos /dev/disk{number} /Volumes/efiusb
- Copy clover settings from USB
- cp -R /Volumes/efiusb/* /Volumes/efidisk
Happy Hackintoshing everyone!!!
Is there any guide for dell 3060 MFF i5 8500T 16 GB RAM and 256 M.2 SSD
- Joined
- Oct 11, 2020
- Messages
- 1
- Motherboard
- NP270E5G-XD 1BR
- CPU
- i5 3230m
- Graphics
- 710m
Thanks for the guide!If you are working with 1080p monitor, just stay away from this fix. Only do this if you really need 4k!
To make it work with 4K monitor you have to edit the BIOS by yourself. WARNING!!! DO IT ON YOUR OWN RISK. THIS METHOD IS FOR THE DELL OPTIPLEX 3060 MFF only (it might work with SFF or MT but check your BIOS before you do this). It might brick your machine.
After successfully boot, edit the config.plist with clover configurator delete the framebuffer-stolenmem, framebuffer-fbmem and the enable-hdmi20. Reboot again, and set your 4k display resolution in the display preference.
- Create a bootable USB with EFI Shell
- Format a USB 2.0 Stick as FAT32 with MBR named EFI
- Create /EFI/BOOT/
- copy BOOTX64.efi into that folder
- Boot with it
- on grub command type : setup_var 0x8DC to check the current value it should be 0x01
- Change to 0x02 by typing : setup_var 0x8DC 0x2
- Check the value again : setup_var 0x8DC make sure that it is 0x02
- Reboot!
You can have 4K @ 30Hz with the HDMI port and 4K @ 60Hz with the Display Port.
I have same pc, but SFF. Do you know if this works for 3060 SFF?
- Joined
- Mar 5, 2015
- Messages
- 30
- Motherboard
- MSI-Z170-SLI Plus
- CPU
- i7-7700K
- Graphics
- GTX 1080
- Classic Mac
- Mobile Phone
Digging this topic up ! I've got a working 3060MFF + i5-8500T + Mojave + Clover + 1080p screen on HDMI.If you are working with 1080p monitor, just stay away from this fix. Only do this if you really need 4k!
To make it work with 4K monitor you have to edit the BIOS by yourself. WARNING!!! DO IT ON YOUR OWN RISK. THIS METHOD IS FOR THE DELL OPTIPLEX 3060 MFF only (it might work with SFF or MT but check your BIOS before you do this). It might brick your machine.
After successfully boot, edit the config.plist with clover configurator delete the framebuffer-stolenmem, framebuffer-fbmem and the enable-hdmi20. Reboot again, and set your 4k display resolution in the display preference.
- Create a bootable USB with EFI Shell
- Format a USB 2.0 Stick as FAT32 with MBR named EFI
- Create /EFI/BOOT/
- copy BOOTX64.efi into that folder
- Boot with it
- on grub command type : setup_var 0x8DC to check the current value it should be 0x01
- Change to 0x02 by typing : setup_var 0x8DC 0x2
- Check the value again : setup_var 0x8DC make sure that it is 0x02
- Reboot!
You can have 4K @ 30Hz with the HDMI port and 4K @ 60Hz with the Display Port.
I have received a 2560x1080p HDMI-only screen and expected it to work out of the box with it. It doesnt.
Will this framebuffer tweak 0x01->0x02 work with screen resolutions in between 4K and 1080p (ie 2560x1080) ?
Also do you confirm that the command is `setup_var 0x8DC 0x2` and not `setup_var 0x8DC 0x02` ?
Thanks!
- Joined
- Sep 7, 2012
- Messages
- 60
- Motherboard
- Dell Optiplex 3060 MFF
- CPU
- i5-8500T
- Graphics
- HD 630
can you share your EFI folder? After using OP's EFI, I could not get it to boot after Mojave install. It gets stuck and says "Failed to detect supported SuperIO Chip". I deleted SMCSuperIO.kext in terminal, but it now just gets stuck at the same point without that line. Using -v for verbose did not give me any extra information on screen to see what's broken.Digging this topic up ! I've got a working 3060MFF + i5-8500T + Mojave + Clover + 1080p screen on HDMI.
I have received a 2560x1080p HDMI-only screen and expected it to work out of the box with it. It doesnt.
Will this framebuffer tweak 0x01->0x02 work with screen resolutions in between 4K and 1080p (ie 2560x1080) ?
Also do you confirm that the command is `setup_var 0x8DC 0x2` and not `setup_var 0x8DC 0x02` ?
Thanks!
- Status
- Not open for further replies.
Copyright © 2010 - 2024 tonymacx86 LLC