Contribute
Register

Andrew LB's First G5 Hackintosh Case Conversion...

Status
Not open for further replies.
Joined
May 22, 2013
Messages
10
Motherboard
Asrock z87 Extreme4
CPU
i5-4670K
Graphics
GTX 780
Mac
  1. iMac
  2. Mac Pro
Classic Mac
  1. Power Mac
Mobile Phone
  1. iOS
For many years I've wanted to get my hands on one of these beautiful and incredibly well built PowerMac G5 cases and do a Hackintosh conversion but back when I got the idea they were far too expensive to risk the project on, and in recent years I was just too busy. Well... last week a relative called me and asked if i'd come down to his office to diagnose why his backup graphic design PowerMac G5 dual 1.8 (June 2004) was not booting and after some frustration with the common "3 blinks" memory error, trying other good ram, and many other things... it was deduced that the logic board was shot and in addition to payment for the work, he gave me the computer to do as i see fit. :)

Behold!

Hackintosh_Case.jpg

So I've built a few Hackintosh systems in the past but never the actual case even though I've been modding PCs since AMD released the first Athlon in 1999. I haven't completely decided on the guts but I know I'm going to configure it to retain the rear expansion slots but remove the I/O ports. I plan on using an mATX motherboard so I can also keep the power supply where it belongs, but I'm already in the process of changing out the guts of the PSU with a 600w OCZ I had laying around. I'll have pics of that tonight once I get some time.

So far I've gutted the G5, removed all the stand-offs, and began work on the PSU and Motherboard tray.

Hackintosh_Gutted.jpg

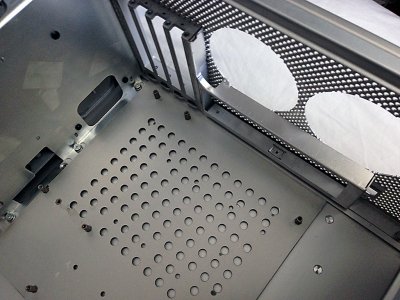
For a motherboard tray, I looked around online at Lian-Li and MountainMods but after some consideration, I realized I had a full aluminum tray collecting dust in my garage which I saved years ago for a project just like this. It came out of a Coolermaster Stacker case and looked like this:

Coolermaster_Tray.jpg

And after removing some rivets, and some slicing and dicing with my angle grinder equipped with a cut-off blade... this is the result:

Hackintosh_Tray.jpg

I also plan on using the part of the tray where the I/O shield snaps in, but I haven't gotten that far yet. I'll be adding more to this thread as work progresses in the coming days. Hope you like things so far.
 
... I haven't completely decided on the guts but I know I'm going to configure it to retain the rear expansion slots but remove the I/O ports. I plan on using an mATX motherboard so I can also keep the power supply where it belongs, but I'm already in the process of changing out the guts of the PSU with a 600w OCZ I had laying around. I'll have pics of that tonight once I get some time...

That motherboard tray and backpane look really nice, I would consider swapping the whole thing in an making room for a full ATX motherboard if I were you. Of course to do this you'll either need to drop the motherboard all the way down to the bottom of the case and top mount your PSU, or move the board upwards and cut clearance in the back of the upper shelf.
 
Dschijn said:
The tray is looking good, will it fit?

You be the judge of that. ;)

Hackintosh_MotherboardFits.jpg

That's a shortened mATX board that I had been using in a media server so when I decide on a proper mATX board, it should be a few inches longer.

rehpotsirhc said:
That motherboard tray and backpane look really nice, I would consider swapping the whole thing in an making room for a full ATX motherboard if I were you. Of course to do this you'll either need to drop the motherboard all the way down to the bottom of the case and top mount your PSU, or move the board upwards and cut clearance in the back of the upper shelf.

I really didn't want to completely butcher the case plus I really like some of the high end mATX boards soon to be released like the Asus Z87 Gryphon seen here:
GRYPHONZ87.jpg

So now that I've got the tray installed properly, right now I'm getting ready to cut the rear of the case and fit the aluminum inset piece which will hold the motherboards I/O shield. Here is a pic of its location being mocked up. I need to trim it a little more though.

Hackintosh_IOposition.jpg

And a few minutes ago I cut a 4.5" hole in the bottom of the stock G5 power supply case for the PSU cooling fan as well as block off the holes where the two 60mm fans were located with a piece of cut aluminum.

Hackintosh_PSUfan.jpg

And as for the corresponding hole cut into the bottom of the G5 case, VOILA!

Hackintosh_Case_Hole.jpg
 
Haha I am currently doing kind of the same with the PSU, but I will use the inside of the case for the fresh air of the PSU. The two 60mm will also be blocked.
How did you cut the holes so nice and round for the 120mm fan in the PSU/ G5 case?
 
Haha I am currently doing kind of the same with the PSU, but I will use the inside of the case for the fresh air of the PSU. The two 60mm will also be blocked.
How did you cut the holes so nice and round for the 120mm fan in the PSU/ G5 case?

I drew the circle using a 120mm fan grill as a template on the outside of the PSU case and cut the hole with my Bosch jigsaw and a standard Bosch blade for metal. I then used a 1" wide half-round metal file to smooth the hole. Then I secured the PSU case into the G5 and set the same 120mm fan grill into the hole which showed me where the center of the outer hole would be and i drilled a small hole on that mark. Lastly, I removed the PSU and turned the G5 upside down and again using the fan grill that originally came out of my power supply, lined it up with the freshly drilled hole and drew the circle.

Now... the actual 120mm hole in the G5 itself is the one you really have to be careful cutting and DON'T USE A STANDARD METAL JIGSAW BLADE! Regular "Metal" or "Bi-metal" blades don't cut Aluminum worth crap because they load up almost instantly. You need a blade with more tooth to it. I would not have attempted this cut without using a blade made by Bosch to specifically cut aluminum. It looks a lot like a wood cutting blade but it's much thinner and will allow you to cut a smooth circle. Here is the same blade I used: http://www.boschtools.com/Products/Accessories/Pages/BoschAccessoryDetail.aspx?pid=T227D#specs

Oh... and make sure you use masking tape or painters tape on the outside of the case so the bottom plate on the jigsaw doesn't scratch up the aluminum.

r46300v33.png


I may sound like a wh0re for Bosch but in the realm of jigsaws, they are heads and shoulders above the competition. I cannot honestly say the same about any other type of power tool, but in this case it's the best.

Even if you don't have one of their Jigsaws, just make sure you use their blades. Most other brands of blades are garbage and tend to walk (not stay where you point the saw) and dull incredibly fast.
 
Put in a little more work today. I finally got around to getting the rear I/O inset piece installed and I'm pleased to say everything lines up. And best of all the I/O shield snaps in and out like it should, so swapping boards will be no problem. Check it out.

Hackintosh_IO_Rear.jpg

Hackintosh_IO_Fit.jpg

I also had my fair share of soldering today. I completely removed all four leads from the PSU that had 4-Pin Molex and SATA power connectors and replaced them with only two leads made from the G5's stock black wiring with two SATA power connectors very close together on one lead for the hard drives and the second lead having only one SATA and one 4-pin molex for the Optical drive and fans when I get to that point. I'm going to get some black mesh wire wrap for the 6-pin PCIe power cable and the auxilary motherboard power connectors. As for the ATX power cable, I'm not sure whether i'm going to shove most of it back inside the PSU or to spend the time shortening it, because right now it looks like hell.

The PSU intake fan lines up perfectly with the hole I cut in the bottom of the case. The funny thing about that mod was how worried I was about getting it right... even though it's hidden from sight and nobody will ever see it.

Hackintosh_PSUIntake.jpg

As for the aluminum PSU cover... the one in my G5 seemed to have had tape or some crap stuck to it in the past and even after cleaning and trying everything from goof-off to Naptha VM&P to denatured alcohol... the marks were still there. So I lightly sanded it down, then wet sanded it to almost a mirror... but that didn't fit the look I wanted so I took my Porter-Cable DA polisher with a scotch brite scrubber pad and knocked it down to a really nice satin shine. Added a coat of Meguiar's Ultimate Synthetic car wax and another buffing with the polisher and here are the results...

Hackintosh_PSUCover.jpg

Hackintosh_PSUCoverInstalled.jpg
 
The bottom Plate looks good! amazing what a little elbow grease can do!! I used the original bottom plate but yours is soo clean
 
So last night I did some fiddling around with the wiring for the front I/O panel and managed to get everything to power up properly and entered the BIOS, so that's an excellent sign. Every time I perform major surgery on a power supply, no matter how careful I am, that first press of the power button is never a very confident one. :)

Also, today I began work on a back plate for the case. After looking at the mountain mods plate and countless ones made by all of you guys, i just couldn't bring myself to actually pay someone to do the work for me. So I asked Siri where some local sheet metal suppliers are near me and after a couple phone calls I was on my way to a place called "Sackin Metals" about 3 miles away in Huntington Beach, CA. They were the only supplier I called that didn't require me to buy a minimum of 12 inches off a 48in wide sheet. So I managed to get a 12"x12" piece of 1/8" aluminum plate for the outstanding price of just $5!!!!

It did have a few scuffs, but those quickly went away after a couple of minutes using my Bosch random orbit sander on it.

Hackintosh_AluminumPlate.jpg

I then drew out all the lines using a carpenters square so everything lined up properly, got out the trusty jigsaw once again and cut out the pattern. I then cleaned up all the cut edges by running a few different files over them, followed by another couple minutes of the power sander.

Here are the results:

Hackintosh_BackPlateCut.jpg

And to check if it fits....

Hackintosh_BackPlateFit.jpg

Indeed it does. Now I just have to mark where I have to remove additional mesh from the back of the case as well as where I plan on drilling and countersinking the mounting holes. I'll do that after dinner.
 
Status
Not open for further replies.
Back
Top