- Joined
- Nov 7, 2010
- Messages
- 155
- Motherboard
- GA-X58A-UD3R
- CPU
- Core i7 950
- Graphics
- AMD Radeon HD 6970
- Mac
- Classic Mac
- Mobile Phone
Why would you mess with your VBIOS!?
If you are anything like me, you are probably nagged by the fact that when you start your lovely hackintosh, instead of a neat and undistorted apple logo, you get something that looks like it has been flattened by a hammer. This was the last time i was going to have this bother me, so I took it upon myself to patch my VESA tables. It goes without saying that when you are editing VBIOSes and flashing them, that you run the chance of making your graphics card into a garbled mess, so please only pursuit at your own risk. It may come in handy to do this on a board that has integrated graphics, as you may need to have the ability to flash if you trash your graphics card
Prerequisites:
-A working windows installation (much easier than OS X unfortunately)
-A Flash drive that has at least 256 MB of storage
-Win98boot.zip (DL: http://www.eocfiles.com/bdc86eb1ed2989c30dcd1902e84939ae/bootdisks/win98boot.zip)
-HP USB Disk Storage Format Tool (DL: http://www.eocfiles.com/bdc86eb1ed2989c30dcd1902e84939ae/bootdisks/SP27608.exe)
-VBIOS Tool in DOS:
AMD CARDS: ATIFLASH.EXE (DL: http://www.techpowerup.com/downloads/2230/atiflash-4-07/)
NVIDIA CARDS: NVFLASH.EXE (DL: http://www.techpowerup.com/downloads/2257/nvflash-5-136/)
-Your Choice of Hex Editor
WINDOWS: 010 Editor (DL: http://download.cnet.com/010-Editor/3000-2352_4-10226087.html)
OS X HexEdit (DL: http://sourceforge.net/projects/hexedit/files/HexEdit/HexEdit v2.20/HexEdit_220.dmg/download)
Making your bootable DOS Flash Drive
1. Extract you win98boot.zip to a place where you may easily find it.
2. Go through the installer for the HP USB Disk Format Tool.
3. Open the HP USB Disk Format Tool. Ensure that the flash drive you wish to format is selected. Also ensure the filesystem is FAT32. Label the volume whatever you please, but for myself I will name it "DOS". Lastly, select "Quick Format" and "Create a DOS startup disk". To finish, point the tool to the recently extracted win98boot.zip and click start. Give the tool roughly 3 minutes and then you should have a bootable DOS USB stick.
4. Now that your USB disk has been made bootable, we need to copy over the necessary files for extraction and flashing of your card's ROM. Please drop either ATIFLASH.EXE or NVFLASH.EXE, depending on the brand of your card, into the root of the flash drive. Eject then plug this into your hackintosh that we will be editing.
Extracting your vBIOS
1. Boot up your hackintosh, and when you reach your BIOS splash screen, press the key assigned to "Boot Options". In my case, I will press F12. Then, choose your DOS disk that we just made for the boot device. In about 5 seconds the win98 splash screen should flash and then you should reach an empty "C:/>" prompt.
2. From here we will confirm that the card we are modifying is the ONLY adapter that the flashing tool is aware of. If you do not make sure of this, then you may flash an incorrect vBIOS to an adapter down the road. to do this, type one of the following respective to the tool that you are using:
Hopefully, you should only see one adapter. Mark down your card's identifier number, as this is handy in what we will do later, as well as if you have multiple cards so you make sure the BIOS is sent to the correct card. This identifier will be referred to as X in the commands after this.
3. Now we will extract the VBIOS found on your card. This will be what we make our edits to. It is also EXTREMELY helpful to have a backup of your stock ROM if you manage to shoehorn a bad BIOS onto your card. To do this, like before, enter one of the following respective to the tool that you are using:
Editing VBIOS
1. Now that you have your ROM backed up, start up the system that you will be doing the BIOS editing on. I have a bias for HexEdit on mac, so I'll be doing my edits there. Plug in your USB to the system AND MAKE A COPY of the ROM to your desktop for editing. I cannot stress it enough as to how important it is to not edit the original copy! If you screw up your card and you don't have a backup then you've just landed yourself in some pretty hot water.
2. Open the copied rom with your hex editor of choice and we will get the show on the road. Lets start by considering your resolution of choice. For many of us, including myself, our monitors are 1920x1080. So lets take this apart. All changes we will be making are in BYTE FLIPPED hex, so we will need to convert them. To convert your values to hex, then I suggest that you visit the website at the bottom of this step. However, then you will need to byte flip, which I will demonstrate below.
http://www.binaryhexconverter.com/decimal-to-hex-converter
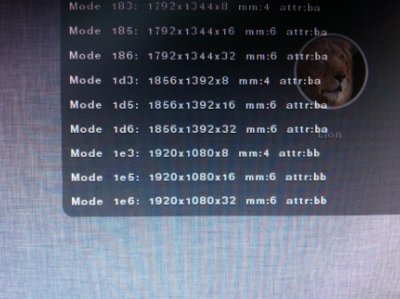
3. Now, it is necessary to hijack one of the existing VESA tables to inject our own custom resolution. In my case, I already had 1920x1440 on my AMD 6870. So, for me, I will find the VESA table for 1920x1440 and change 1440 to 1080. If you are not aware of what your VESA tables/resolutions are, I suggest that when you are in Chameleon/Chimera, type in "?video" to go through a full list of available options.
4. To hunt down your VESA table you are going to hijack, you need to convert to byte flipped hex like we did above. Then you will tell the tool to find the horizontal or vertical resolution in byte flipped hex, depending on which you have entered. If you're a lucky duck like me, then you will only have one instance of it. It should look something like what i have below. If not, then you will need to confirm that you are actually editing the table, not BIOS code, by confirming with the proceeding methods.
NOTE: You may have multiple legitimate tables for the resolution you queried. This is because of the various color depths that the VESA tables may support. In this case, you will want to change every instance of the resolution you are hijacking, so long as you confirm you are changing the VESA table and not damaging the assembly code.
4a. When confirming the table with AMD ROMs, the resolution is separated by two bytes, meaning that in my case, that when I searched for my Vertical resolution, 1440 or A0 05, two bytes, or pairs, behind it I should find 1920, or 80 07. Mine looks like this unedited
4b. When confirming the table with Nvidia ROMs, the resolution, vertical resolution should immediately follow the horizontal resolution, and should look like so for the example 320x200:
5. Now I am going to replace every instance of the resolution I am hijacking with my resolution of choice, which is 1920x1080. When finished, my 1920x1080 table should look like one of the following, depending on which brand of card I have.
NOTE: AMD Users, DO NOT copy and paste what my table looks like, as the bytes in between may be unique to whatever card you may be using, and it is best not to tamper with them.
5a. AMD
5b. Nvidia
6. Now that we have concluded our editing, save a copy of your newly created ROM with a name to identify it as edited. In my case, I will name mine "6870_NEW.ROM". Now just move a copy to the root of your DOS USB drive and we are ready to flash to your card!
Flashing your VBIOS
1. Plug in your DOS USB stick, with the included ROM files, boot your hackintosh, open your "Boot Options" like before, again, in my case it is F12, and select USB as your boot media. Once at the C:\> prompt, we will be preparing to flash the card.
2. Like before, we will want to confirm that your card is the sole card recognized by the tool, and mark down the identifier for the card. If your card isn't the only attached adapter, then the identifier will help greatly in directing the tool to the proper card.
Again, the identifier will be referred to as "X" in the following commands.
3. Now we are ready to flash the BIOS to the card. To do so, you will enter one of the following commands, respectful to your brand. It is worth noting that usually the tools will checksum the file to make sure it is legit. Since we have edited them, the checksums will not match. As a bypass, the -f and -4 force flags are included in the commands to ignore the difference.
After this, your flashing should go successfully. If you receive any error codes, then proceed with caution. If you lack an integrated GPU, I suggest that you go ahead and undo the ROM by flashing the backup we put on the drive using one of the above commands. If you do, then you may restart to see if you had a successful flash, if not, your cards fan may speed up to a very noisy state, and not get a BIOS splash screen. In this case, swap your display over to integrated, start up DOS, and flash your backup using the above commands. No harm done.
4. If it all went over smoothly, then reboot and see if you get output. If so, you are pretty much in the clear, but there is one last step to this puzzle.
Configuring Chimera/Chameleon for your newly added resolution
1. Start up your system and boot with Chimera/Chameleon. When you see the screen for your bootloader, enter ?video again and check and see if your new resolution is in the VESA modes. If so, its on to the last step. Boot up your OS X installation so that we may continue.
2. Firstly, we need to make a change to org.chameleon.Boot.plist. This can be found in your Extra folder at the root of your OS X partition. Now, you will want to enter the following string into your Boot.plist, AFTER the last "<string></string>" entry and BEFORE </dict>. Swap out "1920x1080x32" with your respective resolution, including "x32" at the end. Make these changes uniform with your Boot.plist by pressing TAB in front of them.
3. Now, to conclude, there are four values in your theme that we need to change. Open up /Extra/Themes/Default/theme.plist and find the following in it. Worth noting that these strings may be separated and scattered throughout the plist file.
Now, change the values like so, and make the changes respective to your monitor's resolution.
4. Save, reboot and voila! A beautiful hackintosh that is one step closer to a real mac!
Conclusion
Just letting you know, as I said before, I am not liable for any damage caused to hardware from this guide. Do so at your own risk. However, post with a reply here and I will gladly help you. Au revoir!
If you are anything like me, you are probably nagged by the fact that when you start your lovely hackintosh, instead of a neat and undistorted apple logo, you get something that looks like it has been flattened by a hammer. This was the last time i was going to have this bother me, so I took it upon myself to patch my VESA tables. It goes without saying that when you are editing VBIOSes and flashing them, that you run the chance of making your graphics card into a garbled mess, so please only pursuit at your own risk. It may come in handy to do this on a board that has integrated graphics, as you may need to have the ability to flash if you trash your graphics card
Prerequisites:
-A working windows installation (much easier than OS X unfortunately)
-A Flash drive that has at least 256 MB of storage
-Win98boot.zip (DL: http://www.eocfiles.com/bdc86eb1ed2989c30dcd1902e84939ae/bootdisks/win98boot.zip)
-HP USB Disk Storage Format Tool (DL: http://www.eocfiles.com/bdc86eb1ed2989c30dcd1902e84939ae/bootdisks/SP27608.exe)
-VBIOS Tool in DOS:
AMD CARDS: ATIFLASH.EXE (DL: http://www.techpowerup.com/downloads/2230/atiflash-4-07/)
NVIDIA CARDS: NVFLASH.EXE (DL: http://www.techpowerup.com/downloads/2257/nvflash-5-136/)
-Your Choice of Hex Editor
WINDOWS: 010 Editor (DL: http://download.cnet.com/010-Editor/3000-2352_4-10226087.html)
OS X HexEdit (DL: http://sourceforge.net/projects/hexedit/files/HexEdit/HexEdit v2.20/HexEdit_220.dmg/download)
Making your bootable DOS Flash Drive
1. Extract you win98boot.zip to a place where you may easily find it.
2. Go through the installer for the HP USB Disk Format Tool.
3. Open the HP USB Disk Format Tool. Ensure that the flash drive you wish to format is selected. Also ensure the filesystem is FAT32. Label the volume whatever you please, but for myself I will name it "DOS". Lastly, select "Quick Format" and "Create a DOS startup disk". To finish, point the tool to the recently extracted win98boot.zip and click start. Give the tool roughly 3 minutes and then you should have a bootable DOS USB stick.
4. Now that your USB disk has been made bootable, we need to copy over the necessary files for extraction and flashing of your card's ROM. Please drop either ATIFLASH.EXE or NVFLASH.EXE, depending on the brand of your card, into the root of the flash drive. Eject then plug this into your hackintosh that we will be editing.
Extracting your vBIOS
1. Boot up your hackintosh, and when you reach your BIOS splash screen, press the key assigned to "Boot Options". In my case, I will press F12. Then, choose your DOS disk that we just made for the boot device. In about 5 seconds the win98 splash screen should flash and then you should reach an empty "C:/>" prompt.
2. From here we will confirm that the card we are modifying is the ONLY adapter that the flashing tool is aware of. If you do not make sure of this, then you may flash an incorrect vBIOS to an adapter down the road. to do this, type one of the following respective to the tool that you are using:
Code:
ATIFLASH -i
Code:
NVFLASH --listHopefully, you should only see one adapter. Mark down your card's identifier number, as this is handy in what we will do later, as well as if you have multiple cards so you make sure the BIOS is sent to the correct card. This identifier will be referred to as X in the commands after this.
3. Now we will extract the VBIOS found on your card. This will be what we make our edits to. It is also EXTREMELY helpful to have a backup of your stock ROM if you manage to shoehorn a bad BIOS onto your card. To do this, like before, enter one of the following respective to the tool that you are using:
Code:
ATIFLASH -s X CHOOSEYOURNAME.ROM
Code:
NVFLASH -b CHOOSEYOURNAME.ROMEditing VBIOS
1. Now that you have your ROM backed up, start up the system that you will be doing the BIOS editing on. I have a bias for HexEdit on mac, so I'll be doing my edits there. Plug in your USB to the system AND MAKE A COPY of the ROM to your desktop for editing. I cannot stress it enough as to how important it is to not edit the original copy! If you screw up your card and you don't have a backup then you've just landed yourself in some pretty hot water.
2. Open the copied rom with your hex editor of choice and we will get the show on the road. Lets start by considering your resolution of choice. For many of us, including myself, our monitors are 1920x1080. So lets take this apart. All changes we will be making are in BYTE FLIPPED hex, so we will need to convert them. To convert your values to hex, then I suggest that you visit the website at the bottom of this step. However, then you will need to byte flip, which I will demonstrate below.
http://www.binaryhexconverter.com/decimal-to-hex-converter
Code:
 Decimal = Hex = Byte flipped
1234 = ABCD = CD AB
1920 = 780 or 0780 = 80 07
1080 = 438 or 0438 = 38 04
3. Now, it is necessary to hijack one of the existing VESA tables to inject our own custom resolution. In my case, I already had 1920x1440 on my AMD 6870. So, for me, I will find the VESA table for 1920x1440 and change 1440 to 1080. If you are not aware of what your VESA tables/resolutions are, I suggest that when you are in Chameleon/Chimera, type in "?video" to go through a full list of available options.
Code:
?video4. To hunt down your VESA table you are going to hijack, you need to convert to byte flipped hex like we did above. Then you will tell the tool to find the horizontal or vertical resolution in byte flipped hex, depending on which you have entered. If you're a lucky duck like me, then you will only have one instance of it. It should look something like what i have below. If not, then you will need to confirm that you are actually editing the table, not BIOS code, by confirming with the proceeding methods.
NOTE: You may have multiple legitimate tables for the resolution you queried. This is because of the various color depths that the VESA tables may support. In this case, you will want to change every instance of the resolution you are hijacking, so long as you confirm you are changing the VESA table and not damaging the assembly code.
4a. When confirming the table with AMD ROMs, the resolution is separated by two bytes, meaning that in my case, that when I searched for my Vertical resolution, 1440 or A0 05, two bytes, or pairs, behind it I should find 1920, or 80 07. Mine looks like this unedited
Code:
1920x1440=
80 07 A8 02 A0 05
4b. When confirming the table with Nvidia ROMs, the resolution, vertical resolution should immediately follow the horizontal resolution, and should look like so for the example 320x200:
Code:
320x200=
40 01 C8 00
5. Now I am going to replace every instance of the resolution I am hijacking with my resolution of choice, which is 1920x1080. When finished, my 1920x1080 table should look like one of the following, depending on which brand of card I have.
NOTE: AMD Users, DO NOT copy and paste what my table looks like, as the bytes in between may be unique to whatever card you may be using, and it is best not to tamper with them.
5a. AMD
Code:
1920x1080=
80 07 A8 02 38 04
5b. Nvidia
Code:
1920x1080=
80 07 38 04
6. Now that we have concluded our editing, save a copy of your newly created ROM with a name to identify it as edited. In my case, I will name mine "6870_NEW.ROM". Now just move a copy to the root of your DOS USB drive and we are ready to flash to your card!
Flashing your VBIOS
1. Plug in your DOS USB stick, with the included ROM files, boot your hackintosh, open your "Boot Options" like before, again, in my case it is F12, and select USB as your boot media. Once at the C:\> prompt, we will be preparing to flash the card.
2. Like before, we will want to confirm that your card is the sole card recognized by the tool, and mark down the identifier for the card. If your card isn't the only attached adapter, then the identifier will help greatly in directing the tool to the proper card.
Code:
ATIFLASH -i
Code:
NVFLASH --listAgain, the identifier will be referred to as "X" in the following commands.
3. Now we are ready to flash the BIOS to the card. To do so, you will enter one of the following commands, respectful to your brand. It is worth noting that usually the tools will checksum the file to make sure it is legit. Since we have edited them, the checksums will not match. As a bypass, the -f and -4 force flags are included in the commands to ignore the difference.
Code:
ATIFLASH -f -p X YOUREDITEDBIOS.ROM
Code:
NVFLASH -iX -4 -5 -6 YOUREDITEDBIOS.ROMAfter this, your flashing should go successfully. If you receive any error codes, then proceed with caution. If you lack an integrated GPU, I suggest that you go ahead and undo the ROM by flashing the backup we put on the drive using one of the above commands. If you do, then you may restart to see if you had a successful flash, if not, your cards fan may speed up to a very noisy state, and not get a BIOS splash screen. In this case, swap your display over to integrated, start up DOS, and flash your backup using the above commands. No harm done.
4. If it all went over smoothly, then reboot and see if you get output. If so, you are pretty much in the clear, but there is one last step to this puzzle.
Configuring Chimera/Chameleon for your newly added resolution
1. Start up your system and boot with Chimera/Chameleon. When you see the screen for your bootloader, enter ?video again and check and see if your new resolution is in the VESA modes. If so, its on to the last step. Boot up your OS X installation so that we may continue.
2. Firstly, we need to make a change to org.chameleon.Boot.plist. This can be found in your Extra folder at the root of your OS X partition. Now, you will want to enter the following string into your Boot.plist, AFTER the last "<string></string>" entry and BEFORE </dict>. Swap out "1920x1080x32" with your respective resolution, including "x32" at the end. Make these changes uniform with your Boot.plist by pressing TAB in front of them.
Code:
<key>Graphics Mode</key>
<string>1920x1080x32</string>
3. Now, to conclude, there are four values in your theme that we need to change. Open up /Extra/Themes/Default/theme.plist and find the following in it. Worth noting that these strings may be separated and scattered throughout the plist file.
Code:
<key>boot_width</key>
<string>1024</string>
<key>boot_height</key>
<string>768</string>
<key>screen_width</key>
<string>1024</string>
<key>screen_height</key>
<string>768</string>
Now, change the values like so, and make the changes respective to your monitor's resolution.
Code:
<key>boot_width</key>
<string>1920</string>
<key>boot_height</key>
<string>1080</string>
<key>screen_width</key>
<string>1920</string>
<key>screen_height</key>
<string>1080</string>
4. Save, reboot and voila! A beautiful hackintosh that is one step closer to a real mac!
Conclusion
Just letting you know, as I said before, I am not liable for any damage caused to hardware from this guide. Do so at your own risk. However, post with a reply here and I will gladly help you. Au revoir!