- Joined
- Feb 20, 2015
- Messages
- 269
- Motherboard
- Asus P6T SE
- CPU
- 2.81 GHz Intel Core i7
- Graphics
- Nvidia GTX 650 ti 1024 MB
- Mac
- Mobile Phone
Mod About This Mac - Overview Yosemite
Introduction
Welcome. First of all, I will explain why I made this guide. Later on you will see instructions how to customise certain aspects of the ‘About This Mac’ window, i.e. the picture and your Mac’s model / name. There should be no problems at all if this guide is followed by letter, though I am not responsible for any changes you make to your PC / Mac.
I want to mention the guide from king13p which provided me with a lot of information: http://www.tonymacx86.com/general-help/79536-mod-about-mac.html. All credits to the owner and the posters, who found many different ways to modify the About This Mac - panel. However, the original post was made in November 2012 for Mountain Lion. Things have changed by now, especially for Yosemite. Browsing all 24 pages of the thread will provide you with enough information to adjust most of the panel, but it lacks clear overview. With this thread I want to help people and give them an easy step-by-step tutorial to achieve what they want without any frustrations and the need to search for hours. Please don’t consider it a ripoff.
Before you start
You should know that all changes you make as per guide are for ONE system language. If you change your language, you will have to edit the files again because different languages have different system folders. If you go back to your original language, changes will be visible again.
Note: I can not yet figure out how to change the GPU on Yosemite. As soon as I know how, I will adjust this thread.
Below a list with software you have to download.
- Gimp, Photoshop or any other photo editing software.
- Xcode* and/or TextWrangler, both downloadable trough the Appstore.
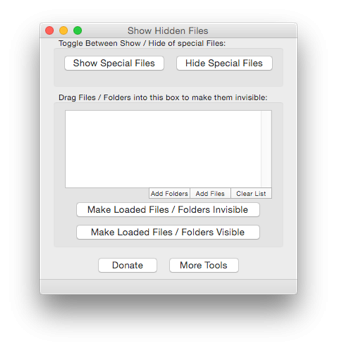
- ShowHiddenFiles
Xcode
Textwrangler
Show hidden files
As you follow this guide, you will have to edit files that can only be seen if you enable ‘show hidden files’. There is no ‘standard’ way to do this, since Apple has not added an option to do so in the System Preferences. There are two methods; via terminal or via a small free third party application, ShowHiddenFiles. I recommend the last option. It’s just a bit easier to press a button rather than using a command via terminal which you probably have to look up every time you want to use it.
Download: http://www.macupdate.com/app/mac/32882/showhiddenfiles

If you prefer terminal, do the following:
- Open spotlight via ⌘ + space, type terminal and press enter.
- Enter the following command.
Code:
defaults write com.apple.finder AppleShowAllFiles YESThen
Code:
killall FinderHidden files are now visible; they are shown as transparent. If you want them to be hidden again, replace YES with NO.
Changing the picture
Probably the most wanted modification; replacing the About This Mac’s picture. This is, just like the other parts of this guide, pretty straightforward.
First, you will have to navigate to Applications/Utilities. Find System Information and show it’s package contents with a right mouse button -click. Make sure hidden files are visible and look for SystemLogo.tiff. Replace it with any other 512x512 .tiff file, and you are done! I am not exactly sure if the size does matter a lot, but I’d rather stick with the standard size.
Creating a decent PC picture
Before you read further, you will have to download photo editing software such as Gimp (free) or Photoshop (paid). I use GIMP myself and it works like a charm. I will therefore use GIMP as the example in this section.
The easiest way to do this is to search the internet for a picture of your case with a transparent background. A background is transparent if it has a pattern of two different grey-colored squares (as seen on the picture below). Once you have found it, save the image and open it in GIMP.
If you couldn’t find a picture with a transparent background, follow these steps at the end of this section. Then continue.
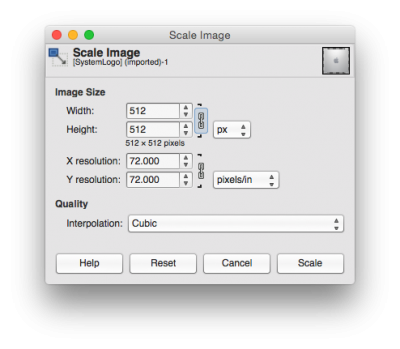
First we have to resize the picture. My original picture was 256x256 and resizing it to 512x512 made it look a bit blurry. This however has no impact on the picture shown at the About This Mac panel. Look for Image in your Mac task bar and select it. Now click on Scale Image. Change whatever values your image has to 512x512.


After we have done that, the last thing we have to do is export it to .tiff. Simply press ⇧⌘E (File -Export As…) and expand the tab at the button of the new window. Search for .tiff, select it and export it to your desktop (or whatever other location you can easily access) and follow the steps explained one section above.
No transparent background:
If your case picture does not have a transparent background it will most likely be white. Making the white transparent instead is not hard and can be achieved by following these steps:
Save the image to your desktop. Now open it with Preview (default opened by double-clicking the file) and select the toolbox button.
This will give you a small menu with a few buttons. The one we need is the little wizard staff,
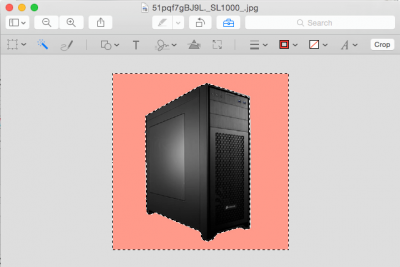
instant alpha. Click on it, and then click on the white part of your picture. Drag your mouse till the white turns red. Make sure you don’t drag too far because it will then remove parts from your case as well. It will now create a border around the white parts. Press backspace. It will give you popup
that the image has to be converted to PNG. Click on Convert. Now save your image and go back to the beginning of this section.

Changing model name
Open Finder and navigate to your user profile. Next, navigate to Library. Your library folder should be transparent like the picture below. Open it. If it doesn’t open by double-clicking, use your right mouse button to open it in a new finder tab. Now find the Preferences folder. In this folder you will find SystemProfiler.plist. This is what we need.
In short: /Users/*Username*/Library/Preferences. Quick navigate via ⌘ + shift + G.

Open SystemProfiler.plist and search for your current model name. Replace it with whatever you want, and this part is done! If you use TextWrangler, do not change anything but your model name. If you accidentally make changes to the code, you will have no success and it might give you problems instead.
Changing memory
Open Finder and navigate to your Applications folder. Go to Utilities and search for System Information. Press your right mouse button and select Show Package Contents. You will see a folder named Contents. Open it and head to Resources. Within this folder you will see another folder named *language*.lproj. If your system language is English, the folder will be named English.lproj which contents a file named SPInfo.strings.
In short: /Applications/Utilities/System Information.app/Contents/Resources/Language.lproj/SPInfo.strings/.
Once again, make sure that hidden files are visible. You won’t be able to edit a file if you can’t see it.
Since you don’t have the rights to edit SPInfo.strings and save it, you will have to create a copy, place it on your desktop (or any other location) and edit this duplicate.
Open it and search for MAC_MEMORY_TEXT = "%@ %@“;
Replace the text colored in pink with whatever you want.
Changing Processor
Note: changing your CPU is a bit different because there are two options; a ‘known’ or an ‘unknown’ CPU. Known means OSX detects a certain processor which will be displayed at the about this mac panel. This can either be right or wrong. Unknown means your CPU will be listed as Unkown. Currently, modifying your CPU is only possible if you have an unknown CPU. Fortunately the known CPU’s are often quite accurate.
Navigate to /System/Library/PrivateFrameworks/AppleSystemInfo.framework/Versions/A/Resources/Language.lproj/AppleSystemInfo.strings. Quick navigate via ⌘ + shift + G.
Drag AppleSystemInfo.strings to your desktop and open it with TextWrangler. Go to line 85 and 86. You will see the following:
Now change Unknown to whatever you want it to be.
Thank you for reading this overview. If you have any criticism, feedback or anything else to say, please do. It is appreciated.
Best regards, Thij.
Last edited:
