
- Joined
- Sep 21, 2010
- Messages
- 13,414
- Motherboard
- HP 17" 17-by3053cl
- CPU
- i5-1035G1
- Graphics
- Intel UHD Graphics, 1920x1080
- Mac
- Classic Mac
- Mobile Phone
The following procedure works on both of my Z68X-UD3H systems - Zorro using HD3000 & Son of Zorro using an AMD/ATI 6850 graphics card. 
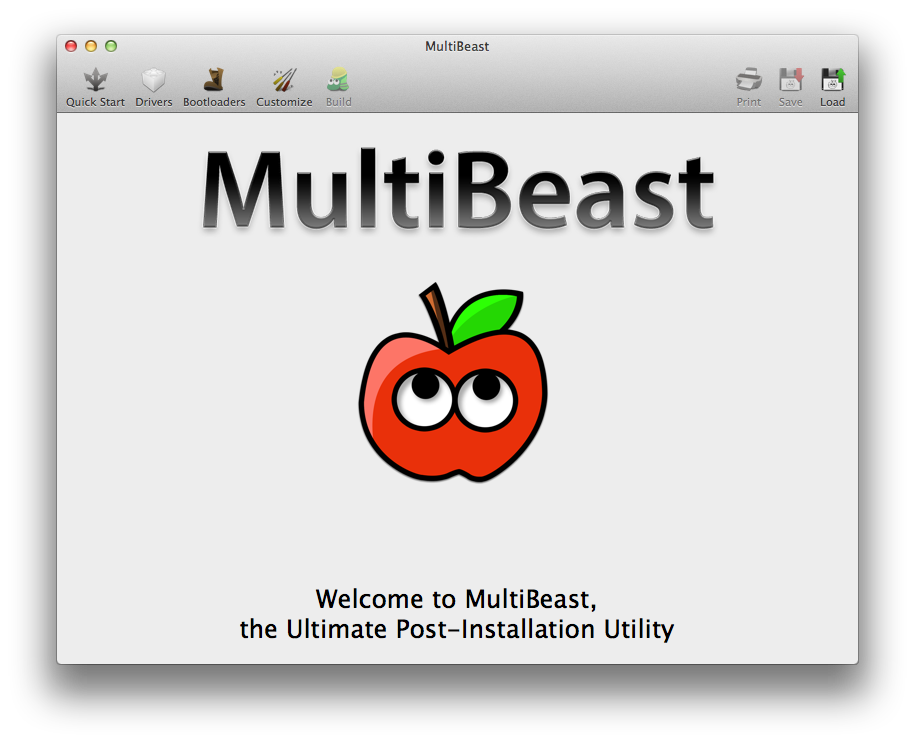
I've updated to Mavericks, and it was soooo easy using the latest UniBeast and MultiBeast for Mavericks. So, if you want to update, here's how to do it.
I'll go into more detail in my build description soon showing an upgrade and a fresh install. For now, I'm installing Mavericks on top of my production Mountain Lion 10.8.5 build (after backup it up, of course). Here's my procedure.
 Download the latest version of UniBeast and MultiBeast for Mavericks;
If you're not currently using a DSDT, download the DSDT for your BIOS version from the tonymacx86 DSDT Database;
Log into the Apple MAS and download Mavericks;
Prepare the UniBeast USB thumb drive using (of course) UniBeast, but don't run it yet;
Put MultiBeast for Mavericks and your DSDT on your UniBeast USB thumb drive;
Now, repair Permissions on your current OS X drive using the Disk Utility on the drive to be updated;*
Backup your current system with Time Machine or Carbon Copy Cloner or SuperDuper;
Insert the UniBeast USB thumb drive and reboot;
Modify your BIOS to change the boot order and first boot device to the UniBeast USB thumb drive;
Save the BIOS changes and reboot;
Upon booting into the Chimera OS Section screen, chose the USB thumb drive and install Mavericks;
When the installation has complete, Mavericks will automatically reboot;
Upon booting into the Chimera OS Section screen, chose your Mavericks installation;
Copy MultiBeast from the UniBeast USB thumb drive onto the desktop;
If you're not yet using a DSDT, copy the DSDT from the UniBeast USB thumb drive onto the desktop and rename it to DSDT.aml;
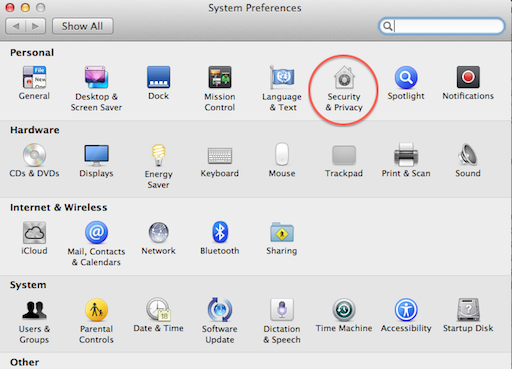
Before running MultiBeast for Mavericks, open the Security & Privacy Preference Pane in System Preferences, which is located in your Dock, and:
 In the lower left corner, click on the padlock and type in your Admin username & password;
 Click on the General tab if it isn't already highlighted;
Click on the "Anywhere" radio button under "Allow applications and downloaded from:" and
Close the System Preferences window. Run the MultiBeast for Mavericks and do a complete configuration load as I did below (Note that I have not listed the MultiBeast 6 defaults, just the choices I made for Zorro's configuration):

 Note: See page 3 of the MultiBeast Guide located at http://multibeast.com/ for the Default loads for UserDSDT, DSDT Free or EasyBeast. The new on-line document is a good read. OR use the MultiBeast Help menu choice for the same information.
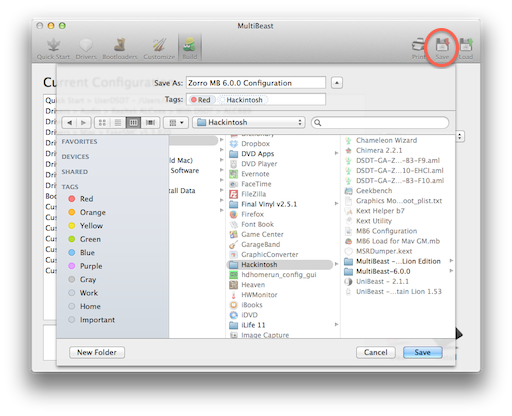
Save your configuration (new capability with MultiBeast for Mavericks) for use with later OS X updates;
Click the Install button;
Reboot in the BIOS and reassign your drives to boot the Mavericks drive and save;
At the Chimera boot screen, hit the keyboard's Spacebar to stop the auto load;
Tap the Spacebar again to open the load options window, input "UseKernelCache=No" and hit Return to load Marvericks; and
Repair Permissions again.*
And we're now Surfing at the Mavericks.
Update: My Zorro build description has now been updated to reflect the Mavericks installation with MultiBeast For Mavericks configuration screen snapshots. I've also attached my MultiBeast configuration file for those of you that have the same configuration.
* You can use the Terminal instead of Disk Utility if you feel comfortable with a UNIX command:
I've updated to Mavericks, and it was soooo easy using the latest UniBeast and MultiBeast for Mavericks. So, if you want to update, here's how to do it.
I'll go into more detail in my build description soon showing an upgrade and a fresh install. For now, I'm installing Mavericks on top of my production Mountain Lion 10.8.5 build (after backup it up, of course). Here's my procedure.
Download the latest version of UniBeast and MultiBeast for Mavericks; If you're not currently using a DSDT, download the DSDT for your BIOS version from the tonymacx86 DSDT Database; Log into the Apple MAS and download Mavericks; Prepare the UniBeast USB thumb drive using (of course) UniBeast, but don't run it yet; Put MultiBeast for Mavericks and your DSDT on your UniBeast USB thumb drive; Now, repair Permissions on your current OS X drive using the Disk Utility on the drive to be updated;* Backup your current system with Time Machine or Carbon Copy Cloner or SuperDuper; Insert the UniBeast USB thumb drive and reboot; Modify your BIOS to change the boot order and first boot device to the UniBeast USB thumb drive; Save the BIOS changes and reboot; Upon booting into the Chimera OS Section screen, chose the USB thumb drive and install Mavericks; When the installation has complete, Mavericks will automatically reboot; Upon booting into the Chimera OS Section screen, chose your Mavericks installation; Copy MultiBeast from the UniBeast USB thumb drive onto the desktop; If you're not yet using a DSDT, copy the DSDT from the UniBeast USB thumb drive onto the desktop and rename it to DSDT.aml; Before running MultiBeast for Mavericks, open the Security & Privacy Preference Pane in System Preferences, which is located in your Dock, and:
In the lower left corner, click on the padlock and type in your Admin username & password;
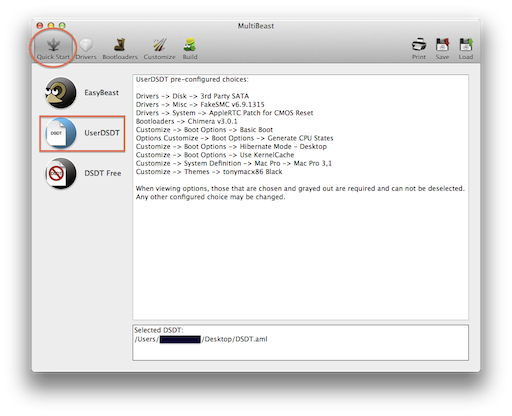
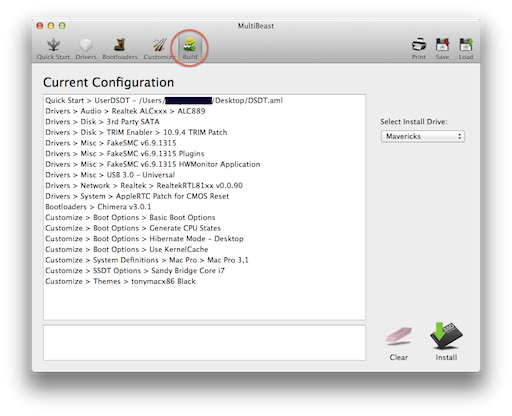
Click on the General tab if it isn't already highlighted; Click on the "Anywhere" radio button under "Allow applications and downloaded from:" and Close the System Preferences window. Run the MultiBeast for Mavericks and do a complete configuration load as I did below (Note that I have not listed the MultiBeast 6 defaults, just the choices I made for Zorro's configuration):Quick Start > UserDSDT - /Users/Stork/Desktop/DSDT.aml <--- loads the defaults
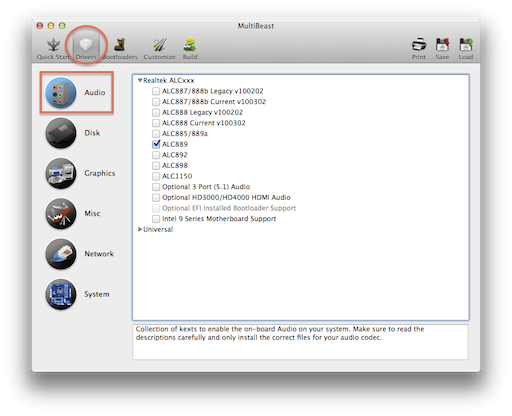
Drivers > Audio > Realtek ALCxxx > With DSDT > ALC889
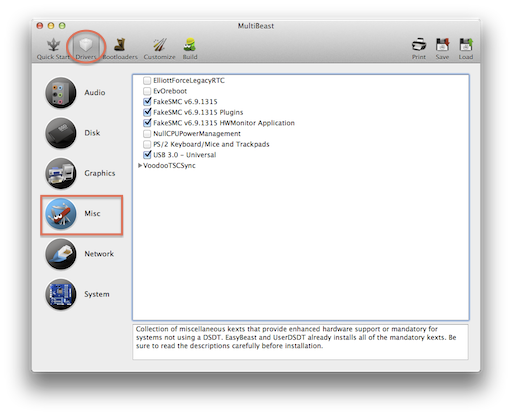
Drivers > Misc > FakeSMC Plugins
Drivers > Misc > FakeSMC HWMonitor Application
Drivers > Misc > USB 3.0 - Universal by Zenith432
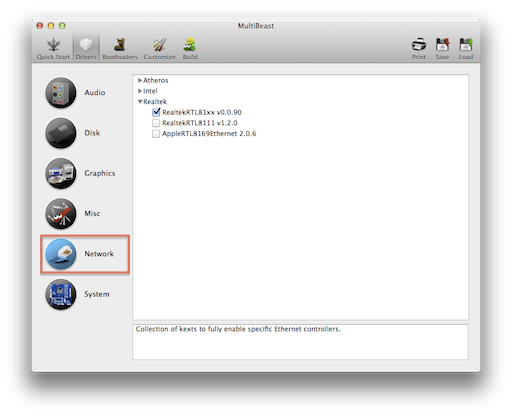
Drivers > Network > Realtek - Lnx2Mac's RealtekRTL81xx v0.0.90
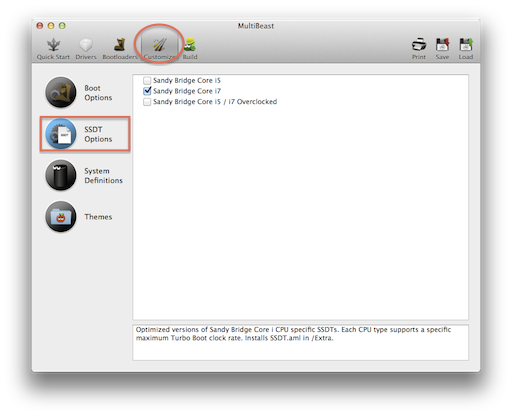
Customize > SSDT Options > Sandy Bridge Core i7
Drivers > Audio > Realtek ALCxxx > With DSDT > ALC889
Drivers > Misc > FakeSMC Plugins
Drivers > Misc > FakeSMC HWMonitor Application
Drivers > Misc > USB 3.0 - Universal by Zenith432
Drivers > Network > Realtek - Lnx2Mac's RealtekRTL81xx v0.0.90
Customize > SSDT Options > Sandy Bridge Core i7
Audio
Disk

Misc
Network
SSDT
Disk
Misc
Network
SSDT
Save your configuration (new capability with MultiBeast for Mavericks) for use with later OS X updates; Click the Install button; Reboot in the BIOS and reassign your drives to boot the Mavericks drive and save; At the Chimera boot screen, hit the keyboard's Spacebar to stop the auto load; Tap the Spacebar again to open the load options window, input "UseKernelCache=No" and hit Return to load Marvericks; and Repair Permissions again.*And we're now Surfing at the Mavericks.
Update: My Zorro build description has now been updated to reflect the Mavericks installation with MultiBeast For Mavericks configuration screen snapshots. I've also attached my MultiBeast configuration file for those of you that have the same configuration.
* You can use the Terminal instead of Disk Utility if you feel comfortable with a UNIX command:
Code:
sudo diskutil repairPermissions /Attachments
Last edited by a moderator:
