Contribute
Register

Ersterhernds iMac G5 (iSight 17) Project

Status
Not open for further replies.
Build Log 13 -- USB Hub

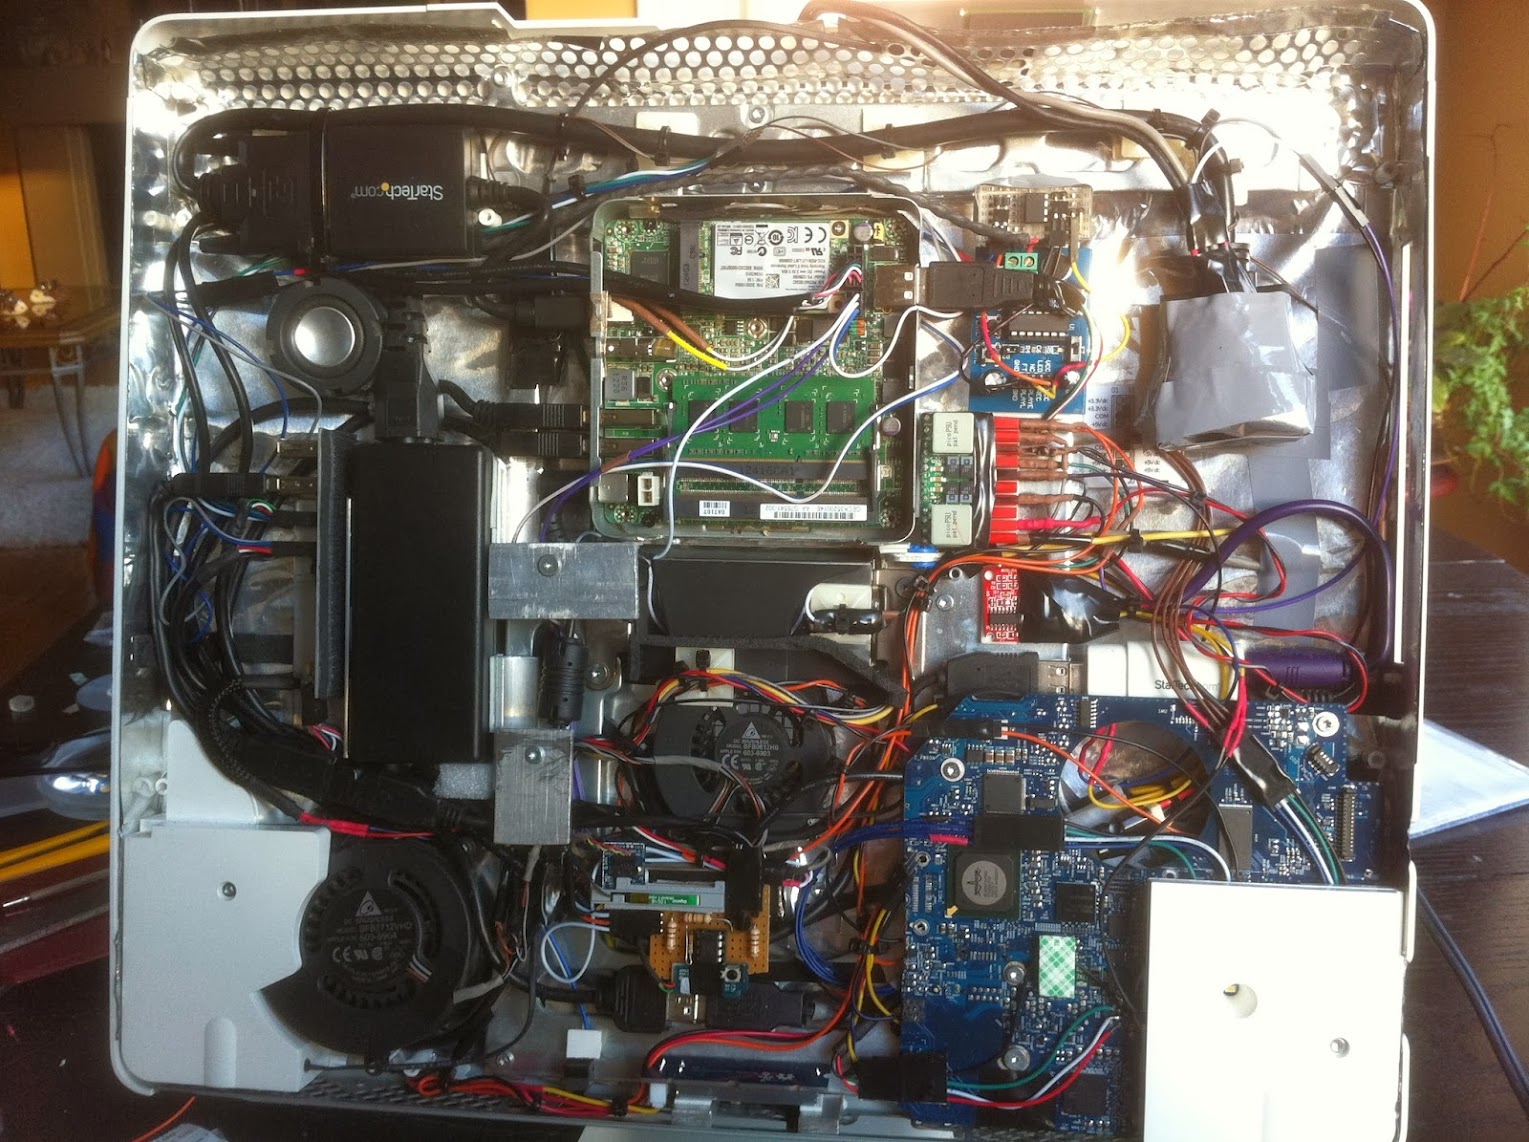
The implementation of an internal USB hub was of paramount importance for this project to allow additional connectivity required for the iSight Camera, Infrared and USB 5V power supply for the iMac LED and Startup Chime. The problem was, USB hubs are large. I needed one that would fit into the 1" of available height and still be able to actually plug connectors into it effectively.

The solution was a brilliant piece of hardware from NZXT. It it linked here. I know it's been used on this forum before, but I wanted to highlight what a terrific product this is for a mod such as this with serious space limitations.

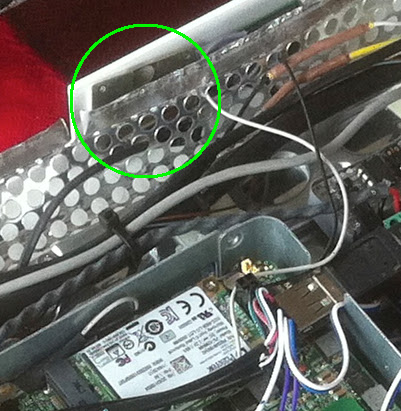
It is less than 1 inch in width, which allowed me to mount it in a sideways-inserted configuration near the center of the iMac G5 where depth is the greatest. It is fastened securely to the NUC power brick with the included Velcro tape. This allowed plenty of space to the left of it's mounted position for the USB peripheral wires to connect to it.


Sideways mounting of the NZXT IU01 Hub (affixed to the NUC power brick)

IMG_4897.JPG


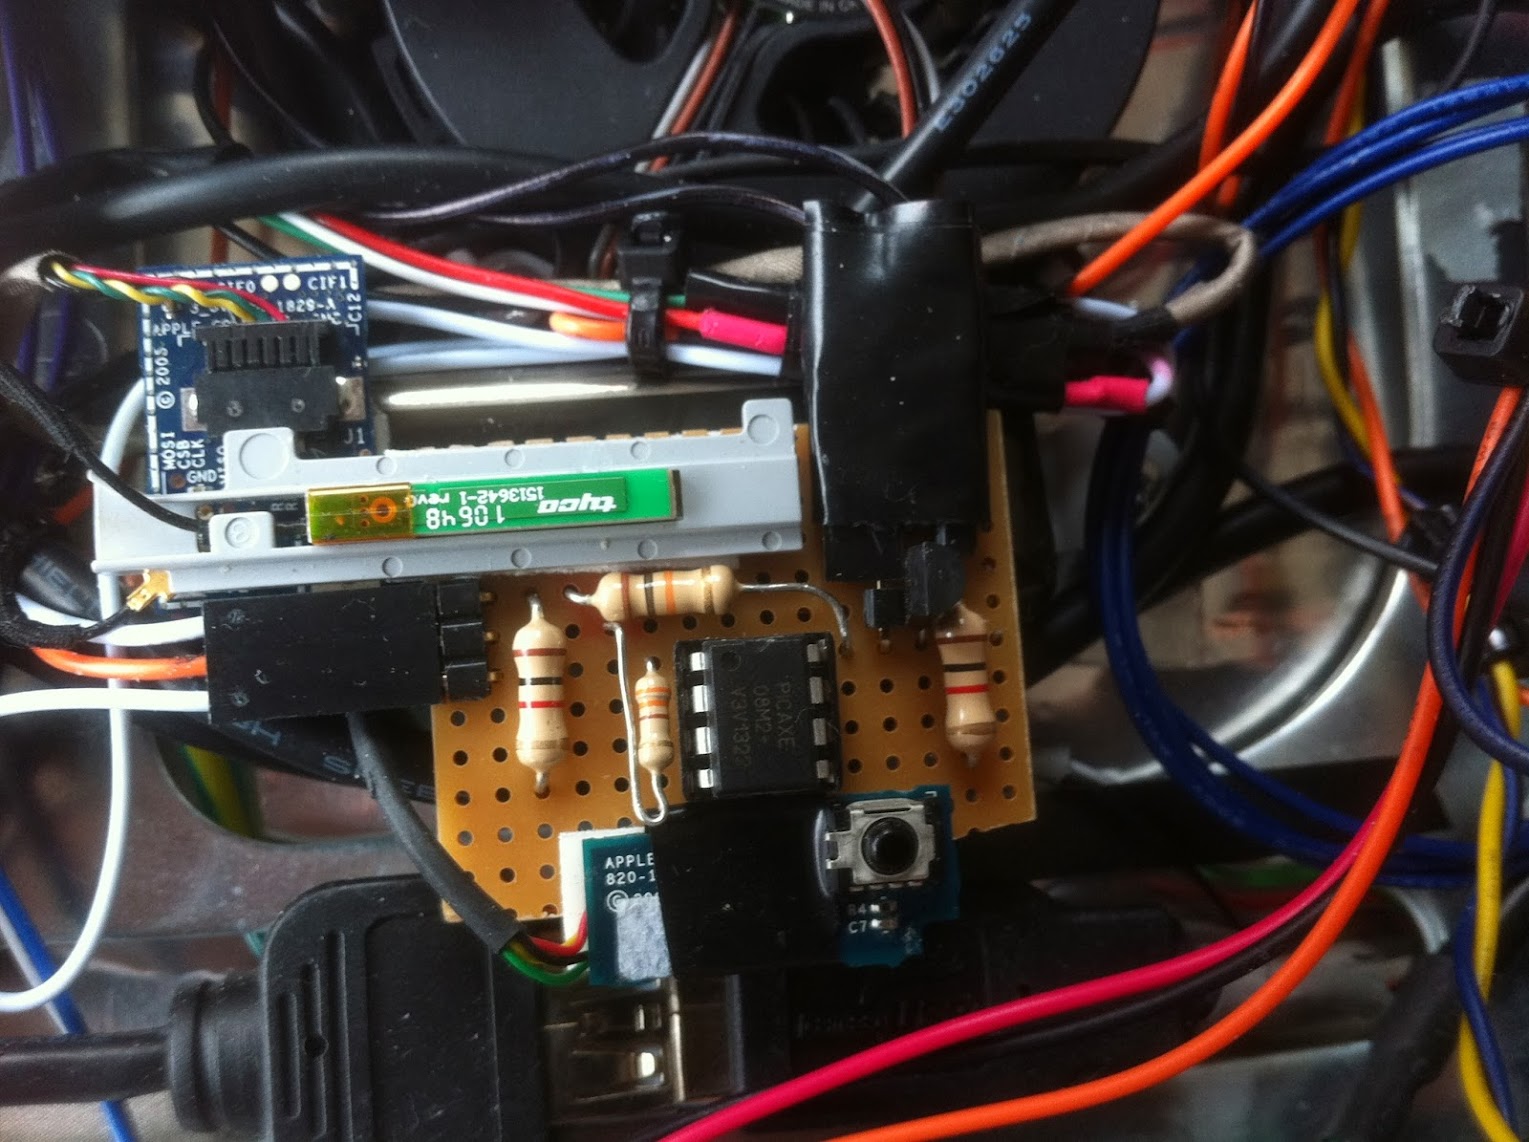
The best part about this hub is that it takes 5V of power from the PicoPSU. It can supply enough to meet any demand, and it stays powered when the system sleeps, which worked absolutely perfectly in powering the two Picaxe microcontrollers installed in this build (controllers for Sleep LED and Apple Startup Chime).

One real bonus that I hadn't expected was that I was able to connect the 5V PAM8403 audio amplifier to the NZXT hub (5V and GND only). This solved an issue of humming feedback that I was experiencing through the iMac speakers when the amp was plugged directly into the PicoPSU. The speakers are completely interference-free now. I was very thankful that the NZXT hub fixed this issue.

I highly recommend this product, its inexpensive and very versatile.


Ersterhernd
 
Build Log 14 - Intel NUC DC3217BY Installation

I have to say that the DC3217BY was a perfect choice for this build, it really made the entire project possible to complete. It fit beautifully into the HDD bay of the iMac G5, and is low enough in profile to allow just a slight clearance when the LCD panel is installed over top.


The arrival of the NUC DC3217BY. Welcome to your new home!

IMG_4911.JPG


The installed NUC. The Front Panel and USB header wires actually touch the back of the LCD panel when it is installed over top of the NUC. There is JUST ENOUGH clearance to fit it all into the limited available height space inside the iMac G5. It is firmly seated with four 3M sticky pads and doesn't move at all. The only unused port is the HDMI on the left. Edit: The HDMI port is now in use, the Thunderbolt port is not.

IMG_4896.JPG


Completed build internals with the NUC in the iMac G5 HDD bay

IMG_4863.JPG


Ersterhernd
 
Build Log 15 -- OSX Mavericks Installation

I can't believe how simple this install was. The whole process took about an hour. The NUC DC3217BY took OSX Mavericks like a champ.

Steps were:

1. Update NUC BIOS to 0042 (not the latest, but I have a DSDT for it)
2. Create Unibeast 3.0 installer USB
3. Move DSDT (attached to this post) to /extra on USB
4. Moved patched AICPUPM.kext (from another system) to USB
5. Install OSX without any boot flags required
6. Move Chameleon bootloader 2286 to installed drive (FileNVRAM.dylib option checked)
7. Apply the basic Multibeast fixes (Trim, HWmonitor, AICPUPM fix)
8. Move DSDT to /Extra

Done!


IMG_4874.JPG


IMG_4875.JPG


Ersterhernd
 

Attachments

  • DSDT0042.aml
    37.4 KB · Views: 193
Build Log 16 -- WiFi Antenna and Apple Bluetooth Installation


WiFi

The interior of the iMac G5 is completely wrapped in EMI shielding material, so the WiFi antennas need to be located on the outside of it. I placed them up at the top, beside the original antenna. The NUC comes with two short WiFi antennas that reach just perfectly without excess wire hanging around.


WiFi antennas located in green circle

wifiinstallation.jpg


I increased my signal strength immensely by placing a small piece of the iMac EMI shielding underneath the WiFi antennas, shiny side out, isolating them from the rest of the hardware and providing a reflective backing for WiFi signals directly onto the antenna ends. Don't throw that EMI material away!

I get over 3.0 MBps (25 mbps) off my VDSL2 through the NUC antennas on an 'N' WiFi connection. Plenty good enough for me.


Apple A1181 Bluetooth

The Bluetooth module and antenna sit almost directly behind the grey Apple Logo on the lower front face of the iMac. The Infrared Reciever is shown just below, in the same location. My LED controller board turned out to be a perfect spot to affix the BT antenna.


IMG_4888.JPG


Ersterhernd
 
Build Log 17 -- LCD Fitment and Close-up

The moment of truth with this project had arrived. Would it all fit back together to become an iMac?

I had continually tested the LCD fitment throughout the project, just to ensure there was no offending hardware that would get in the way at the end. That said, its never over until its over, and I hadn't actually buttoned everything up tight at any point so far.


The iMac with LCD Cables attached to the panel, ready for final closing up. I managed to stick fairly close to my original hardware layout map.

IMG_4883.JPG


YES! It all fit back together and nothing shorted out when I started it up! :)
Looks like careful planning paid off...

IMG_4876.JPG


Ersterhernd
 
Looks really good, well done! :thumbup:

And then, what's your next project? ;)

MacTester
 
Build Log 18 -- Final Presentation

The testing of the system must now begin, but I'm reasonably confident that I can present it as a successfully completed build. That said, surprises can happen, but hopefully not. There's no manual or troubleshooting guide available for these type of mods, so only trial and error over some time will tell for certain if it's solid or not.


IMG_4904.JPG


IMG_4905.JPG


IMG_4908.JPG


IMG_4910.JPG


The only ports that work are the three USB's. The project was designed this way as the other functionality was considered to be redundant.

IMG_4909.JPG


The memory slot cover was cut back to allow fingertip access to the LCD brightness slider and the system reset button. Both are located out of sight underneath the iMac.

IMG_4902.JPG


wut6.jpg


A demonstration video is available below. Its kinda boring, but shows the iMac's functionality. ;)

[video=youtube;62J8EUfKbWQ]https://www.youtube.com/watch?v=62J8EUfKbWQ[/video]


Ersterhernd
 
Build Log 19 - Hardware Summary

This is a compiled list of all hardware that found a home in this iMac G5. Its pretty close to what was planned, and this thing is very full inside now.


- Intel NUC DC3217BY with i3 processor
- 8 GB 1333 DDR3 RAM
- 128 GB mSATA Plextor SSD Storage
- Apple A1181 Bluetooth
- Broadcom ’N’ Series WiFi
- Internal NUC Power Brick (65W)
- Internal PicoPSU WI-25-120 PSU
- BC547B Transistor actuated PicoPSU on/off control
- Adjustable slider on bottom of the iMac for LCD brightness control
- Picaxe 08M2 Micro-Controller for pulsing sleep using original iMac LED
- MiniDisplayport to DVI converter with MOLEX PN 74320-4004 connector
- NZXT IU01 internal USB Hub
- Original iMac cooling fans x 2
- StarTech ICUSBAUDIO Stereo Audio Adapter
- PAM8403 Mini Digital 3 Watt Audio amplifier
- Internal iMac Speakers
- Internal Microphone utilization
- Arduino ISD1820 Audio recorder with Apple Startup Chime (Picaxe controlled)
- Apple iSight Camera
- Apple IR Receiver
- 3 x USB 2.0 external port
- Original AC Power Plug and AC Filter
- Original Power Button
- Hard Reset button
- Apple BT Trackpad and Apple Wired Keyboard


Ersterhernd


Incredible job! So glad you could save it from the junk pile, and it looks really amazing.
 
Incredible job! So glad you could save it from the junk pile, and it looks really amazing.

Thanks justein230, this was a project all about 'thinking thin'...

I hope it continues to work, time will tell.


Cheers!
 
Status
Not open for further replies.
Back
Top