Here is the Clover/EFI boot upgrade guide for the Mavericks (10.9) installation on Acer V5-572p-6858. The original guide posted here
http://www.tonymacx86.com/mavericks...9-installation-guide-acer-v5-572p-6858-a.html
***The benefits***
1) The sound works all native now with AppleHDA instead of the previous method, which uses VoodooHDA.
The default output is internal speaker but it will automatically sense the headphone and switch to it when you plug in.
Sound over HDMI is also working now. When you plug in external display like TV, hold on the “Windows flag” key on your keyboard and right click the “Volume” in menu bar to switch output
2) Powermanagement now works better.
Sleep and Wake work under all conditions. (Note: the wakeup on battery is slower compare to on AC power, and you may need to press several keys randomly)
3) UEFI boot, that means no more legacy switch in BIOS between Win8 and OS X
4) LCD brightness control through keyboard.
In the previous guide, I manually patched the kext to control brightness with F10 (Down) and Pause/Break (UP). Now it change to Fn+F12 (Down), Fn+Pause/Break (UP)
5) Recovery HD (if you want)
***Upgrade steps***
1. Backup
1) System Backup
Recommend backup: EFI/ESP partition (300MB); your Mac OS X partition, or if you want, just backup whole HDD
This backup is not must-to-do. But it is always good idea to do it especially if your are not familiar with the new installation.
***Please note: I am not responsible for any damage or data loss***
2) Patch backup for legacy boot Mac OS X
/Extra (the whole folder)
/System/Library/Extensions/
ACPIBatteryManager.kext
FakeSMC.kext
GenericUSBXHCI.kext
VoodooPS2Controller.kext
AppleIntelCPUPowerManagement.kext
VoodooHDA.kext
AppleRTC.kext
any AppleHDAEnabler or AppleHDAdisabler if you have
(Better to backup all these files to external disk)
2. Install CLOVER EFI boot
1) Under Mavericks, open terminal and mount the EFI partition from internal HDD
diskutil list (to identify the EFI location, mostly disk0s1)
mkdir /Volumes/EFI
sudo mount -t msdos /dev/disk0s1 /Volumes/EFI (replace disk0s1 with yours if different)
(After these, you will see one partition called “ESP” appear)
2) Download the clover.zip file, unzip and copy the entire folder into ESP/EFI/
(All your settings/files are now in ESP/EFI/CLOVER folder as a result)
3. Restore legacy boot Mavericks to original
***Please note: DO NOT RESTART SYSTEM UNTIL YOU FINISH ALL THESE STEPS***
1) delete /Extra folder
2) delete these kexts under /System/Library/Extensions/
ACPIBatteryManager.kext
FakeSMC.kext
GenericUSBXHCI.kext
VoodooPS2Controller.kext
AppleIntelCPUPowerManagement.kext
VoodooHDA.kext
AppleRTC.kext
any AppleHDAEnabler or AppleHDAdisabler if you have
3) Install these kexts to /System/Library/Extensions/ with kext wizard
FakeSMC.kext
AppleHDA.kext
AppleIntelCPUPowerManagement.kext
AppleRTC.kext
AppleIntelFramebufferCapri.kext
(Download the SLE.zip, which has all these files.)
(Don’t forget to rebuild cache and permission with kext wizard)
4) BIOS/EFI setting
(Restart computer and click F2 to enter BIOS)
(Change boot from “Legacy” to “UEFI”, you can enable “secure boot”)
(Restart computer and click F2 to enter BIOS again)
(Add CloverX64 as UEFI boot option and make it the default one)
Under “Security”—”Select an UEFI files as trusted for executing”—HDD1—<EFI>—<CLOVER>—”Cloverx64.efi”
Under “Boot”, move “EFI File Boot 0: Cloverx64” to 1 position
(Restart computer and you are now able to enter Mac OS X)
4. Post upgrade
1) Download the files below and install them (Google search please)
Clover_v2k_r2284.pkg
(Install for UEFI motherboards)
(BootCamp)
(Install RC scripts on target Volume)
(Install all RC scripts on all other bootable OSX volumes)
(Disable sleep proxy client)
(don’t change those settings selected by default)
CloverConfigurator3.8.1+Converter.pkg
HWSensors.5.3.901.pkg
RecoveryHDUpdate.pkg (optional)
2) Restart system and check under “System Information”—>”Memory” and make sure your RAM is recognized correctly. If you upgraded RAM, most likely you will need to inject the right information with “Clover Configurator”
Run “Clover Configurator” in /Applications
Open your config.plist files in ESP/EFI/CLOVER/config.plist
Select “SMBIOS” on the top menu strips
Under the bottom right, select “2” for “SlotCount” if you upgraded RAM
Manually inject the Memory information for both 2 slots
For example, the one fused to motherboard:
Slot: 0
Size: 4096
Frequency: 1600
Vendor: Hynix
Type: DDR3
(Save the files. Don’t touch anything else!!!)
3) HDMI audio
to make HDMI audio works, we need to finish 5 steps including:
Installed patched AppleHDA.kext (Mavericks version)
Inject Layout-ID: 28 into config.plist
Patch AppleIntelFramebuffer Capri (ig-platform-id = 0x01660009)
Patch SSDT-2.aml (inject hda-gfx=onboard-1)
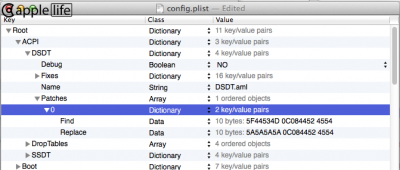
patch DSDT.aml (rename _DSM method of GFX0 to _ZZZ)
I have done four steps of the five. But you will have to patch the DSDT by yourself. I knew we should be able to patch DSDT through config.plist. I just don’t know how to do it. If someone can help here, I appreciate that.
To manual patch your now DSDT.aml, open MaciASL, it will automatically generate and open your own DSDT file. You will have to navigate to : _SB.PCI0……GFX0…….._DSM method like this:
Code:
Method (_DSM, 4, Serialized)
            {
                Name (DRET, Buffer (0x04)
                {
                    0x00
                })
                If (LEqual (Arg0, Buffer (0x10)
                        {
                            /* 0000 */    0xE1, 0x75, 0x39, 0x6F, 0x82, 0x7A, 0x67, 0x4F,
                            /* 0008 */    0x8B, 0x97, 0x15, 0xBE, 0xE0, 0x60, 0xBE, 0xDF
                        }))
                {
                    If (LEqual (Arg2, Zero))
                    {
                        CreateWordField (DRET, Zero, F0SS)
                        Store (0x02, F0SS)
                        Return (DRET)
                    }

                    If (LEqual (Arg2, One))
                    {
                        If (LEqual (^^PEG0.PEGP.LNKV, 0x03))
                        {
                            Return (Zero)
                        }

                        Return (One)
                    }
                }
Just rename the first line to
Method (_ZZZ, 4, Serialized)
Click “Compile”……Save as DSDT.aml…….And then copy to ESP/EFI/CLOVER/ACPI/patched/DSDT.aml
You are done. Restart you will have HDMI audio working
4) Special notes
This guide is specifically made for acer V5-572p with FHD. If you want to try in other acer V3, V5, or V7 model. You will need to make some change. Most likely include:
ig-plateform-id in config.plist. (0x01660009 in this case, yours could be 0x01660003, 0x01660004, …)
Additional ssdt.aml if you have dedicated graphic cards together with HD4000. Most likely you can get this ssdt.aml by press F4 in the Clover startup menu and then copy it from the /CLOVER/ACPI/origin folder to /CLOVER/ACPI/patched folder. I didn’t try it ‘cause I don’t have dedicated graphics card
If you have different ig-plateform-id, you will need to modify the AppleHDA patch too. If you need help, just post here
This guide is for migrating from the legacy installation to EFI boot. If you decide to re-installation from the begining, you sure will be able to do that. Just search google to make CLOVER install USB, replace the /CLOVER folder in your CLOVER partition of USB with the one I attached. The post upgrade is same as above
***Credits***
1) Most of the files are fby Skvo. That must be a great guide but I cannot read their language unfortunately, so I can only get partial information from there by google translate.
I made some changes include:
Change language to English (for new installation)
Change theme to bootcamp
Modified SMBIOS to see correct RAM (original config.plist shown 3 slots!!!)
Audio inject and patch for native sound support
Deleted GenericXHCI.kext (Caused sleep/wake problem)
Included Realtek8111.kext for partial ethernet support
2) Clover teams. Really great works!
3) RehabMan for the initial helps and those guru who developed the softwares and patches
- - - Updated - - -
Just a guess but it is probably best to avoid links to the Russian site in your guide.
Thanks again, RehabMan. I think that's the reason.

")