
- Joined
- Jul 23, 2011
- Messages
- 54
- Motherboard
- Supermicro X11DAi-N
- CPU
- 2x 8260M
- Graphics
- Radeon VII
- Mac
- Classic Mac
- Mobile Phone
EDIT: Updated info for 10.13 here.
Ok, this is my first shot at a guide, so it might suck. Hopefully it doesn't. But it might.
So, this is not a all-encompassing start to finish guide. This assumes you're at the point where you're trying to boot a macOS Sierra thumb drive (or the upgrade file on your boot drive if you have El Capitan working on your rig), and are using xnu power management.
Requirements for this guide:
Also, any particulars or other problems specific to your motherboard are beyond the scope of this guide. I am working on a much broader solution, but for now, this is just to get your foot in the door.
1. Download the latest version of Clover as well as Clover Configurator. Next, install Clover set to UEFI Booting only. For the Drivers64 section, do not enable OsxAptioFixDrv-64, OsxAptioFixDrv2-64, or OsxLowMemFixDrv-64. Not only will it kill kittens, but your machine likely will not boot. The X99/C610 chipsets make the memory space look like a Jackson Pollack painting, and the stock Clover fixes won't cut it. Install any other drivers besides those 3 at your discretion.
2. Mount that thumb drive's EFI partition (feel free to use my 'me-too' EFI mounting utility =P) and navigate to EFI/CLOVER/drivers64 and drop this bad boy in there. OsxAptioFixDrv2-Free2000.efi is thanks to certified bad motherf--ker nickwoodhams. Click his name if you still can't boot - he has some instructions on getting the kernel to load (getting past the reallocation screen) for uncooperative systems. You may have to move some PCIE cards about, worst case.
3. Open up Clover Configurator. Again, the specifics on getting your particular motherboard working are beyond the scope of this guide, but we'll at least eliminate the things that are definitely keeping things from working.
5. Follow the instructions for ssdtPRgen to generate an ssdt.aml file for your processor(s), being careful to use the MacPro6,1 board, -xcpm 1 to enable xnu power management, and -cpus 2 if you have dual cpus. Put the resulting file in EFI/CLOVER/ACPI/patched
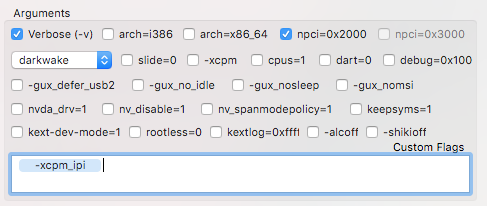
6. Note: If you have a single CPU system, skip to step 7. Dual CPU users MUST follow this step. You will get random hangs, stuttering, and generally terrible performance if you have a dual socket system (2 CPUs) and boot the kernel with -xcpm. This will correctly enable xnu power management, which would be fine if xnu power management was designed to work with dual CPUs. It's not. We need to tell the kernel to enable interprocessor interrupts. This lets a core on one CPU get the attention of a core on the other, which lets them computer more better. So, instead of the -xcpm flag, we need to use the -xcpm_ipi flag. Oh, and you need to use ncpi=0x2000 or ncpi=0x3000. It doesn't matter which, and as far as I know, there is no point to changing from one to the other. It won't fix anything.
8. Since we're using the MacPro6,1 SMBIOS, this has the delightful side effect of making OS X unload the first GPU in your machine. This is probably super not something you want to happen. The main symptom is you'll have video, until you get a bit into the booting process, and the screen goes black. Download and run ADGPFix to fix that. Also, you can disable your GPU's acceleration via nv_disable (if you have an Nvidia card anyway) as a failsafe. This will let you boot without your screen going black. Be warned, because we are editing a plist (don't bother attempting the kext patch, it won't work), that means when you update OS X, it will break your video again so you'll need to remember to reapply the fix. Note: Check back here soon, I will have a permanent solution that works on all systems without needing to patch anything finished shortly. I will be making a separate thread for that, but I'll add a link here when it's done.
9. Hopefully that will get you booting, or at least, crashing for reasons unrelated to your CPU. If it doesn't... ¯\_(ツ)_/¯ This link will make you feel a little better at least. Assuming you did get installed, you'll want to pick either iMac 16,2 or 17,1 as a frequency vector donor. It's simple, just run Piker Alpha's frequencyVectorsEdit.sh script and pick either of those (it really doesn't matter which the frequency vectors mostly just tell the kernel to load the P-states in our SSDT table, it will not make power management behave like the donor Mac's). This is not required to get booting, but you'll want it for proper power management.
Sorry, I know this is not an all-inclusive guide and will likely leave you with other unaddressed problems. There are plenty of resources online though, and no single guide can take into account every motherboard and its quirks.
On the bright side, I am nearly done with a new tool which should hopefully be able to address some of the more common hackintosh issues far more effectively than DSDT patching ever could. But that's neither here nor now.
Anyway,
PEACE
(Mad props to Piker Alpha, braumbear, the Clover dudes, the nickwoodham dude, and any other dudes or dudettes that I may have unintentionally left out. If I failed to give anyone credit, please let me know via PM and I'll edit this guide as needed).
Ok, this is my first shot at a guide, so it might suck. Hopefully it doesn't. But it might.
So, this is not a all-encompassing start to finish guide. This assumes you're at the point where you're trying to boot a macOS Sierra thumb drive (or the upgrade file on your boot drive if you have El Capitan working on your rig), and are using xnu power management.
Requirements for this guide:
- A motherboard with either an X99 or C610 series chipset.
- A Haswell-E, Broadwell-E, Xeon V3 or Xeon V4 CPU (Broadwell/Haswell-EP)
- Install thumb drive already prepared with Sierra. We'll be adding Clover.
- You know how to use ssdtPRgen by Pike R. Alpha (or are willing to read the instructions) to generate an XCPM mode ssdt file for your processor.
- High pain tolerance.
You're a highlander.
Also, any particulars or other problems specific to your motherboard are beyond the scope of this guide. I am working on a much broader solution, but for now, this is just to get your foot in the door.
1. Download the latest version of Clover as well as Clover Configurator. Next, install Clover set to UEFI Booting only. For the Drivers64 section, do not enable OsxAptioFixDrv-64, OsxAptioFixDrv2-64, or OsxLowMemFixDrv-64. Not only will it kill kittens, but your machine likely will not boot. The X99/C610 chipsets make the memory space look like a Jackson Pollack painting, and the stock Clover fixes won't cut it. Install any other drivers besides those 3 at your discretion.
2. Mount that thumb drive's EFI partition (feel free to use my 'me-too' EFI mounting utility =P) and navigate to EFI/CLOVER/drivers64 and drop this bad boy in there. OsxAptioFixDrv2-Free2000.efi is thanks to certified bad motherf--ker nickwoodhams. Click his name if you still can't boot - he has some instructions on getting the kernel to load (getting past the reallocation screen) for uncooperative systems. You may have to move some PCIE cards about, worst case.
3. Open up Clover Configurator. Again, the specifics on getting your particular motherboard working are beyond the scope of this guide, but we'll at least eliminate the things that are definitely keeping things from working.
Make the Acpi section look like this:

Key changes are: Drop tables, Plugin Type = 1, everything else unchecked, and SortedOrder with 'SSDT.aml' added.
OK, now for teh patches. All teh patches.
First, for the KextsToPatch section:
That's it!
Now for the hard part. In the KernelToPatch section, add the following:
*Whew!* Hopefully you didn't ignore the high pain tolerance bullet point.
Ok, now we need to apply one more patch, but it is dependent on which CPU you have.
Pick only one of these patches, and obviously pick the correct one for your CPU. Haswell-E or 3rd generation Xeons use the first one, Broadwell-E and 4th generation Xeons use the second.
4. OK! Now generate a fresh MacPro6,1 smbios. Also, generate a valid UUID by running uuidgen from the terminal. This is optional, but will make iMessage etc. work or at least work better.
Key changes are: Drop tables, Plugin Type = 1, everything else unchecked, and SortedOrder with 'SSDT.aml' added.
OK, now for teh patches. All teh patches.
First, for the KextsToPatch section:
Code:
Name          Find             Replace          Comment                  MatchOS
IOPCIFamily 4881FB00000040 4881FB00000080 X99 Patch by braumbear 10.12Now for the hard part. In the KernelToPatch section, add the following:
Code:
Find                       Replace                    Comment                               MatchOS
20B9E20000000F30           20B9E20000009090           xcpm_idle patch by Pike R. Alpha      10.12
83C3C483FB22               83C3BC83FB22               xcpm_bootstrap Sierra © Pike R. Alpha 10.12
BE0200000031D2E86CFCFFFF   BE0200000031D29090909090   xcpm_core_scope_msrs © Pike R. Alpha  10.12
BE0700000031D2E894FCFFFF   BE0700000031D29090909090   xcpm_pkg_scope_msr © Pike R. Alpha    10.12
*Whew!* Hopefully you didn't ignore the high pain tolerance bullet point.
Ok, now we need to apply one more patch, but it is dependent on which CPU you have.
Pick only one of these patches, and obviously pick the correct one for your CPU. Haswell-E or 3rd generation Xeons use the first one, Broadwell-E and 4th generation Xeons use the second.
Code:
Find     Replace   Comment                   MatchOS
83C0E9   83C0E6    Haswell-E CPUID Patch     10.12
83C0E9 83C0E1 Broadwell-E CPUID Patch 10.125. Follow the instructions for ssdtPRgen to generate an ssdt.aml file for your processor(s), being careful to use the MacPro6,1 board, -xcpm 1 to enable xnu power management, and -cpus 2 if you have dual cpus. Put the resulting file in EFI/CLOVER/ACPI/patched
6. Note: If you have a single CPU system, skip to step 7. Dual CPU users MUST follow this step. You will get random hangs, stuttering, and generally terrible performance if you have a dual socket system (2 CPUs) and boot the kernel with -xcpm. This will correctly enable xnu power management, which would be fine if xnu power management was designed to work with dual CPUs. It's not. We need to tell the kernel to enable interprocessor interrupts. This lets a core on one CPU get the attention of a core on the other, which lets them computer more better. So, instead of the -xcpm flag, we need to use the -xcpm_ipi flag. Oh, and you need to use ncpi=0x2000 or ncpi=0x3000. It doesn't matter which, and as far as I know, there is no point to changing from one to the other. It won't fix anything.
Your boot flags should look like this if you have a dual cpu system:
7. Note: If you have a dual CPU system, skip to step 8. OK, you guys have it easy, all you need to do is enable -xcpm and use either ncpi=0x2000 or ncpi=0x3000. It doesn't matter which, and as far as I know, there is no point to changing from one to the other. It won't fix anything.
8. Since we're using the MacPro6,1 SMBIOS, this has the delightful side effect of making OS X unload the first GPU in your machine. This is probably super not something you want to happen. The main symptom is you'll have video, until you get a bit into the booting process, and the screen goes black. Download and run ADGPFix to fix that. Also, you can disable your GPU's acceleration via nv_disable (if you have an Nvidia card anyway) as a failsafe. This will let you boot without your screen going black. Be warned, because we are editing a plist (don't bother attempting the kext patch, it won't work), that means when you update OS X, it will break your video again so you'll need to remember to reapply the fix. Note: Check back here soon, I will have a permanent solution that works on all systems without needing to patch anything finished shortly. I will be making a separate thread for that, but I'll add a link here when it's done.
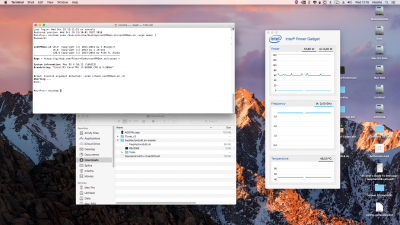
9. Hopefully that will get you booting, or at least, crashing for reasons unrelated to your CPU. If it doesn't... ¯\_(ツ)_/¯ This link will make you feel a little better at least. Assuming you did get installed, you'll want to pick either iMac 16,2 or 17,1 as a frequency vector donor. It's simple, just run Piker Alpha's frequencyVectorsEdit.sh script and pick either of those (it really doesn't matter which the frequency vectors mostly just tell the kernel to load the P-states in our SSDT table, it will not make power management behave like the donor Mac's). This is not required to get booting, but you'll want it for proper power management.
Sorry, I know this is not an all-inclusive guide and will likely leave you with other unaddressed problems. There are plenty of resources online though, and no single guide can take into account every motherboard and its quirks.
On the bright side, I am nearly done with a new tool which should hopefully be able to address some of the more common hackintosh issues far more effectively than DSDT patching ever could. But that's neither here nor now.
Anyway,
PEACE
(Mad props to Piker Alpha, braumbear, the Clover dudes, the nickwoodham dude, and any other dudes or dudettes that I may have unintentionally left out. If I failed to give anyone credit, please let me know via PM and I'll edit this guide as needed).
Last edited:
")