- Joined
- Jun 4, 2017
- Messages
- 54
- Motherboard
- ASROCK H110M-DGS
- CPU
- G4560
- Graphics
- GTX 1050
- Mobile Phone
[GUIDE] Pentium G4560 + GTX 1050

Hello everyone! Let's start!
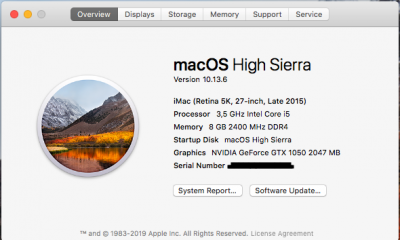
My PC specifications :Hello everyone! Let's start!
MOBO : ASROCK H110M-DGS
CPU : Intel Pentium G4560 @ 3.5GHz
RAM : Patriot 8GB DDR4 @ 2400MHz
GPU : MSI GeForce GTX 1050 2GB OC
HDD/SSD :
HDD : WDC WD2002FYPS-01U1B1(Black Enterprise 2TB WD Disk)
SSD : ADATA SU650 240GB (For Windows)
PSU : MSI 500W(will be upgraded soon,recommended to)
CASE : MSI Phoenix 2
What doesn't work :
Sleep(only monitor goes to sleep)
Sorry for bad cable managment,will make it better soon!
Get 16GB USB drive.Get access to macOS 10.6 and newer.
Step 2 :
Follow this guide from tonymacx86 to download macOS and create bootable usb : https://www.tonymacx86.com/threads/...any-supported-intel-based-pc.235474/#download
Select UEFI!
Step 3 : Download Clover Configurator(https://www.tonymacx86.com/resources/clover-configurator.429/)
Open it.Go to Mount EFI.Mount your USB's EFI partition(make sure it is your USB's partition not HDD's)!
Download these kexts :
FakeSMC
FakeSMC.kext is the only absolutely mandatory kext, and is required for booting the system. Original by netkas, new branch by RehabMan. v6.26-322-g1b20eab7.1765
Lilu
Lilu.kext by acidanthera. Arbitrary kext and process patching on macOS. Install in /Library/Extensions or /Volumes/EFI/EFI/CLOVER/kexts/Other. https://github.com/acidanthera/Lilu v1.4.1
NullCPUPowerManagement
Disables AppleIntelCPUPowerManagement.kext to prevent kernel panic without proper HPET DSDT edits. Version 1.0.0d2.
Go to EFI/Clover/kexts/other(UNZIP these kexts 1st!) and place these kexts here.
Go to EFI/Clover/config.plist.Open it,Clover Configurator will pop-up.
Go to boot : right click on blank field and select : -v dart=0 nv_disable=1.
Go to Devices and select from USB section : Inject and FixOwnership.
Go to Kernel and Kext patches : select KernelPm,AppleIntelCPUPM,Apple RTC. In FakeCPUID section left click on arrows and select IvyBridge 0306A0.
Go to Rt variables : make sure booter config is 0x28 and CsrActiveConfig is 0x67
Go to SMBIOS : left click on arrows select iMac17,1!.
Go to System Parameters: make sure InjectSystemID is selected and set InjectKexts to Yes.
Step 4 : Preparing you MOBO's UEFI :
Spam Delete while booting your PC it should enter UEFI.
If you can see big digital clock press F6,else nothing.
Go to Advanced :
Chipset Configuration : Vt-d : disable
USB Configuration : Legacy USB Support : Yes ; PS/2 : Disable ; XHCI Support : Enabled
Go to Boot :
Make sure option 1 is UEFI usb.
Press F10 and select yes.
Step 5 : Booting USB installer
After pressing F10 and selecting yes your PC should boot to Clover bootloader.
In there it will probably say booting macOS Install from Install macOS High Sierra in 3secs.
If not select the icon with EXTERNAL on it and press enter.
Wait for the verbose text to go away and you should see macOS Utilites menu.
Step 6 : Formating disk and entering installation
Go to Disk Utility and open it.In the left upper corner there will an arrow,press it and click Show All Devices.
Your HDD or SSD should be showing up.Click on it and select Erase.(MAKE SURE YOU SELECTED RIGHT DRIVE!)
Format : macOS Extended(Journaled) Scheme : GUID Partition Map. Wait for it to finish and then quit Disk Utility.
Click on install macOS High Sierra and continue.Agree to any terms,select your HDD or SSD your previously erased and continue.
Your PC will reboot several times(2-3).Everything is automated you just sit and wait for it to boot.
Step 7 : Setting up and installing bootloader,kexts,etc.
When you reach language screen select your language or better English.
If it prompts how does your PC connects to Internet check Ethernet and continue and continue.
When it comes to Apple ID skip,also Skip location services and data collecting.
There you go you should have your macOS booted.
Now go to tonymacx86.com and download :
MultiBeast 10.4.0 - High Sierra
MultiBeast, the ultimate post-installation utility, has been updated to version 10.4.0 for macOS High Sierra 10.13.6. MultiBeast is an all-in-one post-installation utility designed to enable boot from a hard drive. It also features a collection...
Go to Drivers then
Audio : Select AppleALC,in Realtex ALCxxxx select 100/200/300 Series support
Misc : FakeSMC,NullCPUPowerManagement,Core Graphics fixup aka WhateverGreen
Network : in Realtek select RealtekRTL8111 v2.2.2
USB : 3rd party USB 3.0,Remove XHCI USB port limit,UsbInjectAll
Go to Bootloaders :
Clover UEFI Boot mode + Emulated NVRAM
Go to Customize :
Select Nvidia Web Drivers Boot Flag
System definitions : go to iMac and select iMac17,1
Go to Build : select your hdd/ssd(it should be preselected if not select) and click install,wait for finish then close.
Download Clover Configurator again and now Mount your HDD/SSD'S EFI partition!(BE SURE TO CHECK)
Finder won't be showing your disks on desktop to fix open Finder in left upper corner click Finder go to Preferences select Hard Disks.
Now open you EFI partition go to EFI/Clover/kexts/other and in here download and copy FakeSMC.kext,NullCPUPowerManagement.kext,Lilu.kext,Realtek8111.kext,WhateverGreen.kext
Go back and delete your config.plist and place mine config.plist(Scroll down you will find it)
Now open terminal and run this Benjamin Dobell's script to install nvidia drivers :
bash <(curl -s https://raw.githubusercontent.com/Benjamin-Dobell/nvidia-update/master/nvidia-update.sh)
It will prompt for your password,type it and enter.
After everything is finished do your own customization needed for macOS.
REBOOT! MUST REBOOT!
Go to UEFI again(spam Delete while booting your pc up) go to Boot and as option 1 select UEFI OS!
Press F10 and yes.
Congratulations! You installed macOS successfully!
Attachments
Last edited: