
- Joined
- Jul 28, 2012
- Messages
- 143
- Motherboard
- ASRock Z390 Phantom Gaming ITX
- CPU
- i9-9900K
- Graphics
- RX 5700
- Mac
- Mobile Phone
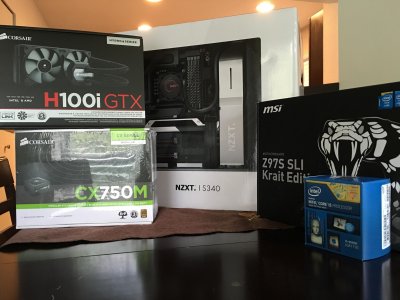
MSI Z97S SLI Krait Edition + Intel Core i5 4690K + EVGA GTX 960 FTW
Components
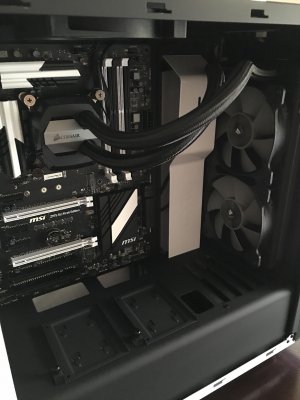
MSI Z97S SLI Krait Edition Motherboard
http://www.amazon.com/dp/B00OJZTSR8/
http://www.newegg.com/Product/Product.aspx?Item=N82E16813130801
Intel Core i5 4690K Processor
http://www.amazon.com/dp/B00KPRWB9G/
http://www.newegg.com/Product/Product.aspx?Item=N82E16819117372
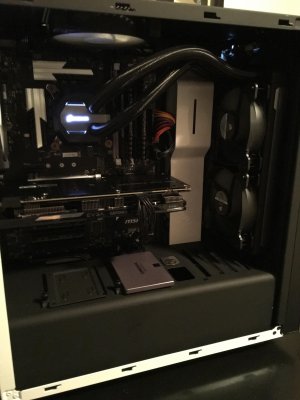
Corsair H100i GTX Hydro Cooler
http://www.amazon.com/dp/B00SV7IEJI
http://www.newegg.com/Product/Product.aspx?Item=N82E16835181090
Corsair Vengeance 8GB DDR3 x2
http://www.amazon.com/dp/B005T63BJM/
http://www.newegg.com/Product/Product.aspx?Item=N82E16820233144
Samsung 840 EVO 250gb SSD
http://www.amazon.com/dp/B00E3W1726/
http://www.newegg.com/Product/Product.aspx?Item=9SIA7WM39T4927
EVGA GTX 960 FTW 2GB
http://www.amazon.com/dp/B00UOYQ9N4/
http://www.newegg.com/Product/Product.aspx?Item=N82E16814487100
Corsair CX750m Power Supply
http://www.amazon.com/dp/B00ALK3KEM/
http://www.newegg.com/Product/Product.aspx?Item=N82E16817139051
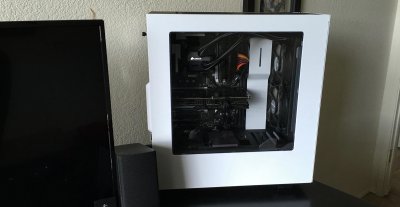
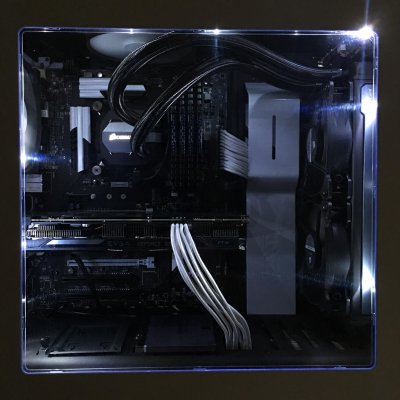
NZXT S340 White ATX Tower
http://www.amazon.com/dp/B00NGMIBXC/
http://www.newegg.com/Product/Product.aspx?Item=N82E16811146189
Dell S2715H 27" FHD IPS Display x2
http://www.amazon.com/dp/B00M9B3S0W/
http://www.newegg.com/Product/Product.aspx?Item=N82E16824260218
NZXT White LED Sleeved Lighting
http://www.amazon.com/dp/B0046Y7OI2
http://www.newegg.com/Product/Product.aspx?Item=N82E16812170028
Silverstone White Sleeved 24pin ATX Extension
http://www.amazon.com/dp/B00B46XJQ6/
http://www.newegg.com/Product/Product.aspx?Item=9SIA4TZ3293099
Silverstone White Sleeved 8pin PCI Extension for GPU
http://www.amazon.com/dp/B00B46XJ2K/
http://www.newegg.com/Product/Product.aspx?Item=9SIA4TZ34N6036
Comments
UPDATE 11/2/15:
I quickly shot and edited a video of the current setup with both 27" monitors. Feel free to check it out!
UPDATE 11/1/15:
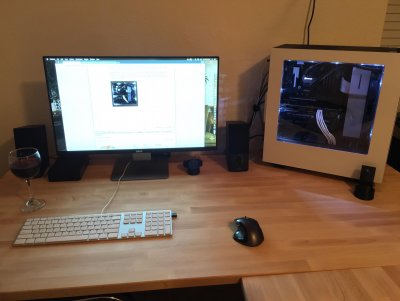
I decided to buy another matching Dell S2715h monitor to aid in multitasking duties. I thought I could get by with just one monitor but I was dead wrong. Once again, this monitor is simply stunning in every way and I'm in love with color vibrancy and accuracy!
UPDATE 10/26/15:
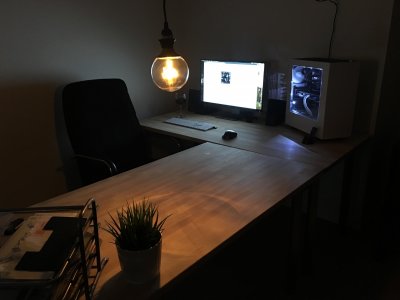
I have pretty much rebuilt my entire home office around this build (lol). I've built a brand new desk using IKEA components and purchased the new Dell monitor. I was going to go for a 4K monitor but the scaling for text would absolutely KILL me. I also purchased more products on Amazon including the white sleeved SilverstoneTech cabling, NZXT white sleeved LED lighting, and an ADDITIONAL 8GB of Corsair RAM, totaling 16GB now
") Please leave any and all comments or questions below! I'm fairly proud of this build as it's incredibly beautiful, clean, and powerful.
Please leave any and all comments or questions below! I'm fairly proud of this build as it's incredibly beautiful, clean, and powerful.INSTALL NOTES / GUIDE
Pre Install
1. Follow the install guide here as a complete general walk through on installing El Capitan.
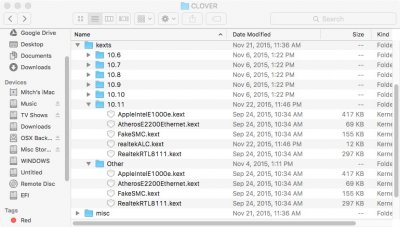
2. After UniBeast finishes installing to your USB drive, mount the EFI partition using Clover Configurator.
IMPORTANT: You MUST remove all 10.xx folders in your UniBeast EFI partition's Kext folder except for 10.11 and "Other." In these two folders I copied FakeSMC and NullCPUManagement for redundancy. I was having an issue with Clover booting into the installer until I singled out the 10.11 and "Other" folder.
My guess is that the Clover installer is having a hard time loading FakeSMC when all of the folders are present.
3. Before the install, make sure VT-D and CFG Lock are disabled in the UEFI/Bios of the motherboard. Press F2 to enter setup during POST, Click on OC settings, then choose CPU options at the bottom to change these settings.
4. Before choosing the OS X install volume in Clover, go to Clover options and add nv_disable=1 if you are using a Maxwell Nvidia card like I am.
Post Install
5. Open Multibeast 8.2.3 and install using Clover UEFI option, Realtek ALC892, FakeSMC, and RealtekRTL8111 drivers.
6. Download and install the current alternate Nvidia Web Drivers.
7. Open Clover Configurator and Mount EFI partition.
8. Add nvda_drv=1 to the Boot arg section (this will force Clover to boot the web drivers)
9. In the same Boot section, click on XMP Detection 1 (this will detect RAM at 1600mhz instead of 1333mhz)
10. Click on SMBIOS and run the magic wand wizard on the right side of the window. Choose iMac 14,2
11. Follow THIS guide on creating and implementing a custom SSDT for more power states and lower CPU temps.
Performance Notes
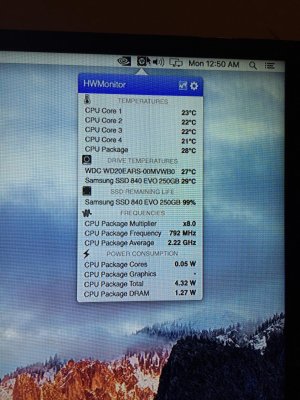
-CPU Temps idle around 26*
-CPU Temps at full load are around 58*
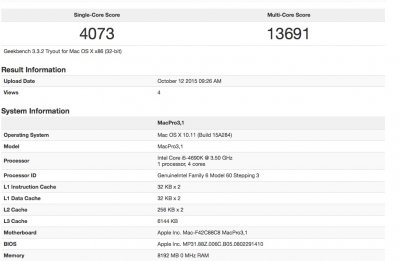
-The 4690k overlocks amazingly well and stable with the Corsair cooler. 4.6ghz with 1.25v stable.
-The GTX 960 FTW plays Fallout 4 in Ultra settings with very few frame rate drops. Looks great.
Final Thoughts
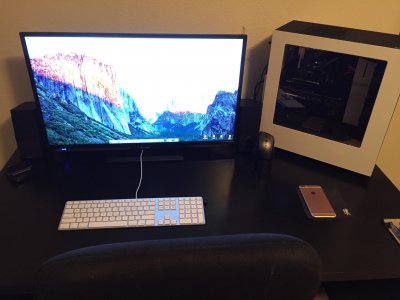
This build is a beauty. I am extremely pleased on how it turned out and the level of OSX compatibility. I aimed to build a powerful yet budget friendly build in a beautiful package. I believe I have succeeded in doing so! This machine will primarily be used for post processing of wedding photos, graphic design, and playing Fallout 4 on my Windows 10 partition. Please leave any questions or comments below!
Build Photos
Attachments
-
 IMG_0055.jpg577.3 KB · Views: 1,628
 -
 IMG_0056.jpg994.1 KB · Views: 1,707
 -
 IMG_0244.jpg871.9 KB · Views: 7,588
 -
 IMG_0246.jpg877.6 KB · Views: 7,479
 -
 IMG_0326.jpg933.5 KB · Views: 7,228
 -
 Untitled.jpg95.7 KB · Views: 7,168
 -
 IMG_0322.jpg501.2 KB · Views: 727
 -
 IMG_0602.jpg676.8 KB · Views: 1,584
 -
 IMG_0600.jpg970.6 KB · Views: 703
 -
 IMG_0598.jpg621.7 KB · Views: 1,706
 -
 IMG_0576.jpg737.2 KB · Views: 7,661
 -
 IMG_0679.jpg697.9 KB · Views: 7,402
 -
 IMG_0749.jpg620.9 KB · Views: 6,154
 -
 bannerlogo.jpg176 KB · Views: 5,927
 -
 kextwindow.jpg106.7 KB · Views: 6,141
 -
 cloverbootwindow.jpg107.7 KB · Views: 6,234
 -
 cloversmbioswindow.jpg285.2 KB · Views: 6,182

