- Joined
- Aug 2, 2011
- Messages
- 7
- Mac
- Classic Mac
- Mobile Phone
After fighting with it for quite some time, I've finally got OS X running on my hardware. I followed most of the iBoot + MultiBeast guide, but had to change up a few things.
The Build:
Mobo: GA-Z68MA-D2H-B3 $125
http://www.amazon.com/dp/B004ZBHMN8/ref=sr_1_1?s=pc&ie=UTF8&qid=1315446739&sr=1-1
Processor: Intel Core i5 2500K $220
http://www.amazon.com/Intel-i5-2500K-Processor-3-3GHz-LGA1155/dp/B004EBUXHQ/ref=sr_1_1?s=pc&ie=UTF8&qid=1315446808&sr=1-1
RAM: Corsair Vengeance Dual Channel 1600MHz 8GB (2x4GB) $73
http://www.amazon.com/Corsair-Vengeance-240-Pin-Platforms-CMZ8GX3M2A1600C9/dp/B004CRSM4I/ref=sr_1_1?s=pc&ie=UTF8&qid=1315446872&sr=1-1
PSU: Corsair GS700 $115
http://www.amazon.com/Corsair-700-Watt-Certified-Compatible-Platforms/dp/B003XT1QAI/ref=sr_1_1?s=pc&ie=UTF8&qid=1315446923&sr=1-1
Graphics: VisionTek Radeon 5450 2GB (PCIe x16) $100
http://www.amazon.com/VisionTek-Radeon-Express-Graphics-900356/dp/B005EPQI70/ref=sr_1_1?s=pc&ie=UTF8&qid=1315447051&sr=1-1
Network: D-Link DWA-556 Xtreme N Desktop PCI Express Adapter $70
http://www.amazon.com/D-Link-DWA-556-Express-Desktop-Adapter/dp/B000N4WRFY/ref=sr_1_1?s=pc&ie=UTF8&qid=1315447113&sr=1-1
Optical: OEM Asus $20
HDD: Seagate Barracuda 1TB $70
http://www.amazon.com/Seagate-Barracuda-7200-12-Internal-ST31000524AS/dp/B004IZN3YI/ref=sr_1_1?s=pc&ie=UTF8&qid=1315447247&sr=1-1
Mid-tower: Antec Nine Hundred $100
http://www.amazon.com/Antec-Nine-Hundred-Steel-Ultimate/dp/B000I5JHB0/ref=sr_1_1?s=pc&ie=UTF8&qid=1315447189&sr=1-1
Total: $893
Closest Apple Store Price: $2144
Mac OS X 10.6 Snow Leopard
http://store.apple.com/us/product/MC573Z/A?fnode=MTY1NDAzOA&mco=MTM3NDgwNzM
Installation Procedure:
Preliminary:
Download and burn iBoot to disc.
Download MultiBeast.
Download UpdateHelper.
Download Mac OS X 10.6.8 Combo Update.
Download our DSDT from the DSDT Database.
Remove any extra RAM so there is only 4GB max.
Part 1: BIOS Settings
1. Flash BIOS ver. F4 if it is not currently that version.
2. Set Advanced BIOS Features/Hard Disk Boot Priority to boot from your destination drive first.
3. Set Advanced BIOS Features/First Boot Device to CDROM.
4. Set Advanced BIOS Features/Second Boot Device to Hard Disk.
5. Set Advanced BIOS Features/Init Display First to Onboard.
6. Set Advanced BIOS Features/Onboard VGA to Auto.
7. Set Integrated Peripherals/PCH SATA Control Mode to AHCI.
8. Set Power Management Setup/HPET Mode to 64-bit mode.
9. Press F10 to save and exit.
Part 2: Install Mac OS X
1. Place iBoot in your CD/DVD drive during the BIOS startup screens.
- if the "Loading Operating System" screen does not seem to pick up the disc in the drive, restart your computer.
2. At the boot prompt, eject iBoot.
3. Place your retail Snow Leopard Install DVD into the drive and press F5.
4. Press Enter on the Mac OS X Install DVD icon when it appears to begin installation.
5. After the installation screen appears, open Utilities/Disk Utility.
6. Partition your destination hard drive to the GUID Partition Table, Mac OS X Extended (Journaled), and with the name Snow Leopard. You can rename it later.
- NOTE: The destination partition must be 1TB or less in order to boot.
7. Close Disk Utility.
8. Choose Snow Leopard when the installer asks for your destination drive.
9. Click Customize to choose which extra features to install.
10. Install Snow Leopard.
11. Restart the computer when the installation finishes.
12. Place iBoot back in the drive.
13. Choose the Snow Leopard icon.
Part 3: Post Install
1. Run Update Helper, install to its default location.
2. Restart computer, boot with iBoot.
3. Place our DSDT file on the desktop and rename it to DSDT.aml
4. Open MultiBeast.
5. Open and install the Mac OS X 10.6.8 Combo Update. DO NOT REBOOT AFTER INSTALLATION.
6. Run MultiBeast, choosing only the UserDSDT option.
- NOTE: If Installer unexpectedly quits, reopen Multibeast and repeat step 6.
7. Restart computer.
8. Change your BIOS settings to match these:
- Advanced BIOS Features/First Boot Device to Hard Disk.
- Advanced BIOS Features/Second Boot Device to CDROM.
9. Press F10 to save and exit.
Now when the computer boots up, it should load straight into OS X 10.6.8!
You should make a backup image of your drive so you can restore it if something goes wrong.
You can also follow the xMove + MultiBeast guide to upgrade your machine to Lion.
Sleep/Wake Support:
Set BIOS Settings:
Power Management Setup/Power On By Mouse/Double Click
Power Management Setup/Power On By Keyboard/Password
KB Power ON Password/(Press enter and enter a 1-5 character password)
NOTE 1: To wake the computer, either wiggle the mouse or press a key. After the computer powers up, press a key (I've been using the spacebar) or the computer will fall back asleep.
NOTE 2: It seems that once you restart, wether it's a restart or complete shutdown/power on, after you've gone through a sleep/wake cycle the mobo reverts back to it's last known good BIOS settings. Not sure how to take care of this
Audio Support:
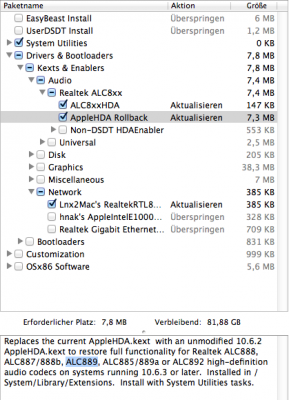
1. Run MultiBeast
2. Check System Utilities
3. Check Drivers & Bootloaders/Kexts & Enablers/Audio/Realtek ALC8xx/ALC8xxHDA
4. Check Drivers & Bootloaders/Kexts & Enablers/Audio/Realtek ALC8xx/AppleHDA Rollback
5. Install
6. Reboot and enjoy audio support for the front/back headphone port, optical out, and line out.
Network Support:
Both my DWA-556 PCIe wireless card and onboard ethernet port work without additional setup.
Notes:
The onboard graphics run at a maximum of 1024x768
As far as I can tell, QE/CI are supported in both 10.6.8 and 10.7
Audio doesn't seem to work on 10.6.8 (nicely anyway), but is supported in 10.7
If anyone has any suggestions for support for things like better sound quality or other updated drivers, please share.
The Build:
Mobo: GA-Z68MA-D2H-B3 $125
http://www.amazon.com/dp/B004ZBHMN8/ref=sr_1_1?s=pc&ie=UTF8&qid=1315446739&sr=1-1
Processor: Intel Core i5 2500K $220
http://www.amazon.com/Intel-i5-2500K-Processor-3-3GHz-LGA1155/dp/B004EBUXHQ/ref=sr_1_1?s=pc&ie=UTF8&qid=1315446808&sr=1-1
RAM: Corsair Vengeance Dual Channel 1600MHz 8GB (2x4GB) $73
http://www.amazon.com/Corsair-Vengeance-240-Pin-Platforms-CMZ8GX3M2A1600C9/dp/B004CRSM4I/ref=sr_1_1?s=pc&ie=UTF8&qid=1315446872&sr=1-1
PSU: Corsair GS700 $115
http://www.amazon.com/Corsair-700-Watt-Certified-Compatible-Platforms/dp/B003XT1QAI/ref=sr_1_1?s=pc&ie=UTF8&qid=1315446923&sr=1-1
Graphics: VisionTek Radeon 5450 2GB (PCIe x16) $100
http://www.amazon.com/VisionTek-Radeon-Express-Graphics-900356/dp/B005EPQI70/ref=sr_1_1?s=pc&ie=UTF8&qid=1315447051&sr=1-1
Network: D-Link DWA-556 Xtreme N Desktop PCI Express Adapter $70
http://www.amazon.com/D-Link-DWA-556-Express-Desktop-Adapter/dp/B000N4WRFY/ref=sr_1_1?s=pc&ie=UTF8&qid=1315447113&sr=1-1
Optical: OEM Asus $20
HDD: Seagate Barracuda 1TB $70
http://www.amazon.com/Seagate-Barracuda-7200-12-Internal-ST31000524AS/dp/B004IZN3YI/ref=sr_1_1?s=pc&ie=UTF8&qid=1315447247&sr=1-1
Mid-tower: Antec Nine Hundred $100
http://www.amazon.com/Antec-Nine-Hundred-Steel-Ultimate/dp/B000I5JHB0/ref=sr_1_1?s=pc&ie=UTF8&qid=1315447189&sr=1-1
Total: $893
Closest Apple Store Price: $2144
Mac OS X 10.6 Snow Leopard
http://store.apple.com/us/product/MC573Z/A?fnode=MTY1NDAzOA&mco=MTM3NDgwNzM
Installation Procedure:
Preliminary:
Download and burn iBoot to disc.
Download MultiBeast.
Download UpdateHelper.
Download Mac OS X 10.6.8 Combo Update.
Download our DSDT from the DSDT Database.
Remove any extra RAM so there is only 4GB max.
Part 1: BIOS Settings
1. Flash BIOS ver. F4 if it is not currently that version.
2. Set Advanced BIOS Features/Hard Disk Boot Priority to boot from your destination drive first.
3. Set Advanced BIOS Features/First Boot Device to CDROM.
4. Set Advanced BIOS Features/Second Boot Device to Hard Disk.
5. Set Advanced BIOS Features/Init Display First to Onboard.
6. Set Advanced BIOS Features/Onboard VGA to Auto.
7. Set Integrated Peripherals/PCH SATA Control Mode to AHCI.
8. Set Power Management Setup/HPET Mode to 64-bit mode.
9. Press F10 to save and exit.
Part 2: Install Mac OS X
1. Place iBoot in your CD/DVD drive during the BIOS startup screens.
- if the "Loading Operating System" screen does not seem to pick up the disc in the drive, restart your computer.
2. At the boot prompt, eject iBoot.
3. Place your retail Snow Leopard Install DVD into the drive and press F5.
4. Press Enter on the Mac OS X Install DVD icon when it appears to begin installation.
5. After the installation screen appears, open Utilities/Disk Utility.
6. Partition your destination hard drive to the GUID Partition Table, Mac OS X Extended (Journaled), and with the name Snow Leopard. You can rename it later.
- NOTE: The destination partition must be 1TB or less in order to boot.
7. Close Disk Utility.
8. Choose Snow Leopard when the installer asks for your destination drive.
9. Click Customize to choose which extra features to install.
10. Install Snow Leopard.
11. Restart the computer when the installation finishes.
12. Place iBoot back in the drive.
13. Choose the Snow Leopard icon.
Part 3: Post Install
1. Run Update Helper, install to its default location.
2. Restart computer, boot with iBoot.
3. Place our DSDT file on the desktop and rename it to DSDT.aml
4. Open MultiBeast.
5. Open and install the Mac OS X 10.6.8 Combo Update. DO NOT REBOOT AFTER INSTALLATION.
6. Run MultiBeast, choosing only the UserDSDT option.
- NOTE: If Installer unexpectedly quits, reopen Multibeast and repeat step 6.
7. Restart computer.
8. Change your BIOS settings to match these:
- Advanced BIOS Features/First Boot Device to Hard Disk.
- Advanced BIOS Features/Second Boot Device to CDROM.
9. Press F10 to save and exit.
Now when the computer boots up, it should load straight into OS X 10.6.8!
You should make a backup image of your drive so you can restore it if something goes wrong.
You can also follow the xMove + MultiBeast guide to upgrade your machine to Lion.
Sleep/Wake Support:
Set BIOS Settings:
Power Management Setup/Power On By Mouse/Double Click
Power Management Setup/Power On By Keyboard/Password
KB Power ON Password/(Press enter and enter a 1-5 character password)
NOTE 1: To wake the computer, either wiggle the mouse or press a key. After the computer powers up, press a key (I've been using the spacebar) or the computer will fall back asleep.
NOTE 2: It seems that once you restart, wether it's a restart or complete shutdown/power on, after you've gone through a sleep/wake cycle the mobo reverts back to it's last known good BIOS settings. Not sure how to take care of this
Audio Support:
1. Run MultiBeast
2. Check System Utilities
3. Check Drivers & Bootloaders/Kexts & Enablers/Audio/Realtek ALC8xx/ALC8xxHDA
4. Check Drivers & Bootloaders/Kexts & Enablers/Audio/Realtek ALC8xx/AppleHDA Rollback
5. Install
6. Reboot and enjoy audio support for the front/back headphone port, optical out, and line out.
Network Support:
Both my DWA-556 PCIe wireless card and onboard ethernet port work without additional setup.
Notes:
The onboard graphics run at a maximum of 1024x768
As far as I can tell, QE/CI are supported in both 10.6.8 and 10.7
Audio doesn't seem to work on 10.6.8 (nicely anyway), but is supported in 10.7
If anyone has any suggestions for support for things like better sound quality or other updated drivers, please share.