
- Joined
- Oct 3, 2013
- Messages
- 39
- Motherboard
- GA-Z87X-UD3H
- CPU
- 3.5GHZ i7-4770K
- Graphics
- Intel HD 4600
Success!! Ryantcu10’s Haswell i7-4770K - GA-Z87X-UD3H - 16GB RAM - INTEL HD4600
Components
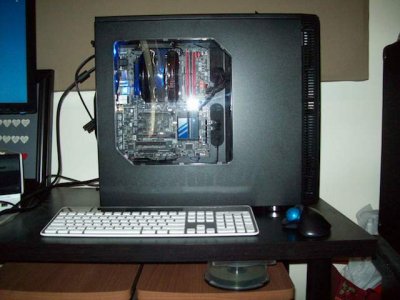
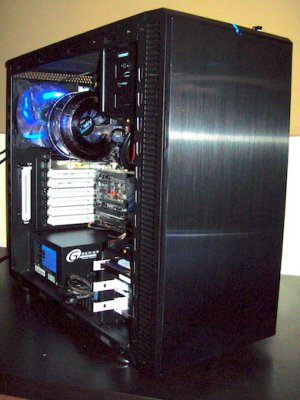
Fractal Design Define R4 with Window Titanium Grey
http://www.newegg.com/Product/Product.aspx?Item=N82E16811352023
GIGABYTE GA-Z87X-UD3H LGA 1150 with UEFI BIOS
http://www.newegg.com/Product/Product.aspx?Item=N82E16813128592
Intel Core i7-4770K Haswell 3.5GHz LGA 1150 Quad-Core Desktop Processor Intel HD Graphics
http://www.newegg.com/Product/Product.aspx?Item=N82E16819116901
Team Vulcan 16GB (2 x 8GB) 240-Pin DDR3 1600 Desktop Memory TXD316G1600HC9DC-V
http://www.newegg.com/Product/Product.aspx?Item=N82E16820313288
ZALMAN CNPS9900MAX-B 135mm CPU Cooler Blue LED
http://www.newegg.com/Product/Product.aspx?Item=N82E16835118074
SAMSUNG 840 EVO 2.5" 120GB SATA III Solid State Drive
http://www.newegg.com/Product/Product.aspx?Item=N82E16820147247
Seagate Barracuda 1TB 7200RPM 64MB Cache SATA 6.0Gb/s 3.5" Internal Hard Drive
http://www.newegg.com/Product/Product.aspx?Item=N82E16822148840
SeaSonic SSR-650RM 650W Modular Active CPU Certified Haswell Ready
http://www.newegg.com/Product/Product.aspx?Item=N82E16817151118
ASUS VE247H Black 23.6" 2ms LCD Monitor
http://www.newegg.com/Product/Product.aspx?Item=N82E16824236112
ASUS 24X DVD - CD-R 32X CD-RW Burner
http://www.newegg.com/Product/Product.aspx?Item=N82E16827135204
TP-LINK WIFI PCI Express Adapter
http://www.newegg.com/Product/Product.aspx?Item=N82E16833704133
IOGEAR Bluetooth 4.0 Micro Adapter USB
http://www.newegg.com/Product/Product.aspx?Item=N82E16833139027
Corsair Air Series 140mm Blue LED Quiet Edition High Airflow Fan
http://www.newegg.com/Product/Product.aspx?Item=N82E16835181049
Already Owned
OSX Mavericks 10.9.1 (app store download from my Macbook)
https://itunes.apple.com/us/app/os-x-mavericks/id675248567?mt=12&ls=1&v0=www-osx-upgrade-button
SanDisk Cruzer Blade 32GB USB Flash Drive
http://www.newegg.com/Product/Product.aspx?Item=9SIA12K0GR2149
Comments
Background
Because I’m a first timer, I spent roughly two months researching and absorbing all I could, then began to develop my wishlist for this build. This build is intended to be my DAW (digital audio workstation) machine, Logic Pro being my DAW software of choice. Boomr’s hackintosh DAW builds inspired me to build my own. I crossed referenced several builds using the same motherboard / BIOS configuration, mainly: Adamsmasher’s, Dasdf’s, and Short’s builds. I also referenced and used some suggestions from thelostswede's 7-Series UEFI Guide, because many of the same rules apply with Gigabyte's Haswell boards. Big thanks to tonymacx86 and the entire tonymacx86 community...you all rock!
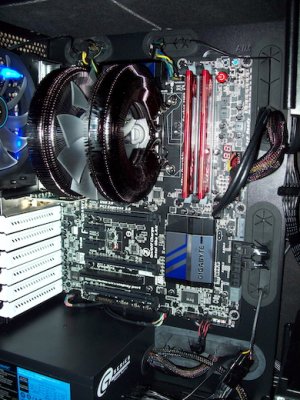
Quick note about the Zalman 9900MAX CPU cooler: installation is NOT easy! The difficulty is due to having to align the posts with the post screws, while keeping the cooler from rocking all over the place. But once installed the thing looks really cool with it's circular heatpipe design, glossy black finish, and blue LED. It also does a stellar job keeping the CPU cool.
Installation
Download the Mavericks installer app (link in components list) and follow the instruction to create UniBeast USB boot drive Here. I copied MultiBeast to my USB drive.
1. To access UEFI Setup, press and hold Delete on a USB Keyboard while the system is booting up.
2. You want to make sure you have Version F7 as your motherboard BIOS. Mine shipped with this BIOS version installed; if yours did not, you may want to update and flash your BIOS (as described in Short's build).
3. Press F2 to enter Classic BIOS
Now Let's Set Things Up:
- Press F7 to load Optimized Defaults
- Performance > X.M.P. > Profile 1
- Peripherals > xHCI Mode > AUTO
- Peripherals > xHCI Hand-OFF > ENABLED
- Peripherals > EHCI Hand-OFF > ENABLED
- Peripherals > Init Display First > IGFX (because I'm using Integrated Graphics)
- Power Management > Wake on Lan > DISABLED
- BIOS Features > Boot Options > Choose the disk you plan to install OSX
- Save and Exit Bios.
4. Boot from USB drive and press F12. Choose Unibeast Drive
5. At the installation screen, go to Utilities and choose Disk Utility.
- Choose the drive you want to install OS X to on the left.
- Go to "Partiiton" tab > Select "1 Partition"
- Enter "Mavericks SSD" as name (you can change it later)
- Choose "Mac OS Extended (Journaled)" as format and under options > "GUID Partition Table"
- Click "Partition" and exit disk utility upon completion
6. Install OS X to the drive you just partitioned
7. Boot again from the USB drive. This time you choose "Mavericks SSD"
8. Run through OSX setup and then run MultiBeast
9. Reboot and enjoy!

The Results!
What's Working
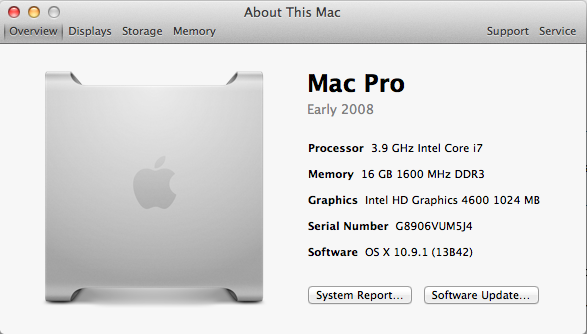
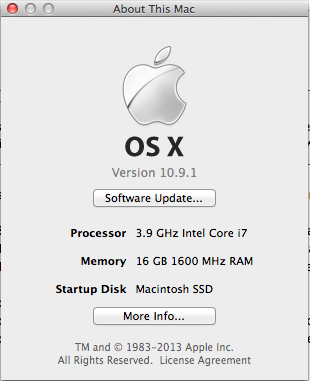
- Everything seems to be working out of the box! HD4600, Ethernet, Audio, Wireless, Sleep, USB 2 and 3 working, FakeSMC + HWMonitor, Speedstep working 8x through 39x.
- Stress testing produced no errors. CPU Cooler responds appropriately and rocks!
- I do not use iMessage...so I haven't checked that.
- Bluetooth is working.
- My ODD was going to sleep, causing any application that shows available drives to freeze (like "about this mac," Disk Utility, or saving a file in any application). This was solved by going into System Preferences > Energy Saver > deselect "Put drives to sleep when possible." Everything works fine now.

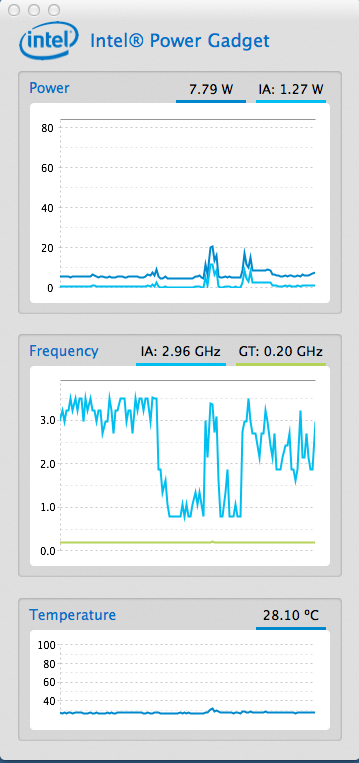
There are some questions in related member builds about Speedstep. I downloaded the Intel Power Gadget to verify speedstep is working properly...AND IT IS!
Edit Log
Jan. 13th 2014:
-Updated BIOS settings in my Comments section because I forgot to include the "Peripherals > Init Display First > IGFX" settings!
- Included "what's Working" section (I will keep this updated as testing continues)
- Cleaned up build description formatting.
Jan. 14th 2014
- Updated "what's working"
Jan. 25th 2014:
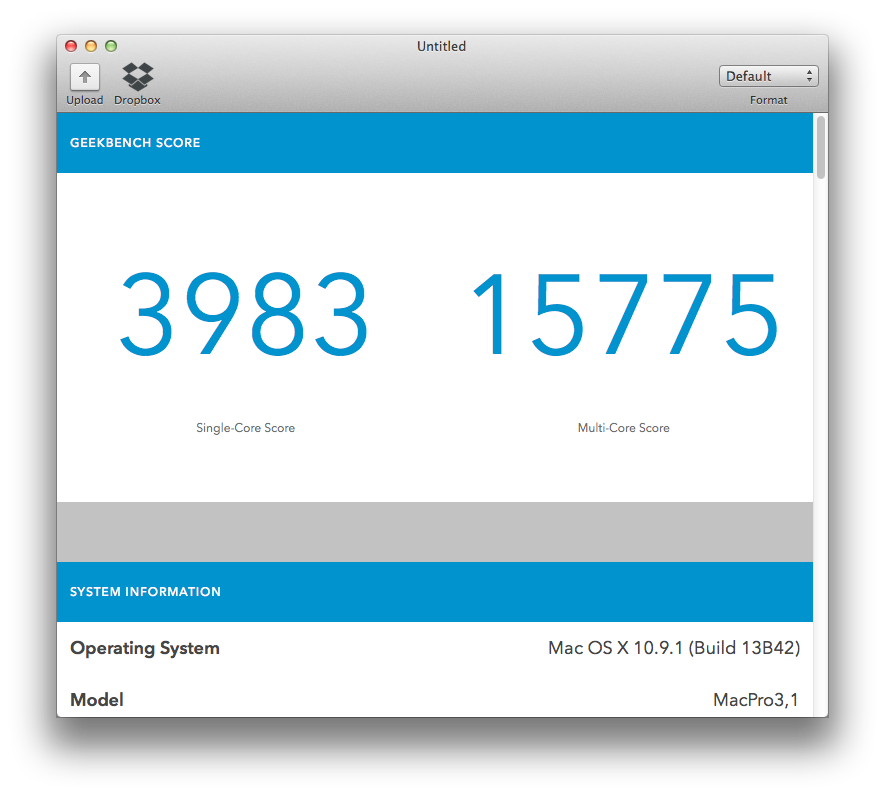
- Updated to 64bit Geekbench score...mainly because it's much more impressive! HAHA!Feb. 14th 2014:
- Updated motherboard bios to F8. Gigabyte reports better haswell support and speedstep improvements.Feb. 25th 2014:
- Updated to Mavericks 10.9.2. OSX installation remains the same. I followed Stork's informative guide found on 10.9.2 update page.
Ryantcu10’s Build: Haswell Core i7-4770K - GA-Z87X-UD3H - 16GB RAM - INTEL HD4600

Components
Fractal Design Define R4 with Window Titanium Grey
http://www.newegg.com/Product/Product.aspx?Item=N82E16811352023
GIGABYTE GA-Z87X-UD3H LGA 1150 with UEFI BIOS
http://www.newegg.com/Product/Product.aspx?Item=N82E16813128592
Intel Core i7-4770K Haswell 3.5GHz LGA 1150 Quad-Core Desktop Processor Intel HD Graphics
http://www.newegg.com/Product/Product.aspx?Item=N82E16819116901
Team Vulcan 16GB (2 x 8GB) 240-Pin DDR3 1600 Desktop Memory TXD316G1600HC9DC-V
http://www.newegg.com/Product/Product.aspx?Item=N82E16820313288
ZALMAN CNPS9900MAX-B 135mm CPU Cooler Blue LED
http://www.newegg.com/Product/Product.aspx?Item=N82E16835118074
SAMSUNG 840 EVO 2.5" 120GB SATA III Solid State Drive
http://www.newegg.com/Product/Product.aspx?Item=N82E16820147247
Seagate Barracuda 1TB 7200RPM 64MB Cache SATA 6.0Gb/s 3.5" Internal Hard Drive
http://www.newegg.com/Product/Product.aspx?Item=N82E16822148840
SeaSonic SSR-650RM 650W Modular Active CPU Certified Haswell Ready
http://www.newegg.com/Product/Product.aspx?Item=N82E16817151118
ASUS VE247H Black 23.6" 2ms LCD Monitor
http://www.newegg.com/Product/Product.aspx?Item=N82E16824236112
ASUS 24X DVD - CD-R 32X CD-RW Burner
http://www.newegg.com/Product/Product.aspx?Item=N82E16827135204
TP-LINK WIFI PCI Express Adapter
http://www.newegg.com/Product/Product.aspx?Item=N82E16833704133
IOGEAR Bluetooth 4.0 Micro Adapter USB
http://www.newegg.com/Product/Product.aspx?Item=N82E16833139027
Corsair Air Series 140mm Blue LED Quiet Edition High Airflow Fan
http://www.newegg.com/Product/Product.aspx?Item=N82E16835181049
Already Owned
OSX Mavericks 10.9.1 (app store download from my Macbook)
https://itunes.apple.com/us/app/os-x-mavericks/id675248567?mt=12&ls=1&v0=www-osx-upgrade-button
SanDisk Cruzer Blade 32GB USB Flash Drive
http://www.newegg.com/Product/Product.aspx?Item=9SIA12K0GR2149
Comments
Background
Because I’m a first timer, I spent roughly two months researching and absorbing all I could, then began to develop my wishlist for this build. This build is intended to be my DAW (digital audio workstation) machine, Logic Pro being my DAW software of choice. Boomr’s hackintosh DAW builds inspired me to build my own. I crossed referenced several builds using the same motherboard / BIOS configuration, mainly: Adamsmasher’s, Dasdf’s, and Short’s builds. I also referenced and used some suggestions from thelostswede's 7-Series UEFI Guide, because many of the same rules apply with Gigabyte's Haswell boards. Big thanks to tonymacx86 and the entire tonymacx86 community...you all rock!
Quick note about the Zalman 9900MAX CPU cooler: installation is NOT easy! The difficulty is due to having to align the posts with the post screws, while keeping the cooler from rocking all over the place. But once installed the thing looks really cool with it's circular heatpipe design, glossy black finish, and blue LED. It also does a stellar job keeping the CPU cool.
Installation
Download the Mavericks installer app (link in components list) and follow the instruction to create UniBeast USB boot drive Here. I copied MultiBeast to my USB drive.
1. To access UEFI Setup, press and hold Delete on a USB Keyboard while the system is booting up.
2. You want to make sure you have Version F7 as your motherboard BIOS. Mine shipped with this BIOS version installed; if yours did not, you may want to update and flash your BIOS (as described in Short's build).
UPDATE 2/14/2014: Updated to latest F8 Bios, following prescribed steps in Short's build description.
3. Press F2 to enter Classic BIOS
Now Let's Set Things Up:
- Press F7 to load Optimized Defaults
- Performance > X.M.P. > Profile 1
- Peripherals > xHCI Mode > AUTO
- Peripherals > xHCI Hand-OFF > ENABLED
- Peripherals > EHCI Hand-OFF > ENABLED
- Peripherals > Init Display First > IGFX (because I'm using Integrated Graphics)
- Power Management > Wake on Lan > DISABLED
- BIOS Features > Boot Options > Choose the disk you plan to install OSX
- Save and Exit Bios.
4. Boot from USB drive and press F12. Choose Unibeast Drive
5. At the installation screen, go to Utilities and choose Disk Utility.
- Choose the drive you want to install OS X to on the left.
- Go to "Partiiton" tab > Select "1 Partition"
- Enter "Mavericks SSD" as name (you can change it later)
- Choose "Mac OS Extended (Journaled)" as format and under options > "GUID Partition Table"
- Click "Partition" and exit disk utility upon completion
6. Install OS X to the drive you just partitioned
7. Boot again from the USB drive. This time you choose "Mavericks SSD"
8. Run through OSX setup and then run MultiBeast
9. Reboot and enjoy!
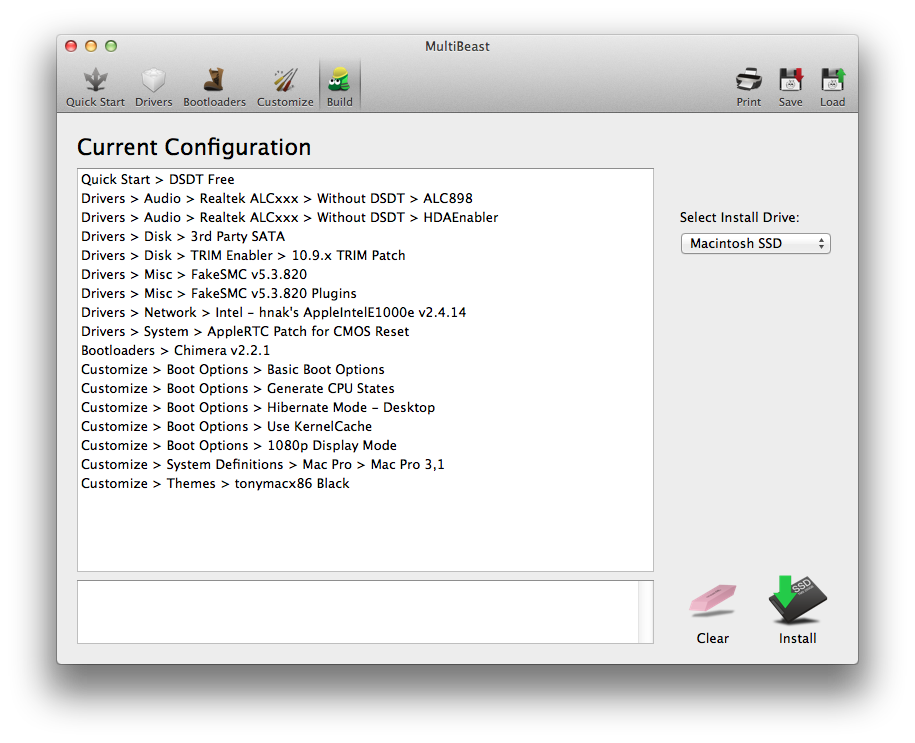
My MultiBeast Configuration
org.chameleon.boot.plist
The Results!
What's Working
- Everything seems to be working out of the box! HD4600, Ethernet, Audio, Wireless, Sleep, USB 2 and 3 working, FakeSMC + HWMonitor, Speedstep working 8x through 39x.
- Stress testing produced no errors. CPU Cooler responds appropriately and rocks!
- I do not use iMessage...so I haven't checked that.
- Bluetooth is working.
- My ODD was going to sleep, causing any application that shows available drives to freeze (like "about this mac," Disk Utility, or saving a file in any application). This was solved by going into System Preferences > Energy Saver > deselect "Put drives to sleep when possible." Everything works fine now.
There are some questions in related member builds about Speedstep. I downloaded the Intel Power Gadget to verify speedstep is working properly...AND IT IS!
Edit Log
Jan. 13th 2014:
-Updated BIOS settings in my Comments section because I forgot to include the "Peripherals > Init Display First > IGFX" settings!
- Included "what's Working" section (I will keep this updated as testing continues)
- Cleaned up build description formatting.
Jan. 14th 2014
- Updated "what's working"
Jan. 25th 2014:
- Updated to 64bit Geekbench score...mainly because it's much more impressive! HAHA!Feb. 14th 2014:
- Updated motherboard bios to F8. Gigabyte reports better haswell support and speedstep improvements.Feb. 25th 2014:
- Updated to Mavericks 10.9.2. OSX installation remains the same. I followed Stork's informative guide found on 10.9.2 update page.
Attachments


Last edited by a moderator: