- Joined
- Mar 19, 2011
- Messages
- 56
- Motherboard
- Asus ROC Strik Z390-E Gaming
- CPU
- i7 9700K
- Graphics
- 760
- Mac
- Mobile Phone
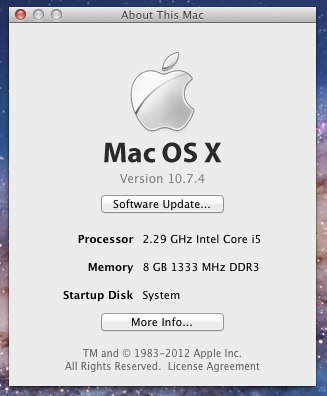
Today I got my new i5 2410m processor to upgrade my standard i3 CPU, and I would like to share my experience in this process.
NOTE: if you feel comfortable taking apart electronic components go for it, if not I will suggest to seek help!!")
I purchase this processor for a cheap price in eBay about $79 including shipping sweet!!!
I started by taking the screws underneath the battery, they are 4 big flat screes that hold the back of the casing.
To remove the bottom covert just release the lock hinges that makes the battery come loose, keep moving the lock hinges until the bottom comes off.
Remove the screw (little one) located in the middle after the battery is removed, this have a label with a lock on it.
Remove the rest of the screws (hex screws) on the side of the casing (labeled MX2.5x6), at this point you can remove the rest of the screws located underneath the cover that covers the memory, they are going to be a few, also some Philips screws that hold the keyboard.
Also you can remove at this point the burner and the screws underneath it (3 of them).
At this point you can remove the wireless cable connectors, the have a black and white sticker, make sure you noticed where those go, so just in case you will not have any issues at the time you need to put it back, JUST IN CASE!!!!
Ohh before I forget, make sure you take the SD card cover and the wifi broadband cover as well
Ok moving on, take the keyboard very carfully, you will fell that is kind of tight on the sides and is because the put glue to keep it tight, after you release the keyboard, take the ribbon cable by lifting the white lock lever. You will find 3 little ones underneath the keyboard + the speaker cable (red & black cable).
Take the rest of the screws you will see in that area as well, they will be 3 labeled M2.5X6
Prime the top case easily, they will be a cable closed to the trackpad.
At this point the motherboard will be exposed and you can take the screen cable, if see more go ahead and remove them, honestly I don't remember if there is more cables there.
Remove the screw located in the bottom left of the motherboard.
Remove the cables on the side of the motherboard, I believe you will see 2 of them, then underneath it will be a few.
At this point you are pretty much all set, remove the piece adhesive holding one side of the heatsink, then unscrew the cpu heatsink and the processor will be exposed.
The CPU will be locked in place, unscrew the lock counter-clock wise to loose the CPU. Place the new one CAREFULLY, follow the mark arrow in the CPU. The CPU will fit only one way, don't force it, it should falls into place easily. Lock clock-wise so the pins will make contact.
Prepare the heatsink with thermal paste evenly, Then start assembling everything again.
You can connect everything till you get the top case. At this point you can give it a try to see if the laptop will show the bios at least, that is a good sign that is reading the CPU info propertly.
I will post some pictures of the laptop later.
I hope this helps some people in this forum that wanted to upgrade there CPU to a fastest one.
PD: If I miss something and I'm sure I did, I'm sorry for that.
PD2: yes I forgot about the HDD, 4 Screws to release it. That's it.
I'm OOOUUT!!!!
NOTE: if you feel comfortable taking apart electronic components go for it, if not I will suggest to seek help!!
I purchase this processor for a cheap price in eBay about $79 including shipping
sweet!!!I started by taking the screws underneath the battery, they are 4 big flat screes that hold the back of the casing.
To remove the bottom covert just release the lock hinges that makes the battery come loose, keep moving the lock hinges until the bottom comes off.
Remove the screw (little one) located in the middle after the battery is removed, this have a label with a lock on it.
Remove the rest of the screws (hex screws) on the side of the casing (labeled MX2.5x6), at this point you can remove the rest of the screws located underneath the cover that covers the memory, they are going to be a few, also some Philips screws that hold the keyboard.
Also you can remove at this point the burner and the screws underneath it (3 of them).
At this point you can remove the wireless cable connectors, the have a black and white sticker, make sure you noticed where those go, so just in case you will not have any issues at the time you need to put it back, JUST IN CASE!!!!
Ohh before I forget, make sure you take the SD card cover and the wifi broadband cover as well
Ok moving on, take the keyboard very carfully, you will fell that is kind of tight on the sides and is because the put glue to keep it tight, after you release the keyboard, take the ribbon cable by lifting the white lock lever. You will find 3 little ones underneath the keyboard + the speaker cable (red & black cable).
Take the rest of the screws you will see in that area as well, they will be 3 labeled M2.5X6
Prime the top case easily, they will be a cable closed to the trackpad.
At this point the motherboard will be exposed and you can take the screen cable, if see more go ahead and remove them, honestly I don't remember if there is more cables there.
Remove the screw located in the bottom left of the motherboard.
Remove the cables on the side of the motherboard, I believe you will see 2 of them, then underneath it will be a few.
At this point you are pretty much all set, remove the piece adhesive holding one side of the heatsink, then unscrew the cpu heatsink and the processor will be exposed.
The CPU will be locked in place, unscrew the lock counter-clock wise to loose the CPU. Place the new one CAREFULLY, follow the mark arrow in the CPU. The CPU will fit only one way, don't force it, it should falls into place easily. Lock clock-wise so the pins will make contact.
Prepare the heatsink with thermal paste evenly, Then start assembling everything again.
You can connect everything till you get the top case. At this point you can give it a try to see if the laptop will show the bios at least, that is a good sign that is reading the CPU info propertly.
I will post some pictures of the laptop later.
I hope this helps some people in this forum that wanted to upgrade there CPU to a fastest one.
PD: If I miss something and I'm sure I did, I'm sorry for that.
PD2: yes I forgot about the HDD, 4 Screws to release it. That's it.
I'm OOOUUT!!!!