
- Joined
- Dec 1, 2010
- Messages
- 161
- Motherboard
- Hack Pro
- CPU
- Core i7 2600k
- Graphics
- GT 240
- Mac
- Classic Mac
- Mobile Phone
Ok so I posted this on my build but I wanted to make a post of how to do this as a stand alone how to for anyone who wants to do this.
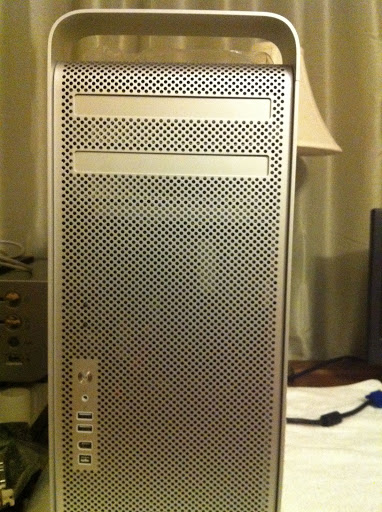
For anyone who is reading this and wondering why you would need such a thing take a look at the Mac Pro and G5 case front just like all macs there is no way to eject the DVD drive outside of the OS, on a real Mac you can use the Keyboard eject button but on a Hackintosh you do not have that option so its a pain when you need to reinstall your OS or in my case my system is going to be a home theater system so being able to pop in a DVD with out having to break out the mouse is very helpful
So first off parts: This will cost less than $10 if you already have some wire, a hot glue gun and a soldering iron if not figure on and extra $30 for that stuff.
Parts you will need:
Tact Switches pack of 4 cost about $3.99, these are the same type of switch that dvd drives have on them, you can also use any normally open momentary switch. Normally open just means that when the switch is not depressed the circuit is open and momentary means that it is only closed for the moment that you have it depressed. If you get normally closed it will still work but every time you turn on the system your drive will eject because you are closing the circuit.
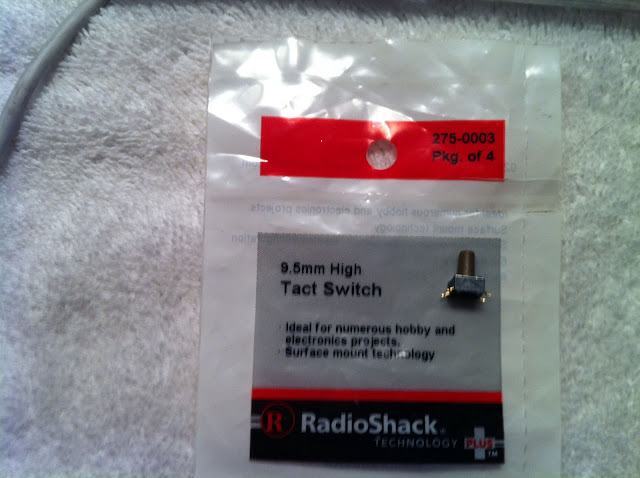
These switches are tiny less than one CM tall and the post is just a little to big around to fit through the holes on a Mac Pro case so you will need to drill the hole a little bigger.
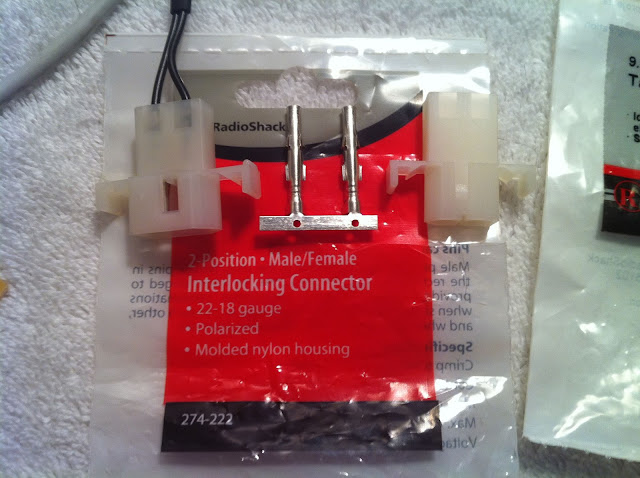
Nylon interlocking connectors $2.99, you will need a plug for the DVD drive so that you can unplug the drive from the switch. I like these from Radio Shack they are 2 pin, simple to solder the wires to, and small so you can mount them in to almost any DVD drive.
You will need a circuit board you can make this or buy one at Radio Shack for $1.99, this will be what you mount the switch on
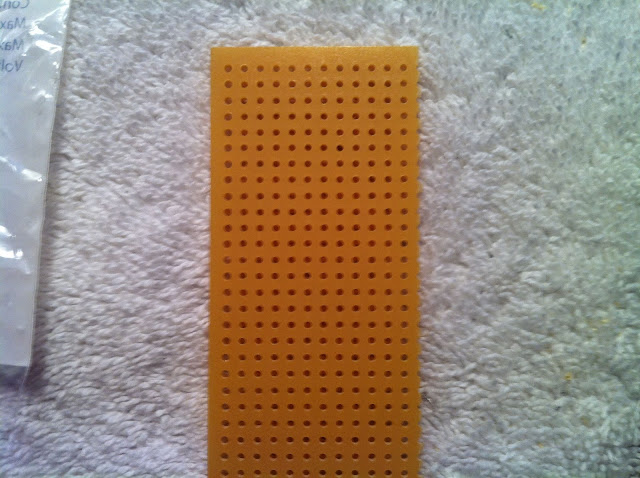
For $1.99 you get a board about 3"x5" you a box cutter and a straight edge to make a score line and break it in to what ever size you need.
You will need wire, almost anything will work since this is not going to have any power on it just completing a circuit. For inside the dvd drive I used 20 gauge solid core wire because it was cheap and it holds the shape you put it in very well and inside the case I used wires off of an old dead power supply because it already had a plug on it and it was free.
**(Just a quick warning I know I just said I used a Molex power plug in my build and you will see how down the page but DO NOT use a molex power plug on the back of the DVD drive If anyone ever hooked up power to it by mistake you could kill your DVD drive and or your Power Supply so dont do it)**
Ok so time to start building.
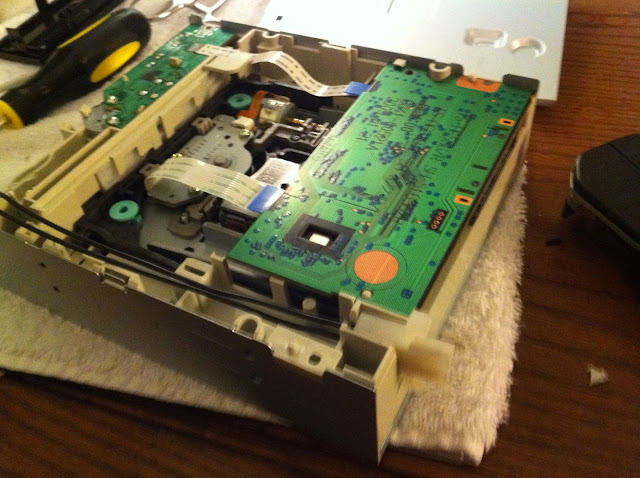
You will need to take out the 4 screws on the bottom of your DVD drive and the bottom will pop right off, now be careful at this point because at this point nothing is holding the drive in place you may even want to put on screw back in to hold every thing down. You may also need to take off the front plate it may be in your way. To do that all you do is take off the drive tray front, if you look at it with the tray open you will see that it just slips off with a little outward pressure and sliding up. And for the drive front all you have to do is press in the 2 side tab and slide out (some drives have top or bottom tabs as well)
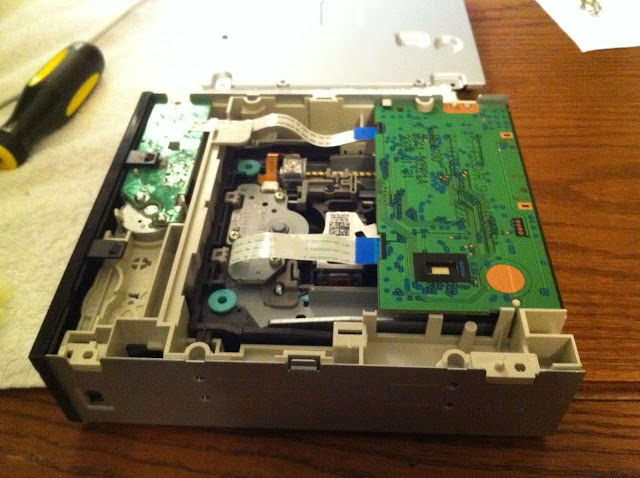
I did not have to take the front off of this drive

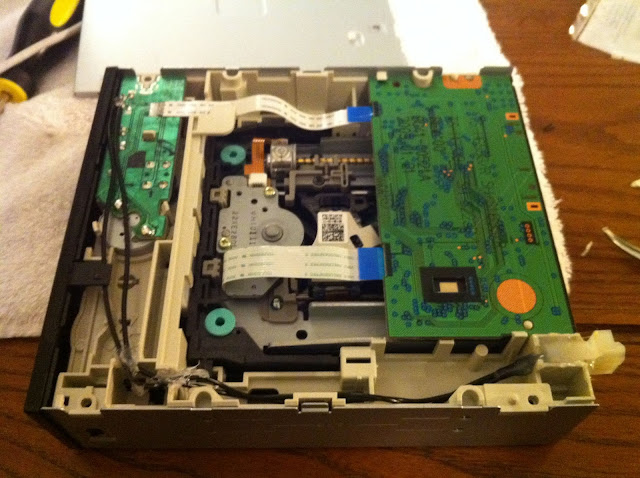
These are the solder points for the switch, the 2 front ones are the switch and the 2 back ones are the mounts. You can test them at this point by plugging the drive power in and bridging the 2 front points with a bit of wire and the drive should pop open do it again and the drive should pop closed.
Next you need to prep your plug, now these plug are easy to work with all you do is strip back about 4 or 5mm of wire place the wire in the back end of the plug crimp it in place and hit it with a little solder to give it a good connection and lock the wire in. Do the same thing for the other wire and slide them in to the nylon housing and they will lock in place. Be sure to leave plenty of wire to reach the solder points what ever you think is long enough add 3" on to that, trust me its better to over estimate.
Now you need to cut a hole at the back of the drive for the plug, you can use a saw or cut off wheel just don't get saw dust in the workings of the drive. I used a exacto knife attachment on my soldering iron, have you heard the saying hot knife through butter well this is literally a hot razor blade through PVC plastic.
Now you can run your wires, leave some slack and strip about 1mm of wire, tin the end of the wire with a little solder, lay it in place touching the solder points and all you have to do is touch the solder point and wire for a second for it to attach, be very careful not to stay on to long or to use to much solder as you do not want to short the to points together. Next use hot melt glue to lock the plug in place and lock your wire from moving, and I like to put a little over the solder points just incase the the bottom would touch the wires when you put it back on. Don't build the hot glue up to high over the points of you will have a hard time getting the bottom back on and you can smooth the glue when its still hot with a wet finger.
You should end up with something like this.
Next lets build the switch
If you can find a switch with longer wires that will help these are super small, you will need to very carefully fold the wires up so they are under the plug and not out to the sides and you will need to drill out the holes in your board to about double there regular size. To make the wires stick through the holes a little better I build up a little solder on them and let it pull out in to like a little wire. You can test your switches with a multi-metar but on mine the diagonal wires made a circuit. I place the switch in the holes and got the tip of my soldering iron loaded with solder and let a blob of solder fall on the points. I'm sure there is a better way of doing this, but I could not find it everything else was just burning the board so this worked.

Switch mounted to the board
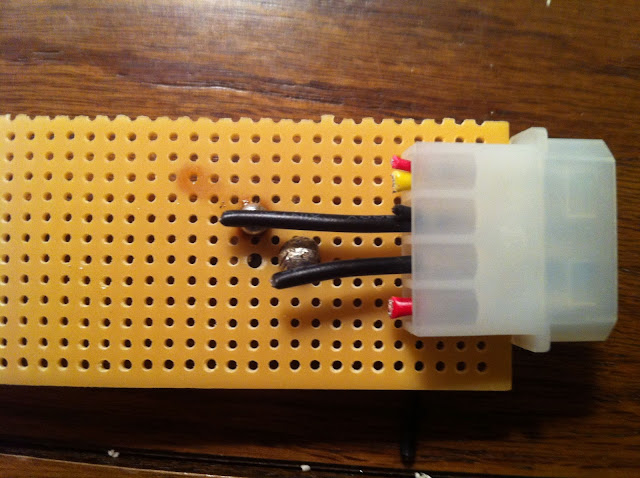
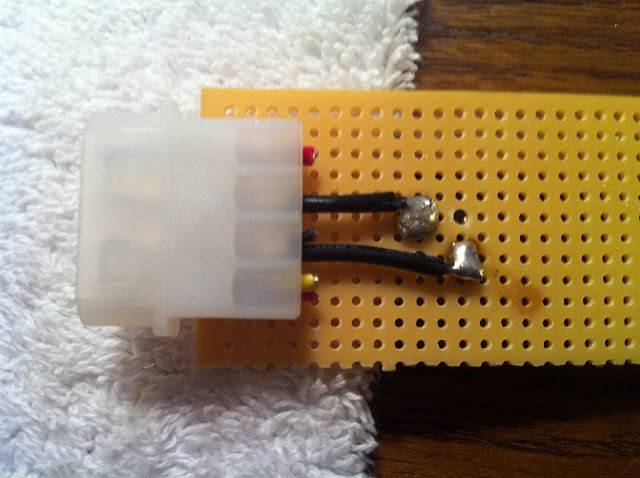
The Molex Plug to hook the board to the cable
This is the one switch board I am building for my G5 case
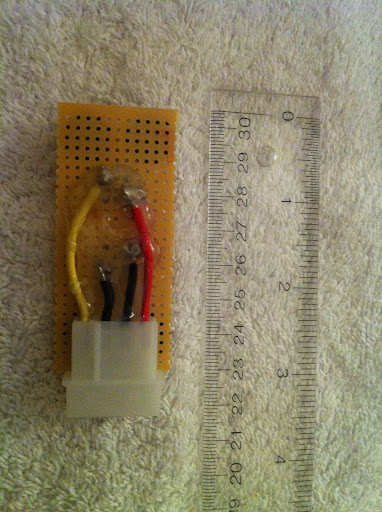
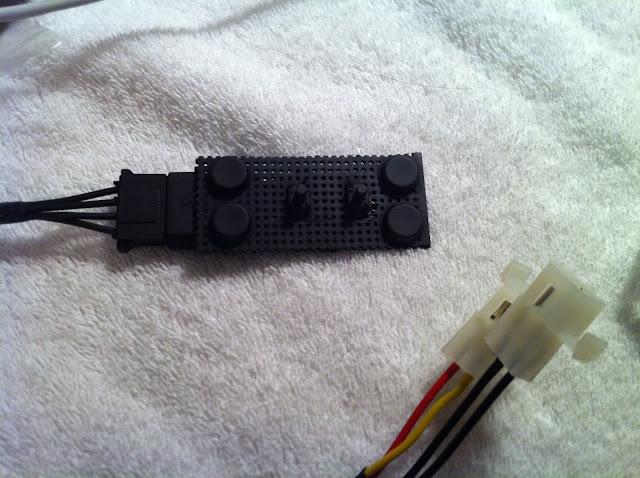
This is the two switch one for my Mac Pro case, this is why I used the Molex Power cable is it has 4 wires and I needed 4 wires for this system
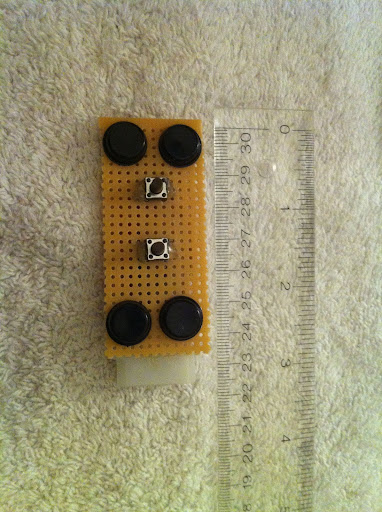
This is the front side with 4 rubber feet I got at Radio Shack and I found that black Velcro stuck to the top of the rubber feet make the tips of the buttons only just stick through the case
Now all that is left is to make the cable this is as simple as measuring the length, soldering the ends on and routing the cables
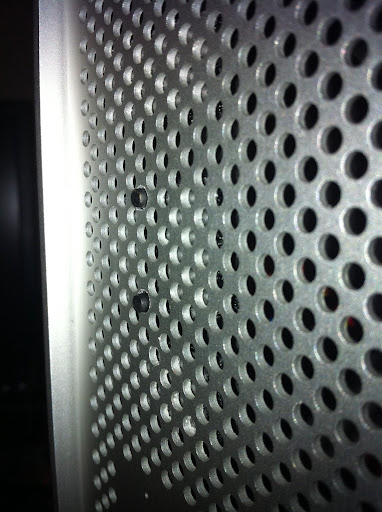
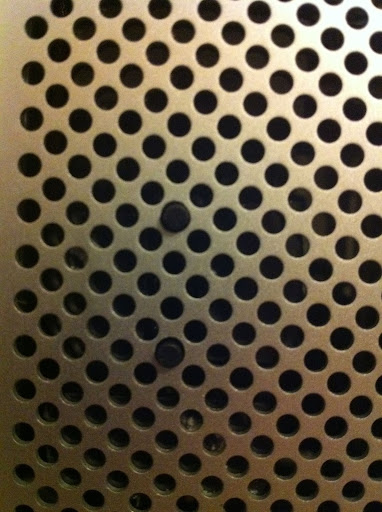
Hit it with a little black paint so you can not see it through the holes in the case drill out your holes so that is will fit and mount it with a little black Velcro and you are done.
For anyone who is reading this and wondering why you would need such a thing take a look at the Mac Pro and G5 case front just like all macs there is no way to eject the DVD drive outside of the OS, on a real Mac you can use the Keyboard eject button but on a Hackintosh you do not have that option so its a pain when you need to reinstall your OS or in my case my system is going to be a home theater system so being able to pop in a DVD with out having to break out the mouse is very helpful
So first off parts: This will cost less than $10 if you already have some wire, a hot glue gun and a soldering iron if not figure on and extra $30 for that stuff.
Parts you will need:
Tact Switches pack of 4 cost about $3.99, these are the same type of switch that dvd drives have on them, you can also use any normally open momentary switch. Normally open just means that when the switch is not depressed the circuit is open and momentary means that it is only closed for the moment that you have it depressed. If you get normally closed it will still work but every time you turn on the system your drive will eject because you are closing the circuit.
These switches are tiny less than one CM tall and the post is just a little to big around to fit through the holes on a Mac Pro case so you will need to drill the hole a little bigger.
Nylon interlocking connectors $2.99, you will need a plug for the DVD drive so that you can unplug the drive from the switch. I like these from Radio Shack they are 2 pin, simple to solder the wires to, and small so you can mount them in to almost any DVD drive.
You will need a circuit board you can make this or buy one at Radio Shack for $1.99, this will be what you mount the switch on
For $1.99 you get a board about 3"x5" you a box cutter and a straight edge to make a score line and break it in to what ever size you need.
You will need wire, almost anything will work since this is not going to have any power on it just completing a circuit. For inside the dvd drive I used 20 gauge solid core wire because it was cheap and it holds the shape you put it in very well and inside the case I used wires off of an old dead power supply because it already had a plug on it and it was free.
**(Just a quick warning I know I just said I used a Molex power plug in my build and you will see how down the page but DO NOT use a molex power plug on the back of the DVD drive If anyone ever hooked up power to it by mistake you could kill your DVD drive and or your Power Supply so dont do it)**
Ok so time to start building.
You will need to take out the 4 screws on the bottom of your DVD drive and the bottom will pop right off, now be careful at this point because at this point nothing is holding the drive in place you may even want to put on screw back in to hold every thing down. You may also need to take off the front plate it may be in your way. To do that all you do is take off the drive tray front, if you look at it with the tray open you will see that it just slips off with a little outward pressure and sliding up. And for the drive front all you have to do is press in the 2 side tab and slide out (some drives have top or bottom tabs as well)
I did not have to take the front off of this drive
These are the solder points for the switch, the 2 front ones are the switch and the 2 back ones are the mounts. You can test them at this point by plugging the drive power in and bridging the 2 front points with a bit of wire and the drive should pop open do it again and the drive should pop closed.
Next you need to prep your plug, now these plug are easy to work with all you do is strip back about 4 or 5mm of wire place the wire in the back end of the plug crimp it in place and hit it with a little solder to give it a good connection and lock the wire in. Do the same thing for the other wire and slide them in to the nylon housing and they will lock in place. Be sure to leave plenty of wire to reach the solder points what ever you think is long enough add 3" on to that, trust me its better to over estimate.
Now you need to cut a hole at the back of the drive for the plug, you can use a saw or cut off wheel just don't get saw dust in the workings of the drive. I used a exacto knife attachment on my soldering iron, have you heard the saying hot knife through butter well this is literally a hot razor blade through PVC plastic.
Now you can run your wires, leave some slack and strip about 1mm of wire, tin the end of the wire with a little solder, lay it in place touching the solder points and all you have to do is touch the solder point and wire for a second for it to attach, be very careful not to stay on to long or to use to much solder as you do not want to short the to points together. Next use hot melt glue to lock the plug in place and lock your wire from moving, and I like to put a little over the solder points just incase the the bottom would touch the wires when you put it back on. Don't build the hot glue up to high over the points of you will have a hard time getting the bottom back on and you can smooth the glue when its still hot with a wet finger.
You should end up with something like this.
Next lets build the switch
If you can find a switch with longer wires that will help these are super small, you will need to very carefully fold the wires up so they are under the plug and not out to the sides and you will need to drill out the holes in your board to about double there regular size. To make the wires stick through the holes a little better I build up a little solder on them and let it pull out in to like a little wire. You can test your switches with a multi-metar but on mine the diagonal wires made a circuit. I place the switch in the holes and got the tip of my soldering iron loaded with solder and let a blob of solder fall on the points. I'm sure there is a better way of doing this, but I could not find it everything else was just burning the board so this worked.
Switch mounted to the board
The Molex Plug to hook the board to the cable
This is the one switch board I am building for my G5 case
This is the two switch one for my Mac Pro case, this is why I used the Molex Power cable is it has 4 wires and I needed 4 wires for this system
This is the front side with 4 rubber feet I got at Radio Shack and I found that black Velcro stuck to the top of the rubber feet make the tips of the buttons only just stick through the case
Now all that is left is to make the cable this is as simple as measuring the length, soldering the ends on and routing the cables
Hit it with a little black paint so you can not see it through the holes in the case drill out your holes so that is will fit and mount it with a little black Velcro and you are done.