Contribute
Register

HackPro G5: Budget Gaming Hackintosh Build

Status
Not open for further replies.
Joined
Apr 16, 2013
Messages
45
Motherboard
HackPro G5
CPU
i5-3750 3.4ghz
Graphics
EVGA GTX 650 Ti Boost SC
Mac
  1. Mac Pro
Classic Mac
  1. 0
Mobile Phone
  1. 0
Hey all, I had asked a couple questions around here already and had some great help from folks. I have done a couple of PC builds back in college, but the latest was probably 10 years ago or more so I'm pretty rusty. I'm also new to the hackintosh approach but it really appealed to me after I did some figuring and realized I could sell my 2009 iMac for $700 and spend that or less on a decent, if not top-tier dual-boot gaming machine.

So, anyway, I'm going to document my progress here and hopefully get some help when needed and also offer it others in the process. I fully expect to **** up something but we shall see.

Here's the basic plan:


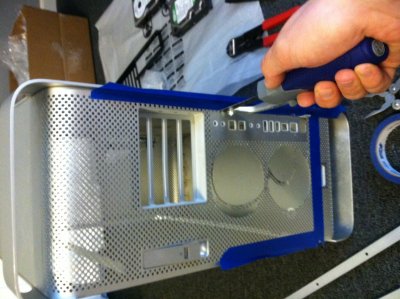
  1. 2005-ish PowerMac G5 Case - Done. Picked up for free from a stack of them in our IT closet.
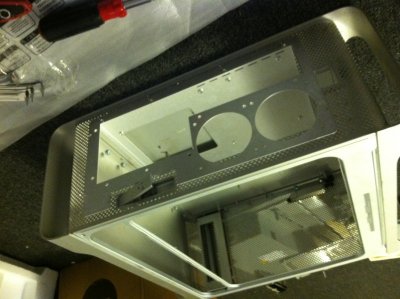
  2. Mountain Mods G5 Motherboard Tray - Done. Just got it - see below for pic.
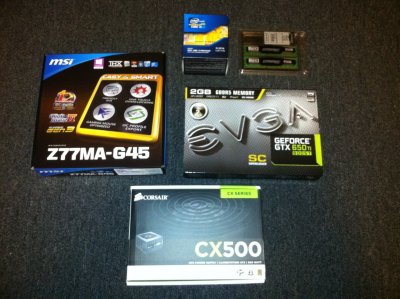
  3. Newegg Parts - On their way, full line-up is below.
  4. Stock PSU conversion - Mulling this one over, anyone done it? Dangerous?
  5. Relocate Stock HD Tray - May not even need to do this depending on mobo.
  6. Keep Stock Acrylic Air Channel - Clear acrylic cover over the insides is badass, want to keep that.
  7. Keep some/all Stock Fans - This may be a jump, but we'll see if i can get some adapters
  8. Hook-up front panel harness - I think I may just buy a wire kit

Okay, let's see how this plays out...
 
I wanted to get as close to a clean-swap in terms of cost from selling off my old, but trusty iMac 24" Dual Core. Within 2 days of posting to Craigslist I had it picked up by a guy, cash in hand for the full $700 I asked for it.

So, what did I spend that cash on? Here's the line-up of the major components of the build from NewEgg, this came out to just about $617 with shipping:


1 Intel Core i5-3570 Ivy Bridge 3.4GHz (3.8GHz Turbo Boost) LGA 1155 77W Quad-Core Desktop Processor Intel HD Graphics 2500 ...Item #: N82E16819115233CPU Replacement Only Return Policy $214.99
1 CORSAIR Builder Series CX500 500W ATX12V v2.3 80 PLUS BRONZE Certified Active PFC Power SupplyItem #: N82E16817139027Standard Return Policy $69.99$49.99
1 NVIDIA $75 value in-game coin couponItem #: N82E16800995150Standard Return Policy $75.00
1 Crucial Ballistix Sport 8GB (2 x 4GB) 240-Pin DDR3 SDRAM DDR3 1600 (PC3 12800) Desktop Memory Model BLS2KIT4G3D1609DS1S00Item #: N82E16820148544Memory Standard Return Policy $57.99
1 COOLER MASTER R4-C2R-20AC-GP 120mm Case coolerItem #: N82E16835103061Standard Return Policy $9.99$8.99
1 EVGA 02G-P4-3658-KR GeForce GTX 650 Ti BOOST SuperClocked 2GB 192-bit GDDR5 PCI Express 3.0 SLI Support Video Card ...Item #: N82E16814130910VGA Standard Return Policy $179.99
1 MSI Z77MA-G45 LGA 1155 Intel Z77 HDMI SATA 6Gb/s USB 3.0 Micro ATX Intel Motherboard with UEFI BIOSItem #: N82E16813130647Standard Return Policy $109.99$104.99
2 APEVIA CF4S-BK 80mm Case coolerItem #: N82E16835228011Computer Cables and Accessories Extended Return Policy $7.98$4.56($2.28 ea)
 
The remaining dough from my iMac sale went toward a Mountain Mods motherboard tray adapter and back-panel. I hadn't hurt of the Lian models before I pulled the trigger on this but I like the overall look of the Mountain Mods better so let's hope it is functionally sound. They were out of the full brushed aluminum kit, so I had them give me a mirror-back IO port...I actually like it better that way, gives some definition to the back of the case.

Here's the parts laid out in the basement...now I'm just waiting on Newegg's legendary blazing fast shipping.

photo (1).JPG
 
So, after being absolutely slammed with work for the last couple weeks, I finally found a decent block of time to start tearing the G5 apart and getting it prepped for the new guts. It's pretty amazing what you can accomplish on MUTE during back to back conference calls all day:

STEP 1 - Remove the old guts

Apple seriously overbuilds these things, huh? I had flashes of Tony Stark building the Mark 1 as I was tearing this **** apart.

photo (4).JPG

STEP 2 - Strip the superfluous **** from the recipient case. Nothing too hard here, did have to spend some time trying to get that damned upper tray out but finally figured it out thanks to the FAQ over at G5 Modders. Nifty little design, in fact, I think I'll build back in when I'm done.

photo (5).JPG

STEP 3 - Admire the (mostly) finished product. Again, pulled out the upper tray, optical drive and HDD caddy. Definitely want to reuse the caddy, it's such an awesome design that it'd almost be wrong not to incorporate in some way. I'm thinking I will actually put it right back in place if I can trim enough away to slide the MOBO up into place, 2 drive slots will let me run an SSD for OS and my 2TB caviar drive.

photo (3).jpg

STEP 4 - Considering my complete lack of power tools at the moment and that I have to keep one ear on the phone to see if someone references my name on this god forsaken conference call, I decided to bust out the mini-hacksaw and tin snips. Here goes nothing:

photo (6).JPG

STEP 5 - That was not that hard! I have read a bunch of commentary on here about what a bitch it is to remove the back panel, but I think I knocked this out purely with hand power, overly developed wrists :think: and some intermittent cursing. Took me maybe an hour in between calls? A jigsaw certainly would have made it easier but I found this to be fairly exact and I kind of enjoyed linking up all the little perforations in the aluminum...

photo (7).JPG

STEP 6 - Now, the fun stuff! Started fitting the MoBo tray on the stock stand-offs as everyone advises and test fitted it into place. The only real pain in the ass here was trimming out the back-panel aluminum piece for the side panel release lever. Why in the hell does Mountain Mods not trim this thing for you when you're specifically paying for a G5 adapter?! Gonna have to knock them there considering the price tag and specific option you select for this mod...but, again, some quick tin snip work had this carved out albeit a little inelegantly:
photo (8).JPG

STEP 7 - Done for the night! Here's the motherboard tray in place. I need to finish screwing everything into place and then we start playing with the components. Hopefully I'll have a similar work day tomorrow of pointless conference call meetings and we'll see some real progress. Until then, I'm scouring the threads for additional improvements including a front ports adapter harness, PSU repackaging and possibly an AirPort card down the line. Anyway, here you go - ready for the transplant:

photo (9).JPG
 

Attachments

  • photo (6).JPG
    photo (6).JPG
    557.5 KB · Views: 284
  • photo (8).JPG
    photo (8).JPG
    515.4 KB · Views: 294
Today was busier at work, but did get some time over lunch here to make a few more tweaks. For background, my idea of placing the back-panel lower that some others have done is that I a) want to preserve the top tray functionality for holding the HDD caddy and optical drive if at all possible b) I'd like to eventually build the power-supply into the very slick, stock container that slides into the bottom of the G5 case.

Anyway, with that in mind, I relocated a couple of the stock G5 standoffs (just hit them with the end of my tin snips a couple times, popped right off) to secure the actual motherboard tray and then spent a decent amount of time mulling over securing the back-panel to the case. I eventually stumbled upon another wise G5 modder's point that the M3 screws that come with the Mountain Mods kit fit perfectly through the perforated holes in the aluminum...duh! So, I used 4 sets of Mountain Mods' standoffs and M3 screws and it worked like a charm.

photo (10).JPG

Now that I have the IO ports and back-panel firmly secured to the case, I installed my Apevia 80mm brushless fans. I thought about doing a fan "grate" using the stock scissor grates from the Apple 60mm fans but I kind of like the piano black on aluminum style that's developing here:

photo (11).JPG

And here's what the back looks like now with everything attached and ready for final tightening. I think I had bent the back-panel just a little bit when tin-snipping away the cut-out for the release lever but it went right up snug against the case once I put the standoff screws through. What d'yall think?

photo (12).JPG
 

Attachments

  • photo (12).JPG
    photo (12).JPG
    529.5 KB · Views: 321
Thanks! It is coming along pretty well and I'm surprised how jazzed I am about my first computer build in over a decade. This **** is fun!

Before I close up shop for the day, I moved a couple more stand-offs under the board and I'm letting the glue dry on those before screwing everything down. Pretty happy with the progress and will see about breaking into installing the components tomorrow afternoon.

Since I just realized I haven't unveiled those yet, here's what's going in sans HDDs, fans, optical drive, etc:

photo (13).JPG

From top-center clockwise, that's:


  • Intel i5-3570 Ivy 3.4ghz CPU
  • Crucial Ballistix 8GB of RAM
  • EVGA GeForce GTX 650 Ti Boost Super-Clocked GPU
  • Corsair CX500 80 Plus Bronze PSU
  • MSI Z77MA-G45 LGA 1155 MOBO
 
Lots of progress over the weekend, got all of the components installed and did a live fire trial run of simply power-up...it turned on!

Now, I need to go and get myself a USB keyboard so I can run the BIOS mods...gave my last non-wireless keyboard away as part of the deal to the guy who bought my iMac. Other than that, I need to get the HDD caddy mounted, the top tray back into place and of course the OS installed.

I've also decided I'm going to try to keep this under $700 if at all humanly possible. Mostly I want to prove that I can replace my 2009 iMac with a bang-up budget gaming machine dollar for dollar for what I sold it for...so, I cleared my Newegg shipping cart of a couple extras and decided to try my hand at wiring up a front panel. At this point I've spent $617 on the components and $59.99 on the Mountain Mods motherboard, plus $13 shipping. I'm at about $690 on the build and going strong.

Here's a few pics of the installed components and bastard trial run setup:

photo (14).JPGphoto (15).JPG
 

Attachments

  • photo (13).JPG
    photo (13).JPG
    516.4 KB · Views: 231
Nothing new to report due to a busy work week but did just stumble across this insane G5 case mod on Bit Tech. I am beyond blown away by this setup in terms of look and quality, but I also kinda can't believe how much time this guy spent on it - a year of modding?!

http://www.bit-tech.net/modding/2008/10/28/apple-core-duo-by-cyprio/1

I started my G5 case mod on overclock.net in June of 2012 and I am just now finishing it. It has been a labor of love and I want to start on my next one already!

Jeffinslaw
 
Status
Not open for further replies.
Back
Top