- Joined
- Oct 27, 2013
- Messages
- 16
- Motherboard
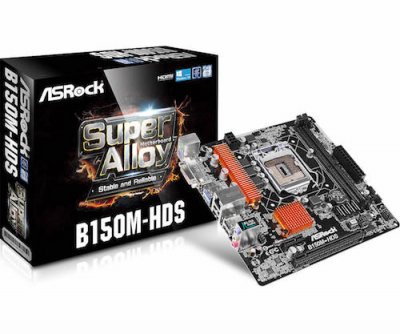
- ASRock B150M-HDS
- CPU
- i3-6100 [email protected]
- Graphics
- GTX 1070 Ti
- Mobile Phone
Hi everyone, this guide will help you to install macOS Sierra on your ASRock B150M-HDS.
This guide skips the USB creation part with Unibeast.
Just make sure you use UEFI Boot Mode for Clover and don't touch config.plist
My PC Setup
- ASRock B150M-HDS
- Intel Core i3-6100 @ 3,7GHz
- AMD Radeon R7 370
- Realtek Ethernet RTL8111GR
- Realtek ALC887 Audio
- Samsung EVO 850
- VT-d disabled
- IOAPIC 24-119 disabled
- XHCI Hand-off enabled (Requires UEFI version 7.10 to configure, but USB ports work also on older versions
)
- Fast boot disabled
- Secure boot disabled
1. Configuring Clover BEFORE installation
Please use the attached BeforeInstall_config.plist to boot the installer otherwise you won't be able to boot.
This config.plist will use "iMac17,1" as SMBIOS, the correct one for this Skylake board.
While in Clover Boot Menu, change to Configs and do the following steps:
ACPI->DSDT Fixes
Fix USB
Fix Display (if you have same graphics card)
Don't drop any OEM table, otherwise you can't boot!
Devices->USB
InjectUSB
Add ClockID
FixOwnership
External Graphics R7 370
InjectATI
FakeID: 0x68101002 (For the R7 370, because it's a rebranded HD 7870)
Framebuffer: Futomakis (Loads default RadeonFramebuffer or you patch the Futomaki framebuffer)
VRAM: 2048 or 4096 (The R7 370 exists as 2 or 4GB model)
Ports: Count the ports of your graphics card (The R7 370 exists with 4 or 5 ports)
Internal Graphics HD 530
InjectIntel
Graphics -> ig-platform-id: 0x19120000
Devices -> Add Properties
| Device | Key | Value (data) |
| IntelGFX | AAPL,Gfx324 | AQAAAA== |
| IntelGFX | AAPL,GfxYTile | AQAAAA== |
| IntelGFX | AAPL00,PanelPowerUp | MAAAAA== |
| IntelGFX | AAPL00,PanelPowerOn | GQEAAA== |
| IntelGFX | AAPL00,PanelPowerOff | EQAAAA== |
| IntelGFX | AAPL00,PanelPowerDown | PAAAAA== |
| IntelGFX | AAPL00,PanelCycleDelay | +gAAAA== |
| IntelGFX | device-colors | AAIAAKCdnQAAAAAAAAAAAA== |
2. Installation
- Choose Install macOS Sierra.
- After reaching the Installer format your HDD/SSD with the Disk Utility to HFS+ Journaled, GUID Partition Table.
- Exit Disk Utility and install macOS Sierra to your formated HDD/SSD.
- The system will reboot after the installation.
- Boot again to USB but this time choose macOS from your HDD/SSD to continue the installation.
- Don't connect to the internet if asked, this will reboot your installation.
3. Post-Installation
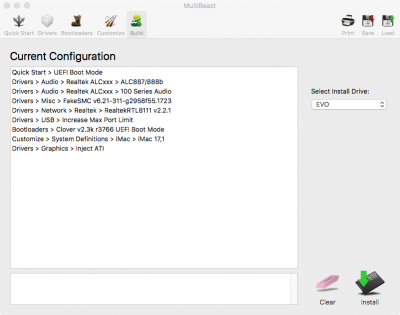
For the Post-Installation we use MultiBeast Sierra Edition and Clover Configurator.
- Choose Quick-Start -> UEFI Boot Mode
- Choose Drivers
Audio -> Realtek ALC 887/888b + 100 Series Audio
Network -> RealtekRTL8111 v2.2.1
USB -> Increase Max Port Limit
- Choose Customize
Graphics Configuration -> Inject ATI (If using the R7 370)
System Definitions -> iMac 17,1

- Select your HDD/SSD and click on Install
- Mount your EFI partition from the HDD/SSD with Clover Configurator
- Replace the configured/downloaded AfterInstall_config.plist to EFI/CLOVER/
- Reboot to your HDD/SSD not the USB!
- Boot macOS
4. DSDT Fixes & Generate CPU SSDT
DSDT (ONLY IF YOUR UEFI VERSION IS BELOW 7.10)
While this mainboard doesn't support macOS or Linux below UEFI version 7.10, you have to correct the DSDT because the console will spam constantly:
ACPI Error: Method parse/execution failed, [\_GPE._L6F] (Node ffffff80323535d0), AE_NOT_FOUND (20140828/psparse-270)
To fix this error on macOS you can use my fixed DSDT for the B150M-HDS or update to UEFI 7.10. The DSDT is attached below.
Mount your EFI partition from the HDD/SSD an place this file to EFI/CLOVER/ACPI/patched.
Rename to DSDT.aml.
CPU SSDT
To improve the CPU power management you can generate a SSDT with Piker Alpha's ssdtPRGen script.
Mount your EFI partition from the HDD/SSD an place this file to EFI/CLOVER/ACPI/patched.
5. Working Devices & Known Issues
Working Devices
| Hardware | Comments |
| Realtek ALC887 | Install with 100 Series Audio Fix! |
| Realtek RTL8111 | Re-install if you have issues the first time. |
| AMD Radeon R7 370 | Inject ATI, add FakeID and use default Framebuffer. |
| Intel Core i3-6100 | Optional: Generate CPU SSDT for better power management. |
| Intel HD 530 | When using integrated graphics: https://www.tonymacx86.com/threads/...raphics-glitch-fix.206410/page-2#post-1363199 |
Known Issues
- Wake-on-LAN on the RTL8111GR is not always working. (Also not on Windows... lol)
- Sometimes you get a kernel panic when waking up from sleep (Seems to be an OS related problem https://discussions.apple.com/thread/7680898?start=0&tstart=0 )
OPTIONAL: 6. Improvements / Useful tips
Improve the system performance and durability of your SSD:
| Property | Command |
| Disable Sudden Motion Sensor (SMS) | sudo pmset -a sms 0 |
| Enable TRIM on third-party SSDs | sudo trimforce enable |
| Disable Hibernation | sudo pmset -a hibernatemode 0 |
| Disable TimeMachine Snapshots | sudo tmutil disablelocal |
| Disable Spotlight Indexing | sudo mdutil -a -i off |
| Re-mount macOS with "noatime" flag | sudo mount -vuwo noatime / |
How to create a RAM-Disk on Sierra
#2048 is the multiplier, so if you want a 2 GB RAM-Disk then 2048 * 2048 = 4194304
/usr/sbin/diskutil erasevolume HFS+ "RamDiskName" '/usr/bin/hdiutil attach -nobrowse -nomount ram://4194304'
#Optional: Create a folder on the RAM-Disk
/bin/mkdir -pv
#Optional: Link to a directory
/bin/ln -v -s /RamDiskName ~/LinkToFolder
#Optional: Hide RAM-Disk directory
/usr/bin/chflags hidden /Volumes/RamDiskName
Allow Apps from all sources
sudo spctl --master-disable
Have fun with your Hackintosh
Attachments
Last edited:

