- Joined
- Mar 23, 2014
- Messages
- 3
- Motherboard
- X99-Deluxe
- CPU
- i7-5820K
- Graphics
- GTX 980
- Mac
- Mobile Phone
Components
-- Apple Mac OS X Mavericks 10.9.2
https://itunes.apple.com/en/app/os-x-mavericks/id675248567?mt=12
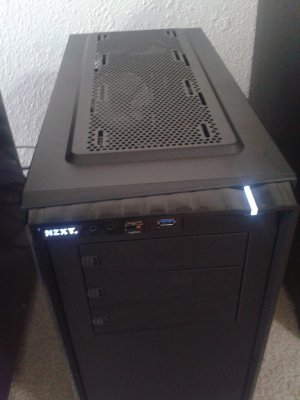
-- NZXT Source 530 CA-SO530-M1 Matte Black Steel / Plastic ATX Full Tower Computer Case
http://www.newegg.com/Product/Product.aspx?Item=N82E16811146114
-- Intel Core i3-4330 Haswell 3.5GHz LGA 1150 54W Dual-Core Desktop Processor Intel HD Graphics 4600 BX80646I34330
http://www.newegg.com/Product/Product.aspx?Item=N82E16819116945
-- Gigabyte LGA 1150 Intel Z87 HDMI SATA 6Gbps USB 3.0 ATX DDR3 1600 Intel Motherboards GA-Z87-HD3
http://www.amazon.com/dp/B00D94X6AK
-- G.SKILL Ripjaws Series 8GB (2 x 4GB) 240-Pin DDR3 SDRAM DDR3 1600 (PC3 12800) Desktop Memory Model F3-12800CL9D-8GBRL
http://www.newegg.com/Product/Product.aspx?Item=N82E16820231314
-- Samsung Electronics 840 EVO-Series 120GB 2.5-Inch SATA III Single Unit Version Internal Solid State Drive MZ-7TE120BW
http://www.amazon.com/dp/B00E3W15P0/
-- Corsair CX Series 500 Watt ATX/EPS Modular 80 PLUS Bronze ATX12V/EPS12V 456 Power Supply CX500M
http://www.amazon.com/dp/B00ALK3HF4/
Comments
This is not a gaming computer and was only made for casual web browsing. It is very fast and games like Minecraft can run at 35-60fps. It is an amazing build for someone who is on a budget. The computer is also really quiet and usually cannot be heard.
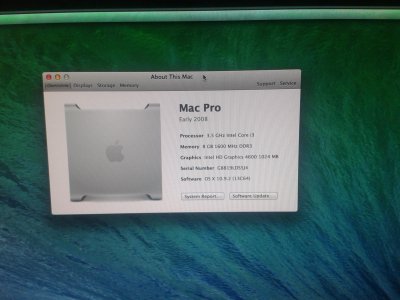
Everything works including: ethernet, audio, usb 3 ports, usb 2 ports, shutdown, sleep, restart, integrated graphics. I have not tested DVI and VGA. I have only tested HDMI. I'm guessing that DVI will also work, but I don't think VGA will.
BIOS SETTINGS
1) Boot up computer and press the Delete key to enter bios.
2) Click on 'Save & Exit' and then click on 'Load Defaults.' After that click yes to 'Load Optimized Defaults.'
3) Click on 'BIOS Features.'
4) Disable 'Limit CPUID Max.'
5) Enable 'Intel Virtualization Technology.'
6) Disable 'VT-d' if it is not grayed out.
7) Disable 'Secure Boot.'
8) Click on 'Peripherals.'
9) Enable 'XHCI Hand-off.'
10) Enable 'EHCI Hand-off.'
11) Disable 'XHCI Mode.'
12) Click on 'Performance.'
13) Click on 'Memory.'
14) Change 'Extreme Memory Profile(X.M.P.)' to 'Profile1.'
15) Click on 'Save & Exit' then click on 'Save & Exit.' After that click on 'Save & Exit Setup.'
Installation
1) Insert your UniBeast Drive and boot into it.
2) When the chimera screen comes up, start typing: '-v' without quotes.
3) If you get an error 'System uptime in nanoseconds...' then power off your computer and remove all memory sticks except 1. Then try again.
4) When you reach the installation screen choose your language and click next.
5) At the top click on 'Utilities' and the click on 'Disk Utillity.'
6) Select your hard drive/ssd from the left and click on the 'Erase' tab.
7) Change the format to 'Mac OS Extended (Journaled).'
8) Name it whatever you want, for example 'Macintosh HD.'
9) Click on 'Erase...'
10) When it is done, close out of Disk Utility and continue with the installation.
11) When you reach the screen where you choose your hard drive, you should select your hard drive which you named in step 8.
12) Wait until it is done installing.
13) When installation is done reboot and boot into your UniBeast drive.
14) This time select your hard drive and click enter without any boot flags.
15) It should work and you should boot up in os x.
16) Complete the simple setup and when you reach the desktop, open System Preferences.
17) In 'System Preferences' click on 'Security & Privacy.'
18) Select 'Anywhere' under 'Allow apps downloaded from:'. If it is grayed out, click the log on the bottom of the screen.
19) Close System Preferences and open MultiBeast which should be on your UniBeast drive or on another drive.
20) Select the following settings:
21) When installation is done, shutdown your computer.
22) Remove UniBeast drive (and your multibeast drive if it is on another drive)
23) Turn on your computer. Everything should work now.
24) If you had to remove your memory in order to install os x, you may now shutdown and install the removed memory.
Thats it! Your Hackintosh should now work!
If you have any questions, please let me know.
- enlil
-- Apple Mac OS X Mavericks 10.9.2
https://itunes.apple.com/en/app/os-x-mavericks/id675248567?mt=12
-- NZXT Source 530 CA-SO530-M1 Matte Black Steel / Plastic ATX Full Tower Computer Case
http://www.newegg.com/Product/Product.aspx?Item=N82E16811146114
-- Intel Core i3-4330 Haswell 3.5GHz LGA 1150 54W Dual-Core Desktop Processor Intel HD Graphics 4600 BX80646I34330
http://www.newegg.com/Product/Product.aspx?Item=N82E16819116945
-- Gigabyte LGA 1150 Intel Z87 HDMI SATA 6Gbps USB 3.0 ATX DDR3 1600 Intel Motherboards GA-Z87-HD3
http://www.amazon.com/dp/B00D94X6AK
-- G.SKILL Ripjaws Series 8GB (2 x 4GB) 240-Pin DDR3 SDRAM DDR3 1600 (PC3 12800) Desktop Memory Model F3-12800CL9D-8GBRL
http://www.newegg.com/Product/Product.aspx?Item=N82E16820231314
-- Samsung Electronics 840 EVO-Series 120GB 2.5-Inch SATA III Single Unit Version Internal Solid State Drive MZ-7TE120BW
http://www.amazon.com/dp/B00E3W15P0/
-- Corsair CX Series 500 Watt ATX/EPS Modular 80 PLUS Bronze ATX12V/EPS12V 456 Power Supply CX500M
http://www.amazon.com/dp/B00ALK3HF4/
Comments
This is not a gaming computer and was only made for casual web browsing. It is very fast and games like Minecraft can run at 35-60fps. It is an amazing build for someone who is on a budget. The computer is also really quiet and usually cannot be heard.
Everything works including: ethernet, audio, usb 3 ports, usb 2 ports, shutdown, sleep, restart, integrated graphics. I have not tested DVI and VGA. I have only tested HDMI. I'm guessing that DVI will also work, but I don't think VGA will.
BIOS SETTINGS
1) Boot up computer and press the Delete key to enter bios.
2) Click on 'Save & Exit' and then click on 'Load Defaults.' After that click yes to 'Load Optimized Defaults.'
3) Click on 'BIOS Features.'
4) Disable 'Limit CPUID Max.'
5) Enable 'Intel Virtualization Technology.'
6) Disable 'VT-d' if it is not grayed out.
7) Disable 'Secure Boot.'
8) Click on 'Peripherals.'
9) Enable 'XHCI Hand-off.'
10) Enable 'EHCI Hand-off.'
11) Disable 'XHCI Mode.'
12) Click on 'Performance.'
13) Click on 'Memory.'
14) Change 'Extreme Memory Profile(X.M.P.)' to 'Profile1.'
15) Click on 'Save & Exit' then click on 'Save & Exit.' After that click on 'Save & Exit Setup.'
Installation
1) Insert your UniBeast Drive and boot into it.
2) When the chimera screen comes up, start typing: '-v' without quotes.
3) If you get an error 'System uptime in nanoseconds...' then power off your computer and remove all memory sticks except 1. Then try again.
4) When you reach the installation screen choose your language and click next.
5) At the top click on 'Utilities' and the click on 'Disk Utillity.'
6) Select your hard drive/ssd from the left and click on the 'Erase' tab.
7) Change the format to 'Mac OS Extended (Journaled).'
8) Name it whatever you want, for example 'Macintosh HD.'
9) Click on 'Erase...'
10) When it is done, close out of Disk Utility and continue with the installation.
11) When you reach the screen where you choose your hard drive, you should select your hard drive which you named in step 8.
12) Wait until it is done installing.
13) When installation is done reboot and boot into your UniBeast drive.
14) This time select your hard drive and click enter without any boot flags.
15) It should work and you should boot up in os x.
16) Complete the simple setup and when you reach the desktop, open System Preferences.
17) In 'System Preferences' click on 'Security & Privacy.'
18) Select 'Anywhere' under 'Allow apps downloaded from:'. If it is grayed out, click the log on the bottom of the screen.
19) Close System Preferences and open MultiBeast which should be on your UniBeast drive or on another drive.
20) Select the following settings:
Code:
QUICK START
-->DSDT Free

DRIVERS
-->Audio
---->Realtek ALCxxx
------>Without DSDT
-------->ALC892
-->Disk
---->3rd Party SATA
---->TRIM Enabler
------>10.9.x TRIM Patch (if using a solid state drive only)
-->Misc
---->USB 3.0 - Universal
-->Network
---->Realtek
------>AppleRTL8169Ethernet 2.0.6
BOOTLOADERS
-->Select the latest version of Chimera (in my case, it was Chimera v2.2.1)
CUSTOMIZE
-->Boot Options
---->Generate CPU States
---->Hibernate Mode - Desktop
---->Use KernelCache
---->1080p Display Mode
-->System Definitions
---->Mac Pro
------>Mac Pro 3,1
-->Themes
---->Your choice (i choose tonymacx86 Black)
BUILD
- Click on save if you want to save your settings.
- Click on Install.22) Remove UniBeast drive (and your multibeast drive if it is on another drive)
23) Turn on your computer. Everything should work now.
24) If you had to remove your memory in order to install os x, you may now shutdown and install the removed memory.
Thats it! Your Hackintosh should now work!
If you have any questions, please let me know.
- enlil


