- Joined
- Dec 18, 2011
- Messages
- 28
- Motherboard
- G5 Mod, i7 gigabyte
- CPU
- i7
- Graphics
- AMD
- Mac
- Classic Mac
- Mobile Phone
In the starting phases of my build, I got some fans in the mail. Unfortunately, they were not sleeved (and some were brightly colored). I had some 1/8" Techflex (braided sleeving) laying around and decided to touch them up without voiding any warranties. I did a brief search on the forum and didn't see anything, so I thought it might benefit someone to see a basic guide like this.
A little tip before you begin, have patience. pulling wire through a braided sleeve is not the easiest thing in the world. I took some pictures with my bad camera (good one is in the dorm room) so please excuse a little blur here and there.
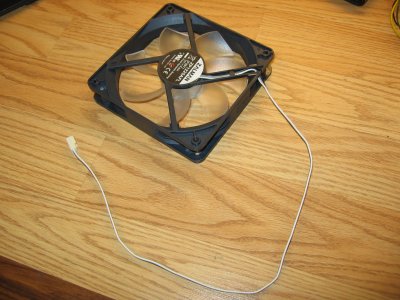
1. Decide where you want your sleeving. Should it go all the way to the motor? Just to the edge of the fan? For me, I had a mix of both. Two fans will be sitting under a radiator, so to prevent any issues, I only sleeved to the edge of the fan. For two 140mm fans in the front of the case, I decided to go all the way to the motor. A little extra thickness was no problem, and it looked fine.
IMG_2994.JPG
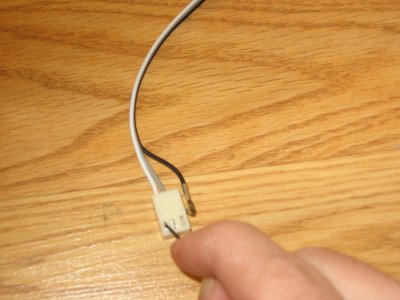
2. Remove the pins out of the cable housing. For most 3 or 4 pin connectors, there will be a small area of metal visible from the outside of the frame recessed just a little bit. This is what holds the pin in the housing. If you take a small screwdriver and press in here, the pin will release and you can pull it out. Pull them all out. (Note, if you are using larger diameter sleeving, this isn't necessary. With the 1/8" I had, it was a requirement.) Be sure to make a note of the order of the wires. You will need to re-install them later.
IMG_2997.JPG
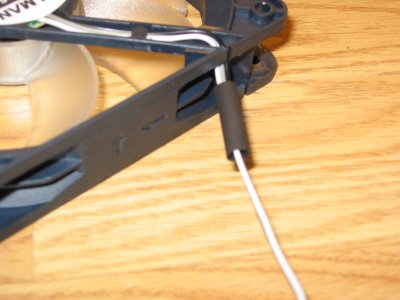
3. Put a piece of heat shrink over the wires and down to the end of the cable. Sleeving comes undone rather easily, so it is really a good idea to use heat shrink.
IMG_2998.JPG
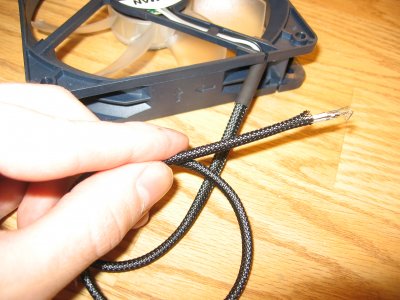
4. Run the cables through the sleeving almost to the end. Cut off the sleeving at the connectors, and slide it the rest of the way guiding it under the heat shrink. Note, it is a good idea to cut after you have pulled it. The sleeving expands and consequently shortens as you pull it around something. If you pre-cut it, it will be too short by the time you're done.
IMG_3000.JPG
5. Put a piece of larger heat shrink over the cable, and re-install the ends by sliding them back in. Check to make sure they are in by tugging on them, and plug in the fan to make sure it still works.
6. Heat the heat shrink to shrink it around the ends.
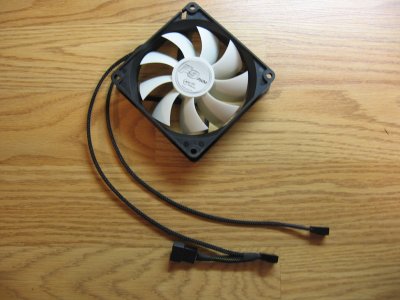
7. Enjoy your beautiful fan!
IMG_3004.JPG
Some other notes:
- You can get more complicated with some fans. One of my 92mm exhaust fans has a 3-pin wire coming off which you plug into the motherboard. It has an extender to plug in a different fan, and a third fan speed wire. I sleeved these two separately, and added another piece between the connector and extender. See a picture for more details.
- Heat shrink only shrinks so much. Don't keep heating it hoping it will shrink more.
- Feel free to use larger sleeving to make it easier. For a really tight look, I used 1/8" black standard tech flex.
- I am not responsible if you destroy your fan, melt your motherboard by inserting the pins wrong, or causing a nuclear explosion. Feel free to credit me with a great result, world peace, or solving world hunger. Be careful and pay attention!
A little tip before you begin, have patience. pulling wire through a braided sleeve is not the easiest thing in the world. I took some pictures with my bad camera (good one is in the dorm room) so please excuse a little blur here and there.
1. Decide where you want your sleeving. Should it go all the way to the motor? Just to the edge of the fan? For me, I had a mix of both. Two fans will be sitting under a radiator, so to prevent any issues, I only sleeved to the edge of the fan. For two 140mm fans in the front of the case, I decided to go all the way to the motor. A little extra thickness was no problem, and it looked fine.
IMG_2994.JPG
2. Remove the pins out of the cable housing. For most 3 or 4 pin connectors, there will be a small area of metal visible from the outside of the frame recessed just a little bit. This is what holds the pin in the housing. If you take a small screwdriver and press in here, the pin will release and you can pull it out. Pull them all out. (Note, if you are using larger diameter sleeving, this isn't necessary. With the 1/8" I had, it was a requirement.) Be sure to make a note of the order of the wires. You will need to re-install them later.
IMG_2997.JPG
3. Put a piece of heat shrink over the wires and down to the end of the cable. Sleeving comes undone rather easily, so it is really a good idea to use heat shrink.
IMG_2998.JPG
4. Run the cables through the sleeving almost to the end. Cut off the sleeving at the connectors, and slide it the rest of the way guiding it under the heat shrink. Note, it is a good idea to cut after you have pulled it. The sleeving expands and consequently shortens as you pull it around something. If you pre-cut it, it will be too short by the time you're done.
IMG_3000.JPG
5. Put a piece of larger heat shrink over the cable, and re-install the ends by sliding them back in. Check to make sure they are in by tugging on them, and plug in the fan to make sure it still works.
6. Heat the heat shrink to shrink it around the ends.
7. Enjoy your beautiful fan!
IMG_3004.JPG
Some other notes:
- You can get more complicated with some fans. One of my 92mm exhaust fans has a 3-pin wire coming off which you plug into the motherboard. It has an extender to plug in a different fan, and a third fan speed wire. I sleeved these two separately, and added another piece between the connector and extender. See a picture for more details.
- Heat shrink only shrinks so much. Don't keep heating it hoping it will shrink more.
- Feel free to use larger sleeving to make it easier. For a really tight look, I used 1/8" black standard tech flex.
- I am not responsible if you destroy your fan, melt your motherboard by inserting the pins wrong, or causing a nuclear explosion. Feel free to credit me with a great result, world peace, or solving world hunger. Be careful and pay attention!