- Joined
- Nov 1, 2012
- Messages
- 1,007
- Motherboard
- GA-Z77X-UP5 TH
- CPU
- i7-3770K
- Graphics
- HD4000 / GTX 1050 Ti
- Mac
- Classic Mac
- Mobile Phone
DBP's "FractalPro": i7-3770 / GA-Z77-D3H / HD4000+GT440
In my photo work my lammergeier build is king. But I also work at another location, where I'd been provided with a 2011 i5 mini. Quite a decent machine, which has been rock solid for me. However, with a recent change in staff the opportunity came up to re-use a Windows PC and pass my mini on to another staffer. Luckily the guts of the machine were very OS X-friendly. This being my third CustoMac build (and approximately my 347th OS X build over the years) it was quite straightforward.
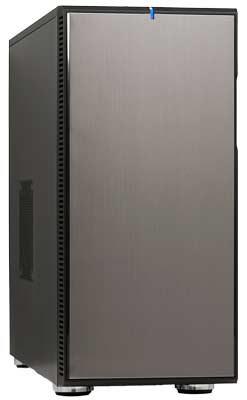
The name was sort of obvious: it's a "Mac Pro" in a Fractal Design Define R3 case.
Components
This was a "zero budget" build: no new gear was bought.
Motherboard: Gigabyte GA-Z77-D3H
http://www.newegg.com/Product/Product.aspx?Item=N82E16813128543
CPU: Intel i7-3770 quad-core i7, with stock cooler
http://www.newegg.com/Product/Product.aspx?Item=N82E16819116502
GPU: Initially HD4000, but later added Gigabyte GV-N440-2GI GT 440 2 GB (both now used)
http://www.newegg.com/Product/Product.aspx?Item=N82E16814125420
RAM: 2x 8GB G.Skill Ripjaws X 1600 MHz CL10 (10-10-10-30) F3-12800CL10D-16GBXL
http://www.newegg.com/Product/Product.aspx?Item=N82E16820231489
Case: Fractal Design Define R3, Titanium Grey
http://www.newegg.com/Product/Product.aspx?Item=N82E16811352014
PSU: Thermaltake TT-500NL1NH-1 OEM
Can't find link, and wouldn't recommend using it in new builds.
OS: OS X 10.8.2 (Mountain Lion) from the App Store
https://itunes.apple.com/au/app/os-x-mountain-lion/id537386512
Optical: TSSTcorp SH-222BB DVD writer
SSD: 240 GB Intel 520
http://www.newegg.com/Product/Product.aspx?Item=N82E16820167088
HDD: 1 TB WD Green
http://www.newegg.com/Product/Product.aspx?Item=N82E16822136949
External HDD: 1 TB Seagate GoFlex USB 3.0
discontinued product
Keyboard: Apple wired keyboard
http://store.apple.com/au/product/MB110LL/B/apple-keyboard-with-numeric-keypad-english-usa
Mouse: Logitech M505 wireless
http://www.newegg.com/Product/Product.aspx?Item=N82E16826104333
Audio: no-name USB audio dongle
Displays: Samsung 24" SyncMaster 24SA450 and Apple 20" Cinema Display
Component comments
I probably would not have chosen this motherboard board new, but jeffcarrera's build using it gave me confidence to try using it. The major advantages for me in moving from the 2.5 GHz i5-2520M mini to this 3.4 GHz (well, it turbos at 3.9) i7-3770 were:
The first thing I did was take the machine outside, open it up and clean everything out with canned air. Sitting on carpet under an office desk, of course it hadn't been maintained well.
Case + PSU
Case LED
Graphics
Whinge about system integrators
Audio
USB
Optical drive
Installation
BIOS setup:
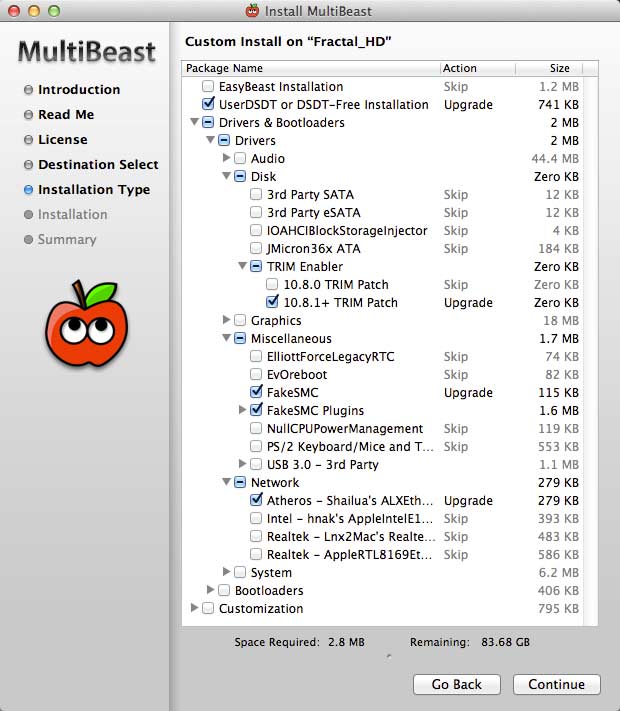
Install with UniBeast.
I downloaded the 10.8.2 version of ML (by deleting the app and then re-downloading it through the App Store). I named my USB stick "UniBeast1082" before installing UniBeast onto it, and when that was done copied the MultiBeast package onto it for easy access. I put the USB stick into one of the front-panel USB2 ports.
Once the basic machine is up, run MultiBeast (I used 5.2.1):
 Because no system definition is selected, the machine believes it's a MacPro3,1.
I then turned off hibernation (where the system saves all 16 GB of RAM to disk so we can power off during sleep). I'm not going to use that mode, and 16 GB of spare filesystem never goes astray.
I partitioned the 1 TB SATA HDD with a 240 GB "clone" partition at the end (the slowest part of the drive) and the rest of the drive as somewhere to store working files. The clone is updated from the SSD using Super Duper! to allow for fast recovery if something stuffs up during a system upgrade.
The external 1 TB drive had been the Time Machine disk for the Mac mini, and I used Migration Assistant to copy the Users and Applications from it. Bingo: my account was there, my apps were there. Only Microsoft Office was upset and wanted me to re-enter the product key.
Once all that was done I reformatted the drive. It's partitioned in two: part for Time Machine, and part for explicit backups of other files. Only backups are kept on that drive.
Speed
Later in this thread you'll also see the details of the different video "card" options.
To do:
"FractalPro": i7-3770 / GA-Z77-D3H / HD4000+GT440
In my photo work my lammergeier build is king. But I also work at another location, where I'd been provided with a 2011 i5 mini. Quite a decent machine, which has been rock solid for me. However, with a recent change in staff the opportunity came up to re-use a Windows PC and pass my mini on to another staffer. Luckily the guts of the machine were very OS X-friendly. This being my third CustoMac build (and approximately my 347th OS X build over the years) it was quite straightforward.
The name was sort of obvious: it's a "Mac Pro" in a Fractal Design Define R3 case.
Components
This was a "zero budget" build: no new gear was bought.
Motherboard: Gigabyte GA-Z77-D3H
http://www.newegg.com/Product/Product.aspx?Item=N82E16813128543
CPU: Intel i7-3770 quad-core i7, with stock cooler
http://www.newegg.com/Product/Product.aspx?Item=N82E16819116502
GPU: Initially HD4000, but later added Gigabyte GV-N440-2GI GT 440 2 GB (both now used)
http://www.newegg.com/Product/Product.aspx?Item=N82E16814125420
RAM: 2x 8GB G.Skill Ripjaws X 1600 MHz CL10 (10-10-10-30) F3-12800CL10D-16GBXL
http://www.newegg.com/Product/Product.aspx?Item=N82E16820231489
Case: Fractal Design Define R3, Titanium Grey
http://www.newegg.com/Product/Product.aspx?Item=N82E16811352014
PSU: Thermaltake TT-500NL1NH-1 OEM
Can't find link, and wouldn't recommend using it in new builds.
OS: OS X 10.8.2 (Mountain Lion) from the App Store
https://itunes.apple.com/au/app/os-x-mountain-lion/id537386512
Optical: TSSTcorp SH-222BB DVD writer
SSD: 240 GB Intel 520
http://www.newegg.com/Product/Product.aspx?Item=N82E16820167088
HDD: 1 TB WD Green
http://www.newegg.com/Product/Product.aspx?Item=N82E16822136949
External HDD: 1 TB Seagate GoFlex USB 3.0
discontinued product
Keyboard: Apple wired keyboard
http://store.apple.com/au/product/MB110LL/B/apple-keyboard-with-numeric-keypad-english-usa
Mouse: Logitech M505 wireless
http://www.newegg.com/Product/Product.aspx?Item=N82E16826104333
Audio: no-name USB audio dongle
Displays: Samsung 24" SyncMaster 24SA450 and Apple 20" Cinema Display
Component comments
I probably would not have chosen this motherboard board new, but jeffcarrera's build using it gave me confidence to try using it. The major advantages for me in moving from the 2.5 GHz i5-2520M mini to this 3.4 GHz (well, it turbos at 3.9) i7-3770 were:
- Spare SATA ports for when I'm reconfiguring drives from other machines.
- More CPU power (not that I really need it for this machine...)
- USB3.0
The first thing I did was take the machine outside, open it up and clean everything out with canned air. Sitting on carpet under an office desk, of course it hadn't been maintained well.
Case + PSU
The Fractal Design Define R3 cases originally came with an eSATA port on the front panel, but this is a later version with a USB3.0 port there instead. For me a front-panel USB3 port is useful for the thumb drive I bring to/from this office.
When I built my own lammergeier system I was looking for a quiet case and considered the Define series, but ended up going with a Corsair Obsidian 550D. Now having used this Define R3 I'm very happy with that decision. The 550D is only slightly bigger, and is just so easy to work on. It probably doesn't help that by the time I received this case it had regular screws instead of thumbscrews on the side panels (on the 550D I just push a button and lift the side off) but this is definitely a lower-budget case in general. Anyway this is a zero-budget build, so moving on...
The vaguely noise-baffling nature of the case does at least do something to hide the noise of the PSU and the stock CPU cooler.
Looking at the PSU took me back a decade or two: it's the ancient design which draws air through vents inside the case and extracts it out the back with an 80mm fan. Luckily it's not too noisy at the moment although I did blow a lot of dust out of it.
Case LED
The case has a blue light (wrapped around the power button) which was wired up to the Message/Power/Sleep LED pins on the motherboard. While for years I've worked without drive activity lights on Apple hardware, I found I've got used to it on my other CustoMacs and it can be a useful debugging tool especially when trying to get a new graphics setup running (e.g. "don't press the reset button, it IS actually doing something and might initialise the screen soon"). As this case has no HDD activity light I simply moved the cable so the front blue light is now the HDD activity light.
How can I tell if the machine is on? Well, for a start it's rarely off. And there'll be a flicker every now and then. If I need to be sure I can open the front door and press the DVD eject button, or pop a fan cover and check the fan's going. But for this machine it's a non-issue.
How can I tell if the machine is on? Well, for a start it's rarely off. And there'll be a flicker every now and then. If I need to be sure I can open the front door and press the DVD eject button, or pop a fan cover and check the fan's going. But for this machine it's a non-issue.
Graphics
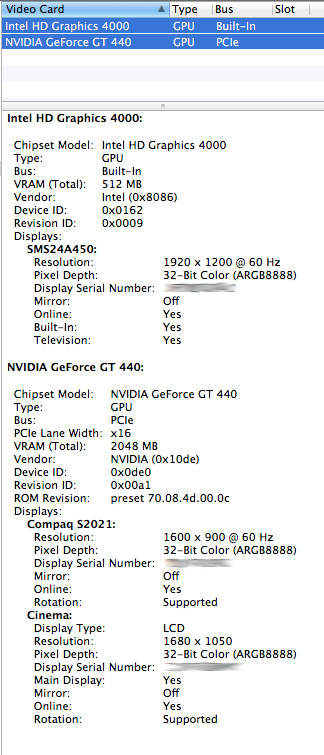
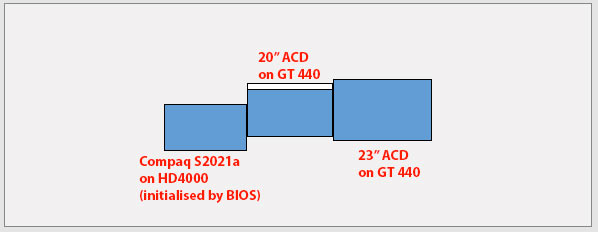
The machine came with a Gigabyte GV-N440-2GI card installed. For now I've removed that, although if I can get it working in parallel to the HD4000 graphics that will give me the option to install more monitors. Not essential, but has a certain "cute" factor.
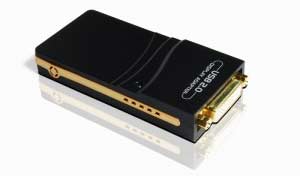
EDIT: see later in this thread. I've used a USB DisplayLink DVI adapter to hook up a third monitor instead.
EDIT: and later still I replaced that with a GT 440 card.
Both my monitors have DVI connections, and to start with I connected one to the motherboard's DVI to do the install. The other is connected to the HDMI using one of the HDMI<->DVI adapters that come with Mac minis.
Whinge about system integrators
With the missing case thumbscrews, the missing fan controller (apparently came standard with the R3), the old-design OEM PSU, and the choice of a GPU with 2 GB (for an office PC? really?) it's obvious this machine was put together by a PC shop more interested in profit than delivering the best product. I'm guessing these things fell into the "They won't notice" category. Oh well.
Audio
I had a couple of goes at using a VoodooHDA kext through the MultiBeast installation to handle the motherboard's VIA audio chip, but after a few too many kernel panics (before the install finished!) I gave up. I've just connected a no-name USB audio dongle instead (which also conveniently puts the headphone socket up on my desk): problem solved.
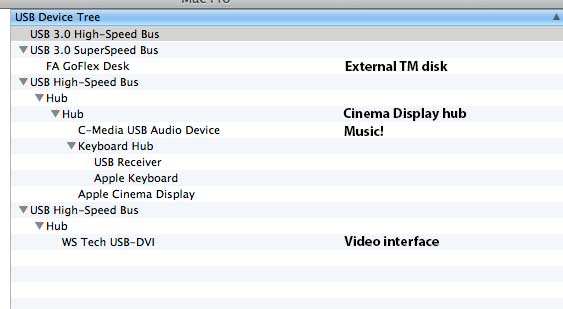
USB
The wireless mouse's dongle hides in the side of the Apple keyboard, which is plugged into the back of the Cinema Display. This is also where my audio dongle is connected. The Cinema Display is connected to one of the rear USB2 ports. The GoFlex drive is connected to one of the rear USB3 ports, and the front USB3 port is where I connect my personal SanDisk Extreme USB stick. It's all nice and straightforward.
Optical drive
The TSSTcorp drive is not recognised as a writer, although it reads CDs and DVDs fine (only tried data disks so far). That's fine: we have a USB DVD writer I can use (had used it on the mini in the past).
Correction: Something changed somewhere along the way. Weeks after the build I found that OS X is recognising it as a writer! Haven't tried it yet though.
Correction: Something changed somewhere along the way. Weeks after the build I found that OS X is recognising it as a writer! Haven't tried it yet though.
Installation
BIOS setup:
My BIOS version was already F18, which is the latest non-beta version available.
Load Optimized Defaults
Enable XHCI handoff so that USB3 works.
Change RAM setting to XMP Profile1
thelostswede's guide to GA Z77 BIOS settings is a good reference.
I also changed the power button to initiate sleep and only power-off when held down for 4s.
Load Optimized Defaults
Enable XHCI handoff so that USB3 works.
Change RAM setting to XMP Profile1
thelostswede's guide to GA Z77 BIOS settings is a good reference.
I also changed the power button to initiate sleep and only power-off when held down for 4s.
Install with UniBeast.
I downloaded the 10.8.2 version of ML (by deleting the app and then re-downloading it through the App Store). I named my USB stick "UniBeast1082" before installing UniBeast onto it, and when that was done copied the MultiBeast package onto it for easy access. I put the USB stick into one of the front-panel USB2 ports.
Once the basic machine is up, run MultiBeast (I used 5.2.1):
I then turned off hibernation (where the system saves all 16 GB of RAM to disk so we can power off during sleep). I'm not going to use that mode, and 16 GB of spare filesystem never goes astray.
Code:
sudo pmset -a hibernatemode 0           # Turn off hibernation
sudo rm /var/vm/sleepimage              # Reclaim 16 GB of space on the boot SSD
I partitioned the 1 TB SATA HDD with a 240 GB "clone" partition at the end (the slowest part of the drive) and the rest of the drive as somewhere to store working files. The clone is updated from the SSD using Super Duper! to allow for fast recovery if something stuffs up during a system upgrade.
The external 1 TB drive had been the Time Machine disk for the Mac mini, and I used Migration Assistant to copy the Users and Applications from it. Bingo: my account was there, my apps were there. Only Microsoft Office was upset and wanted me to re-enter the product key.
Once all that was done I reformatted the drive. It's partitioned in two: part for Time Machine, and part for explicit backups of other files. Only backups are kept on that drive.
Speed
The result of all this: Geekbench result (64-bit) 14619.
As I've shown in another thread, this board is automatically overclocking the all-cores turbo to 3.9 GHz (usually reserved for when only one core is active: with all cores active we expect to see 3.7 GHz).
As described later in this thread, I am now running the CPU at 4.1 GHz (still using the stock Intel cooler) which has resulted in a Geekbench score of 15180.
Later in this thread you'll also see the details of the different video "card" options.
To do:
- Make sure all the USB3 ports are working.
Last edited by a moderator: