- Joined
- Oct 18, 2012
- Messages
- 4
- Motherboard
- Gigabyte z87
- CPU
- i7 4790k
- Graphics
- nVidia GTX 980TI
- Mac
- Mobile Phone
Here's a list of the parts I used:
- Mac Pro 3,1 Tower WITH preexisting hard drive SCSI cable inside
- Gigabyte GA-Z97MX-Gaming 5
https://www.amazon.com/dp/B00K8HNGXS/?tag=tonymacx86com-20
- i7 4790K 4.00 GhZ
https://www.amazon.com/dp/B00KPRWAX8/?tag=tonymacx86com-20
- EVGA GeForce GTX 980 Ti
- Samsung MZHPU256HCGL-000H1 XP941 PCIe 256GB M.2 Drive
- Cooler Master Hyper T4 CPU Cooler
- Ballistix Sport XT 32GB Kit 8GBx4 DDR3
- PCIe 2 Ports Firewire 800 with inner connector
- StarTech.com PCIe SATA III RAID Controller Card
- Samsung BlueRay drive
- Sentey 750W PS
- misc. inner cables
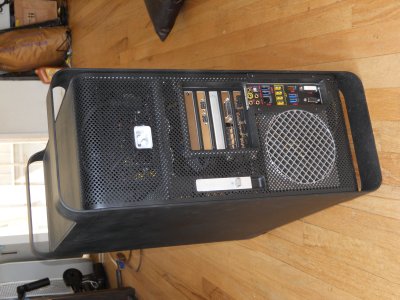
First, I dismantled the Mac Pro case and snapped off the motherboard supports so I could position them where they needed to be for the new motherboard.
I measured the faceplate of the new mobo and used a dremel to cut a section out of the back of the tower.
I cut and formed 1/16" aluminum A beam channels to house the mobo faceplate and attached with rivets.
I also drilled and riveted the front IO connections.
Cut and spliced the wires to the preexisting power button.
Power supply AC cable was cut and spliced with the original Mac Pro AC Inlet on the back of the tower.
Power to the 4 hard drives was re-soldered to match the pinout of the power supply.
An extra SSD mount was added into the optical bay area as well as the blueray drive.
The RAID card has a PCI Riser extension and was flipped around because there wasn't enough room on the mobo slots for the GFX, FW800, as well as the RAID card.
Running 10.10.5 with no issues. Boots off M.2 drive and startup time is about 5 seconds.


- Mac Pro 3,1 Tower WITH preexisting hard drive SCSI cable inside
- Gigabyte GA-Z97MX-Gaming 5
https://www.amazon.com/dp/B00K8HNGXS/?tag=tonymacx86com-20
- i7 4790K 4.00 GhZ
https://www.amazon.com/dp/B00KPRWAX8/?tag=tonymacx86com-20
- EVGA GeForce GTX 980 Ti
- Samsung MZHPU256HCGL-000H1 XP941 PCIe 256GB M.2 Drive
- Cooler Master Hyper T4 CPU Cooler
- Ballistix Sport XT 32GB Kit 8GBx4 DDR3
- PCIe 2 Ports Firewire 800 with inner connector
- StarTech.com PCIe SATA III RAID Controller Card
- Samsung BlueRay drive
- Sentey 750W PS
- misc. inner cables
First, I dismantled the Mac Pro case and snapped off the motherboard supports so I could position them where they needed to be for the new motherboard.
I measured the faceplate of the new mobo and used a dremel to cut a section out of the back of the tower.
I cut and formed 1/16" aluminum A beam channels to house the mobo faceplate and attached with rivets.
I also drilled and riveted the front IO connections.
Cut and spliced the wires to the preexisting power button.
Power supply AC cable was cut and spliced with the original Mac Pro AC Inlet on the back of the tower.
Power to the 4 hard drives was re-soldered to match the pinout of the power supply.
An extra SSD mount was added into the optical bay area as well as the blueray drive.
The RAID card has a PCI Riser extension and was flipped around because there wasn't enough room on the mobo slots for the GFX, FW800, as well as the RAID card.
Running 10.10.5 with no issues. Boots off M.2 drive and startup time is about 5 seconds.