
- Joined
- Apr 30, 2012
- Messages
- 30
- Motherboard
- Gigabyte GA-Z77-DS3H
- CPU
- Intel Core i7-3770K
- Graphics
- Intel HD4000 / Gigabyte 670 OC, 2GB
- Mac
- Classic Mac
- Mobile Phone
My configuration:
GA-Z77-DS3H
i7-3770K
TP-LINK WDN4800 Wifi
Samsung 830 256GB SSD
4x4GB Corsair XMS3
My way to success:
1. Preparation
1.1 Create a Mountain Lion installer on are USB-stick og HDD-partition with the new Unibeast 1.5 (Guide is here)
1.2 Make sure your bios version is F6 and that the default settings are loaded!
1.3 Now change SATA MODE from IDE to ACHI. (that's it don't change anything else yet)
1.4 Make sure you are using the DVI-input and not the D-SUB for connecting your monitor.
2. Mountain Lion installation
2.1 Boot your Mountain Lion installer
2.2 Format the partion or drive that you want to use, using disk-utility
2.3 Continue the installer, select your newly formatted disk.
2.4 When the installer is done, the computer will restart. When you arrive at the boot menu, select the now installed Mountain Lion (Not the Mountain Lion installer you've created)
2.5 Follow along and finish the setup, until you arrive at the desktop.
3. Post-install
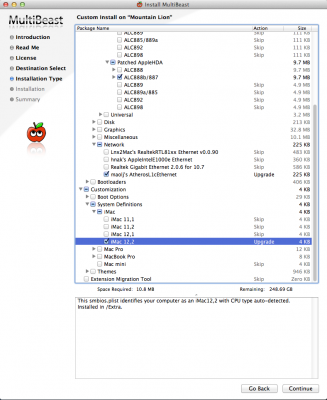
3.1 Download Chimera 1.11.0 and Multibeast 4.6.1
3.2 Install multibeast. Use the settings shown in the attached image.
3.3 Now install Chimera 1.11.0, and make sure your org.chameleon.boot.plist looks like this:
<?xml version="1.0" encoding="UTF-8"?>
<!DOCTYPE plist PUBLIC "-//Apple//DTD PLIST 1.0//EN" "http://www.apple.com/DTDs/PropertyList-1.0.dtd">
<plist version="1.0">
<dict>
<key>GenerateCStates</key>
<string>Yes</string>
<key>GeneratePStates</key>
<string>Yes</string>
<key>GraphicsEnabler</key>
<string>Yes</string>
<key>Graphics Mode</key>
<string>1280x1024x32</string>
<key>Kernel</key>
<string>mach_kernel</string>
<key>Kernel Flags</key>
<string>npci=0x3000 darkwake=0</string>
<key>Legacy Logo</key>
<string>Yes</string>
<key>Timeout</key>
<string>2</string>
<key>UseKernelCache</key>
<string>Yes</string>
</dict>
</plist>
3.5 The strings
<key>Graphics Mode</key>
<string>1280x1024x32</string>
should not be needed, only if you have problems selecting the right resolution. But since the Intel HD 4000 is 100% supported by Mountain Lion, you should be able to change the resolution within the OS.
3.5 Reboot...and volia! Everything should be working.
By the way... if you have trouble with OSX detecting your HD4000/Monitor the right way, try to unplug and reconnect your DVI-cable, while your in Mountain Lion
UPDATE: Added 3.5 - regarded the "Graphics Mode" string.
GA-Z77-DS3H
i7-3770K
TP-LINK WDN4800 Wifi
Samsung 830 256GB SSD
4x4GB Corsair XMS3
My way to success:
1. Preparation
1.1 Create a Mountain Lion installer on are USB-stick og HDD-partition with the new Unibeast 1.5 (Guide is here)
1.2 Make sure your bios version is F6 and that the default settings are loaded!
1.3 Now change SATA MODE from IDE to ACHI. (that's it don't change anything else yet)
1.4 Make sure you are using the DVI-input and not the D-SUB for connecting your monitor.
2. Mountain Lion installation
2.1 Boot your Mountain Lion installer
2.2 Format the partion or drive that you want to use, using disk-utility
2.3 Continue the installer, select your newly formatted disk.
2.4 When the installer is done, the computer will restart. When you arrive at the boot menu, select the now installed Mountain Lion (Not the Mountain Lion installer you've created)
2.5 Follow along and finish the setup, until you arrive at the desktop.
3. Post-install
3.1 Download Chimera 1.11.0 and Multibeast 4.6.1
3.2 Install multibeast. Use the settings shown in the attached image.
3.3 Now install Chimera 1.11.0, and make sure your org.chameleon.boot.plist looks like this:
<?xml version="1.0" encoding="UTF-8"?>
<!DOCTYPE plist PUBLIC "-//Apple//DTD PLIST 1.0//EN" "http://www.apple.com/DTDs/PropertyList-1.0.dtd">
<plist version="1.0">
<dict>
<key>GenerateCStates</key>
<string>Yes</string>
<key>GeneratePStates</key>
<string>Yes</string>
<key>GraphicsEnabler</key>
<string>Yes</string>
<key>Graphics Mode</key>
<string>1280x1024x32</string>
<key>Kernel</key>
<string>mach_kernel</string>
<key>Kernel Flags</key>
<string>npci=0x3000 darkwake=0</string>
<key>Legacy Logo</key>
<string>Yes</string>
<key>Timeout</key>
<string>2</string>
<key>UseKernelCache</key>
<string>Yes</string>
</dict>
</plist>
3.5 The strings
<key>Graphics Mode</key>
<string>1280x1024x32</string>
should not be needed, only if you have problems selecting the right resolution. But since the Intel HD 4000 is 100% supported by Mountain Lion, you should be able to change the resolution within the OS.
3.5 Reboot...and volia! Everything should be working.
By the way... if you have trouble with OSX detecting your HD4000/Monitor the right way, try to unplug and reconnect your DVI-cable, while your in Mountain Lion
UPDATE: Added 3.5 - regarded the "Graphics Mode" string.

")