Contribute
Register

Gigabyte Z390 M Gaming build with working NVRAM

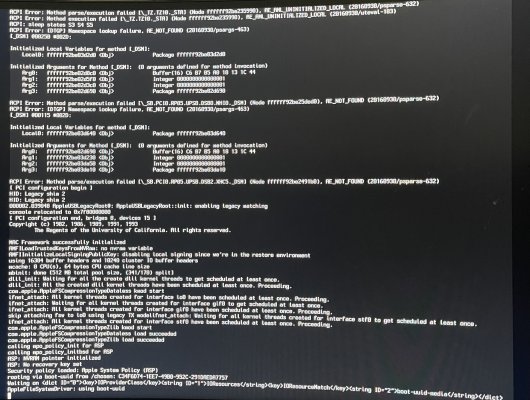
I'm using 9l for BIOS, CFG is disabled, and for OpenCore it just stays on the Apple logo with no bar under the whole time. I tried resetting NVRAM and trying to run partition, but nothing. This is what it stops at

Try opening the OpenCore config.plist and go to config.plist > DeviceProperties > Add and delete everything there.
 
Try opening the OpenCore config.plist and go to config.plist > DeviceProperties > Add and delete everything there.
I did that and now I get this
 

Attachments

  • D60F87FA-D245-4FD2-AE02-579D6C38CB1B.jpeg
    D60F87FA-D245-4FD2-AE02-579D6C38CB1B.jpeg
    2.4 MB · Views: 37
Try opening the OpenCore config.plist and go to config.plist > DeviceProperties > Add and delete everything there.
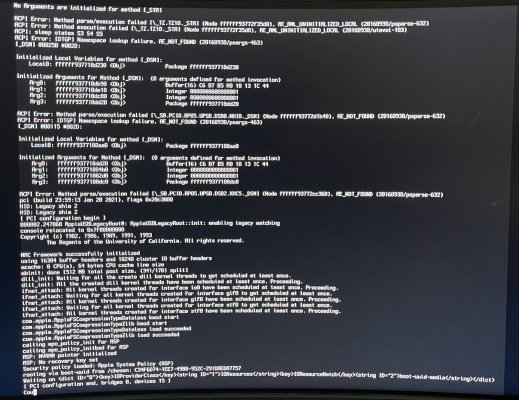
it’s a little weird because clover works completely fine for me when I try to run Big Sur partition it works completely fine, but when I try to run it on open core I get this
 

Attachments

  • 3D39888C-710D-48F7-A424-60ED93006BB3.jpeg
    3D39888C-710D-48F7-A424-60ED93006BB3.jpeg
    2.5 MB · Views: 34
it’s a little weird because clover works completely fine for me when I try to run Big Sur partition it works completely fine, but when I try to run it on open core I get this
In your config.plist, what is the MinDate and MinVersion set at under UEFI?
Also, what is your SecureBootModel set at under Misc?
FWIW, in Big Sur, and OC 0.7.5, I've got the former set to "Any" (-1,-1) and the latter set to "Disabled."
 
it’s a little weird because clover works completely fine for me when I try to run Big Sur partition it works completely fine, but when I try to run it on open core I get this

Try with the following changes:

Screen Shot 2021-11-26 at 2.17.05 PM.png

Screen Shot 2021-11-27 at 11.43.53 AM.png
 
Hi Pastrychef!

First let me thank you for the awesome work here, I've used your Clover setup on Catalina and it still works like a dream.

Trying to do the upgrade to Monterey + Open Core. I have configured the MAC Address in the config.plist correctly and prepared the USB key for installation.

When running the USB key I'm trying to scroll through the boot options from the open core menu. Unfortunately, my keyboard does not respond in the menu and I can't select the Monterey Installer to start running.

Any ideas how I can solve this? I'm using the Apple Keyboard with the USB cable connected.

PS. the Clover EFI files run immediately into the installation.
 
Last edited:
Hi @pastrychef : I'm not sure if you've updated to the latest BIOS for your Z390M Gaming. It looks like Gigabyte rolled out new updates on 11/29/2021, and this latest one is to address a security vulnerability. It concerned me enough that I updated my Gaming X BIOS, despite my previous challenges with getting my RAM functioning at XMP speeds.

Anyway, I just wanted to let you know that one of the little annoyances about this update is that the utility to modify the POST splash screen doesn't appear to work for the new BIOS. I speculate that it is the way they secure the BIOS so that the utility can't modify it. I'm hoping that they will eventually update the utility. But so far, not being able to customize the splash screen is one of the sacrifices for securing the system....
 
Hi Pastrychef!

First let me thank you for the awesome work here, I've used your Clover setup on Catalina and it still works like a dream.

Trying to do the upgrade to Monterey + Open Core. I have configured the MAC Address in the config.plist correctly and prepared the USB key for installation.

When running the USB key I'm trying to scroll through the boot options from the open core menu. Unfortunately, my keyboard does not respond in the menu and I can't select the Monterey Installer to start running.

Any ideas how I can solve this? I'm using the Apple Keyboard with the USB cable connected.

PS. the Clover EFI files run immediately into the installation.

Hmm... The arrow keys on your keyboard should be working...

Please try enabling UsbMouseDxe.efi and see if you can select using the mouse...

Screen Shot 2021-12-06 at 3.56.11 PM.png
 
Hi @pastrychef : I'm not sure if you've updated to the latest BIOS for your Z390M Gaming. It looks like Gigabyte rolled out new updates on 11/29/2021, and this latest one is to address a security vulnerability. It concerned me enough that I updated my Gaming X BIOS, despite my previous challenges with getting my RAM functioning at XMP speeds.

Anyway, I just wanted to let you know that one of the little annoyances about this update is that the utility to modify the POST splash screen doesn't appear to work for the new BIOS. I speculate that it is the way they secure the BIOS so that the utility can't modify it. I'm hoping that they will eventually update the utility. But so far, not being able to customize the splash screen is one of the sacrifices for securing the system....


Thanks for the heads up. I didn't know about this release...

I'm extremely hesitant to update because of how difficult it was to get my RAM running at advertised speeds... I'm going to have to think about this...
 
Thanks for the heads up. I didn't know about this release...

I'm extremely hesitant to update because of how difficult it was to get my RAM running at advertised speeds... I'm going to have to think about this...

Yeah, I spent a lot of time with this and getting the RAM to run with the XMP Profile1 settings. It went down after I updated from my F10g - beta to F10h. Then when I rolled back to F10g - beta, the problem persisted. I think we were having the same problem.

This is how I worked around it, and maybe it would work with you.

1. After the BIOS update, reboot and go into the BIOS settings. Choose all the appropriate settings for the Hackintosh. With the XMP settings, choose Profile 1 then manually adjust the speed to a much lower value. I started off with 2000.

2. Reboot, and see if it POSTs correctly.

3. Enter the BIOS again and you can increase the RAM speed by a small amount, reboot and see if it POSTs correctly. I kept doing these iterative steps, incrementally until I hit my rated speed of 3600. I forget the increments I did, but I believe it was something like 2000, 2400, 2600, 2666, 3000, 3200, 3400 then finally 3600.

4. If you make too big of a jump, then it will have problems reaching POST. Eventually, the BIOS resets to factory settings, as if you cleared the CMOS, and you land back in BIOS with an error message stating that there was problem with the startup and that factory settings were restored. In this case, I power down, unplug, discharge the power, reset the CMOS, reseat the RAM, then go all the way back to Step 1.

I think the key is to increase it in small steps. I kept it to around jumps of 200 (I should have went to 2800 then 3000).

By this method, updating to F10i worked without having to do the CMOS reset and RAM reseat. Once I was confident, I updated to the latest F10. I wanted to make sure I could go up to F10i because updating to the latest F10 is actually irreversible. If you update to the capsule BIOS, you cannot rollback any longer to an earlier BIOS. So be careful, and definitely make sure you want to take that step!
 
Back
Top