Contribute
Register

How to build your own iMac Pro [Successful Build/Extended Guide]

Status
Not open for further replies.
  • RocketRAID 2840A SAS/SATA card for disk array
  • 12 x Seagate Barracuda 4GB drives in RAID 10 with 2 hot spare drives, 20TB of usable space

Why do not you use RAID5? You have a lot more capacity, speed and it's safe. I always had RocketRAIDs in my PowerMacs (4.1, 5.1) and I was very happy with that.
 
EFI? And how does it differ?
Not sure what you are seeking with "EFI?" Mine uses the DesignareEX motherboard, RX580, and has more modest power and cooling requirements. I didn't overclock anything. In fact, I decided I would slightly overclock the CPU today and noticed that I can't. I need to review the Designare's UEFI bios documentation to figure out why my CPU settings are stuck on auto. If one wants to take overclocking to the extreme, copy KGP's configuration. Mine is more "Vanilla." One example, I was encouraged to get a 1000w+ Power Supply. I can see now an 850w would have likely been OK. It is kinda weird that the fan only spins upon startup and when I press the test button.
 
Novice question. The guide indicates that empty drive for OS installation should be pre-formatted with HFS+. As I'm planning to use either Samsung 970 M.2 or Intel 900p drive I can't see a way to connect them to my MacbookPro for formatting. I can install them into Windows or Ubuntu box temporarily. What do you recommend to use for HFS+ formatting of these drives? And one other question - will I have any problems with Intel 900p as boot drive?

Thanks a bunch!

I used a USB drive for the initial install (SSD over SATA/USB). Once I got everything right, I used "SuperDuper" to clone the drive onto my 960 Pro after formatting it with HFS+. If you try to install directly to your 970, it will convert to AFPS unless you take steps to prevent it. I did the following:
  • Installed 10.13.4 to the USB SSD using MacBook Pro
  • Configured EFI partition on USB SSD using MacBook Pro
  • Booted the new Hackintosh with the USB SSD
  • Made corrections until everything worked right
  • Formatted the NVMe with HFS+
  • Used SuperDuper to copy the USB drive to the NVMe drive
  • Mounted the EFI partition on both drives using clover configurator
  • Copied the EFI folder from the USB drive to the NVMe drive
  • Shutdown and disconnected the USB drive
  • Reconfigured boot drive in BIOS
  • Started up under NVMe
 
Not sure what you are seeking with "EFI?" Mine uses the DesignareEX motherboard, RX580, and has more modest power and cooling requirements. I didn't overclock anything. In fact, I decided I would slightly overclock the CPU today and noticed that I can't. I need to review the Designare's UEFI bios documentation to figure out why my CPU settings are stuck on auto. If one wants to take overclocking to the extreme, copy KGP's configuration. Mine is more "Vanilla." One example, I was encouraged to get a 1000w+ Power Supply. I can see now an 850w would have likely been OK. It is kinda weird that the fan only spins upon startup and when I press the test button.

Well, just curious what enchancements/changes/difference in configuration that you might have come up with, and how it differs from KGP's original EFI. Don't want to post it? That's fine, np.....
 
Well, just curious what enchancements/changes/difference in configuration that you might have come up with, and how it differs from KGP's original EFI. Don't want to post it? That's fine, np.....

OH! The EFI directory! I can post mine. It is very close to IZO1's that he posted about a hundred messages ago. The most important change was I had to add a patch for the RX560/RX580. He had special Broadcom kexts that I didn't need because I used an apple card out of a MacBook Air. Here ya go!

The SMBIOS has a few settings marked as "DELETED". You'll need to replace those with valid serial numbers and UUIDs
 

Attachments

  • EFI.zip
    34.3 MB · Views: 176
I don't usually allow sleep on a server class machine like these. considering all the power saving features built into the hardware, are you really saving that much? just let the screen go dark so the display goes on standby IMHO

I don't either. Never actually even on real macs since the early 2000s.

I just set a hot corner for display sleep and set display sleep to 5 mins.

But the issue here is that even when the USB drive is connected for a few days (I let the drives go to sleep, which is ok by me, since they are consumer level and not server level drives sometimes) I have to eject the drive and remount because for some reason the folders show up but I can't access the files. I thought this is related to the USB sleep (since I leave the machine on)...very odd. Never had this issue with real Macs.

On the ASRock MB, in the BIOS you have an option to keep powering USB devices while the system is asleep (this option is enabled by default). Can't remember the Gigabyte BIOS configuration, but it should have something similar.

Unfortunately Gigabyte BIOSes from my experience have way less advanced settings than ASUS (not sure about ASRock but I know they are ex-ASUS people)....can't find an option like that in the BIOS on my end.

hi,friend,When my Vega is running at full speed, it will make a harsh current. I think it should be the vibration of the inductor. Does your Vega have such noise?

I haven't had any issues with the Vega FE fans at all, contrary to other people who have the fans running at full speed sometimes even on 10.13.4. I don't think I'm doing anything differently, I just make sure I have a minimal amount of kexts in the EFI folder and config file is clean and only necessary things are enabled.

The ONLY time the Vega FE fan kicks in to a higher RPM is when I'm exporting something with Adobe Premiere/media encoder with OpenCL enabled, but it's not that loud. If I run Valley benchmark it kicks in too, but not that loud. On idle it runs at very low speeds. I use BeQuiet! Silentwing 3 fans for exhaust and intake as well as the AIO cooler for the CPU is a BeQuiet! as well (ordered from Germany) with bigger fans.

Just a note I have switched the little dipswitch on the Vega FE towards the ports on the back to use less power (I think that's what it does last time I checked). Maybe try doing that too?

Have you looked at this ? It requires a modification to a system .kext but it may be something to look at on your end.

I honestly have zero issues with the Vega FE and it's smooth as butter, coming from NVIDIA it's a miracle.
 
I don't either. Never actually even on real macs since the early 2000s.

I just set a hot corner for display sleep and set display sleep to 5 mins.

But the issue here is that even when the USB drive is connected for a few days (I let the drives go to sleep, which is ok by me, since they are consumer level and not server level drives sometimes) I have to eject the drive and remount because for some reason the folders show up but I can't access the files. I thought this is related to the USB sleep (since I leave the machine on)...very odd. Never had this issue with real Macs.

<< Truncated >>

Actually, I have this same problem on my MacBookPro with a 256GB JetDrive in the SD slot. There is an extension that has to be used to stop (or minimize) the bad ejections. I assume it only works with their drives. Sonnet has an extension for it's USB 3 Allegro card that basically ejects the drives if it detects that the MacPro is about to go to sleep.
 
Actually, I have this same problem on my MacBookPro with a 256GB JetDrive in the SD slot. There is an extension that has to be used to stop (or minimize) the bad ejections. I assume it only works with their drives. Sonnet has an extension for it's USB 3 Allegro card that basically ejects the drives if it detects that the MacPro is about to go to sleep.

Yeah I remember I had this issue with some drives and not others and apparently it’s gotten worse in high Sierra.

https://forums.developer.apple.com/thread/50399

Here’s a long post about it.

And I haven’t tried this script yet
https://www.tonymacx86.com/threads/...another-solution-but-this-one-is-free.164938/


I’m going to see if my external GDrives have the same issue (they use enterprise level hard drives). This might be related to WD.
 
You will receive a message "
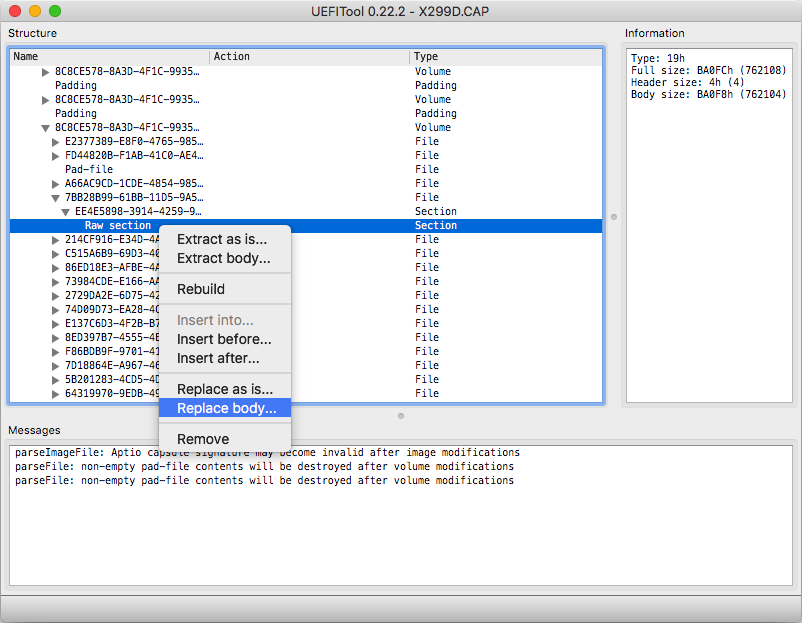
GUID pattern "7BB28B99-61BB-11D5-9A5D-0090273FC14D" found as .... in 7BB28B99-....". Double click on that message and search for the "Raw section" accompanying the "7BB28B99-...." entry, which indeed is the Boot Image, which you can easily verify by extracting the raw section body (right-click on "Raw section" and select "Extract body") to your Desktop and by subsequently opening the extracted raw-file directly with Apple's "Preview.app" (right-click an the raw file and select "Open with.." -> Preview.app).

b.) To exchange the default original ASUS Boot Logo image file stored in "Raw Section" by the iMacPro.raw image file that you previously downloaded to your Desktop, right-click again on "Raw section", select this time "Replace body" and select the iMacPro.raw image file on your Desktop.


I also found that you can change the "Please press DEL or F2 to enter UEFI BIOS" by searching for the key "88EAB212-C64F-4DE0-B83C-0DBE614EEACC" in ROG-RAMPAGE-VI-EXTREME-ASUS-1301.CAP and replacing body with a raw image of your choice, however maintain aspect ratios.....

personally I edited the raw file in photoshop and erased the text (just plain black bar file attached below to match with apple bootlogo)....

you can even make it entertaining by replacing the text with "Please press BELL or F13 to enter UEFI BIOS"......in any case, choice is yours.....mind you I found the key in the latest ASUS firmware ROG-RAMPAGE-VI-EXTREME-ASUS-1301.CAP I downloaded from Asus website.....you can verify with other Asus mobos firmware if the key is the same, I am guessing with high certainty that all Asus x299 will have same key.....

(BONUS) I've attached the apple black boot logo to replace bios splash screen. However rename file extension to .raw before uploading to UEFItool app. (only format I can load to the forum is .jpeg, so I posted in such format. however files are .bmp extension)

P.S The file format are INCORRECT EXTENSIONS, they are NOT .raw or .jpeg, the files format are actually windows bitmap files .bmp....therefore, if you decide to edit using photo editing software you need to change the file extension to .bmp before editing, otherwise your editing application will not understand the file format.

@kgp thanks for the extended guide...your extensive contributions and research is greatly appreciated....if its not burden to you, you may include this info in your guide it will greatly help others....please CORRECT the part you instructed to change the file format as .jpeg
 

Attachments

  • ASUS9.jpeg
    1.2 MB · Views: 242
  • Screen Shot 2018-05-16 at 12.37.24 AM.png
    Screen Shot 2018-05-16 at 12.37.24 AM.png
    367.8 KB · Views: 169
  • bios appleBootflash.jpeg
    2.9 MB · Views: 221
  • press-dell-f2removed.jpeg
    1.5 MB · Views: 228
Last edited:
Status
Not open for further replies.
Back
Top