Contribute
Register

macOS 10.13.3 Supplemental Update

Status
Not open for further replies.

Attachments

  • EFI.zip
    22 MB · Views: 97
Hi PastryChef -

I checked Quick Sync using MacX Video Converter, and it does NOT appear to be working. I've attached my EFI folder as requested.

Much obliged!

  • In Clover Configurator, ACPI section, you should rename your dedicated graphics (usually PEG0 or PEGP) to GFX0. You should probably also put a check next to "PluginType" to enable CPU power management.
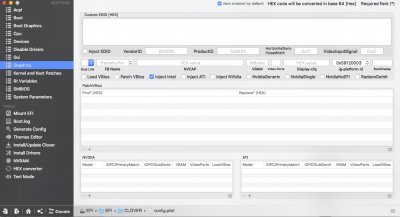
  • In Graphics section, IGPU should be set to "headless" like on real iMacs, so ig-platform-id should be 59120003. Once set to be headless, do not connect monitor(s) to the motherboard video outputs. They will not work.
  • In the SMBIOS section, it would probably be good to select iMac18,3 again just so that all the empty fields could be filled out. I don't know if leaving them blank has any adverse affects, but since it's so easily to get them filled out, why not. Also, put a check next to "Trust" and uncheck "Mobile".
 
I am unable to install this update. First, I had the supplemental update showing up *another time* in the Appstore update section after the *first update.* This happened to my MBP as well. The MBP did the actual update after doing the procedure for the 2nd time, however my Hack is still stuck at 17D47! There were no actual error messages I could see (like others posted). Then I tried to do a manual update using the standalone installer. Still, I am stuck at 17D47, and in addition I now see a Folder called "macOS Install Data" at the root of my boot drive. Even removing this folder and updating again has no effect. Plus I do not see the update in the Appstore anymore.

WTF? Any ideas?
 
This is the first update that I have not been able to perform, ever. Like others, it would just stay stuck at the apple boot logo. Eventually, I just abandoned the update altogether and used clover to boot into my existing MacOS install. Now there's no indication of the update even being available . I'll skip this one I think.

Edit - Same thing on my son's hack.
 
  • In Clover Configurator, ACPI section, you should rename your dedicated graphics (usually PEG0 or PEGP) to GFX0. You should probably also put a check next to "PluginType" to enable CPU power management.
  • In Graphics section, IGPU should be set to "headless" like on real iMacs, so ig-platform-id should be 59120003. Once set to be headless, do not connect monitor(s) to the motherboard video outputs. They will not work.
  • In the SMBIOS section, it would probably be good to select iMac18,3 again just so that all the empty fields could be filled out. I don't know if leaving them blank has any adverse affects, but since it's so easily to get them filled out, why not. Also, put a check next to "Trust" and uncheck "Mobile".

Hi PastryChef -

I performed the changes you suggested above (see attached screenshots and new EFI folder).

Now, when NVIDIA web driver is NOT enabled, the hardware encoding IS functioning per the MacX app (using the IGPU).
However, when NVIDIA web driver IS enabled, hardware encoding is NOT functioning per the MacX app (attempting to use the NVIDIA card).

Any ideas?

Thank you!

New Clover Configurator settings:
Screen Shot 2018-02-24 at 10.32.34 AM.jpg Screen Shot 2018-02-24 at 10.33.06 AM.jpg Screen Shot 2018-02-24 at 10.33.31 AM.jpg

Result with NVIDIA web driver DISABLED:
Screen Shot 2018-02-24 at 11.23.16 AM.jpg

Result with NVIDIA Web driver ENABLED:
Screen Shot 2018-02-24 at 11.34.06 AM.jpg
 

Attachments

  • EFI.zip
    22.1 MB · Views: 94
Hi PastryChef -

I performed the changes you suggested above (see attached screenshots and new EFI folder).

Now, when NVIDIA web driver is NOT enabled, the hardware encoding IS functioning per the MacX app (using the IGPU).
However, when NVIDIA web driver IS enabled, hardware encoding is NOT functioning per the MacX app (attempting to use the NVIDIA card).

Any ideas?

Thank you!

New Clover Configurator settings:
View attachment 315699 View attachment 315700 View attachment 315701

Result with NVIDIA web driver DISABLED:
View attachment 315702

Result with NVIDIA Web driver ENABLED:
View attachment 315703

Are you having any difficulty enabling the Nvidia web drivers?

You can try installing Lilu.kext, NvidiaGraphicsFixup.kext, and Shiki.kext. Then, in Clover Configurator, Boot section, add "shikigva=60" (without quotes) to the Custom Flags field.

*Note: If you want to know what the shikigva=60 means, full explanation can be found here.

Other than these, I haven't done anything else with regards to enabling IGPU.

Pastry -

Yes - I was having problems with NVIDIA web remaining enabled on between reboots.

I already had Lilu.kext, NvidiaGraphicsFixup.kext, and was missing Shiki.kext. I added that to L/E and the "shikigva=60" boot parameter and - VOILA! It's working!

Now when I play that Sony Camp 4K demo video via QuickTime, I get nice, low CPU usage numbers for QuickTime and the VTDecoderXPCService:
Screen Shot 2018-02-24 at 12.39.20 PM.jpg

You ROCK!
 
Crikey! When did I offend you? :crazy:

Check around. Plenty of people have put third-party kexts in the Library/Extensions folder. KextBeast is designed to do this (as well as System/Library/Extensions) although, agreed, I avoid both.

No, I didn't say there wasn't an EFI in Safe Mode, nor did I say I ... " moved my third-party kexts out of the EFI partition and into Library/Extensions to boot in safe mode". Of course the system still boot from the EFI partition. I just said that you can't mount the EFI partition to modify it while in Safe Mode to make amendments. My suggestion was just as a workaround to get the GPU working in normal mode.

You can boot to UniBeast and use a lot of Terminal commands to install the kexts if you really want to.

Or maybe as you say my build is some kind of special case ... Odd if so.

And the reason I comment here in the first place is to try and help - I'm no expert nor on any kind of loud ego-trip.

Woah, woah. Nobody is offended here. And all I meant was that the EFI partion is always there. But you're right in that you can't access it (or any FAT/FAT32 drive) in Safe Mode. That's all. My other point was simply that the original intention of Clover on EFI and separating out third-party kexts to the /kexts/Other folder was so you have all the vanilla (and commercial vendor) items in the normal, Apple locations (LE or SLE). That way, any alterations needed can take place as early in the boot cycle as possible and you don't need to worry about duplicates causing havoc. And I'm not arguing that you CAN'T put them in either location, just the WHY it's not a good practice. Also, I couldn't agree more with your last statement. I'm not on any ego trip, either and just like to help out if I can, as well.
 
Pastry -

Yes - I was having problems with NVIDIA web remaining enabled on between reboots.

I already had Lilu.kext, NvidiaGraphicsFixup.kext, and was missing Shiki.kext. I added that to L/E and the "shikigva=60" boot parameter and - VOILA! It's working!

Now when I play that Sony Camp 4K demo video via QuickTime, I get nice, low CPU usage numbers for QuickTime and the VTDecoderXPCService:
View attachment 315719

You ROCK!

Are you still having problems enabling the Nvidia web drivers? If yes, try going to Clover Configurator, Boot section, put a check next to nvda_drv=1.

Also, you may want to consider switching from OsxAptioFix2Drv-64.efi to OsxAptioFix3Drv-64.efi. This will give you native NVRAM and you can remove EmuVariableUefi-64.efi and the RC scripts. All the tools you need can be found in the Downloads section of this site, under Clover Builds.
 
Status
Not open for further replies.
Back
Top