UtterDisbelief
Moderator
- Joined
- Feb 13, 2012
- Messages
- 9,627
- Motherboard
- Gigabyte B760 Gaming X AX
- CPU
- i5-14600K
- Graphics
- RX 560
- Mac
- Classic Mac
- Mobile Phone
Components:
Intel NUC10i5FNHN:
https://www.amazon.co.uk/gp/product/B0BBKTR2Y3/?tag=tonymacx86-21
Crucial 32GB 3200 DDR4 SODIMM RAM kit:
https://www.amazon.co.uk/gp/product/B08C4X9VR5/?tag=tonymacx86-21
Gigabyte GSM2NE3256GNTD 256GB M.2 SSD:
https://www.amazon.co.uk/gp/product/B07YV3V4M5/?tag=tonymacx86-21
Already Owned:
Apple Magic Mouse 1 - Prefer AA battery version to the rechargeable, but if you must …
https://www.amazon.co.uk/dp/B016MUCHTS/?tag=tonymacx86-21
Apple Wired USB Keyboard - The classic with USB ports. I have a boxed spare too. No longer available new.
Acer 24” R241Y HD Monitor - No longer available new but I love it’s almost bezel-less design.
Comments
Owning real Apple Mac Minis I love the small form-factor and paltry power consumption of these little computers, so when I decided to build another hackintosh, chose to shun my trade-mark Mini-ITX towers and go even smaller. There are many mini PCs on the market now, with the potential to be hackintoshed, and most mimicking the basic Intel NUC design. These little boxes have an even smaller footprint than the Mac Mini and usually come in two heights, roughly the same as the Mac or a little bit taller, depending on the model.
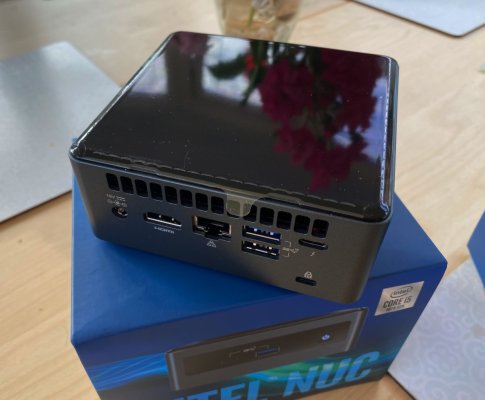
I chose a full height Intel NUC 10, model NUC10i5FNHN. The “H” in the name denotes a full-height box and the “N” on the end that there is no extra audio codec or headphone jack. These latter points were not actually an option here in the UK, but the only version available. Many builds online from other regions *do* have the codec and jack so you may be luckier.
No other parts were actually required for the build but because the NUC I bought only had 8GB of RAM, I bought a 32GB kit to upgrade it. This is a very easy job to do. Just unscrew the four “feet” and lift the plate away carefully - it’s attached to the motherboard with a ribbon-cable and has a heat-conducting pad for the SSD - then pop out the old memory and click-in the new.
Finally, as the NUC came with Windows 10 Pro pre-installed on it’s 256GB M.2 SSD, I swapped this out for a new Gigabyte 256GB M.2 SSD.
Installation:
There are reasons I chose to install Big Sur, even though we can go to Ventura on this build, and I’ll cover that later. The following is my standard practice for installing macOS.
First create a correctly formatted 16GB USB2.0 Memory Stick. Here we call it “USB”:
With the Big Sur installer file - Install macOS Big Sur.app - in your Applications folder, build your Big Sur installation media using the following Terminal command from our Big Sur Beta Installation Guide:
Code:
sudo /Applications/Install\ macOS\ Big\ Sur.app/Contents/Resources/createinstallmedia --volume /Volumes/USB /Applications/Install\ macOS\ Big\ Sur.app --nointeractionYou should use a recent version of the Big Sur installer and later than 11.3.
Once complete copy the EFI folder attached to this post into the hidden EFI partition on the installer stick. To access this load the EFI Mounter v3.1 app from our Downloads section and select your drive from the list - if there is one. If there is no list then only the default main drive is available. To check which the correct drive is, if you have more than one in your system, use Disk Utility to identify it. Remember if you identify your main drive as “disk3s2” for example, then your EFI partition should be at “disk3s1” and show in the list.
BIOS settings:
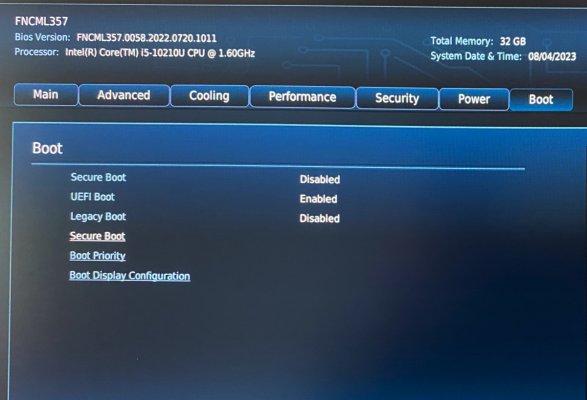
To access BIOS Setup, press and hold the F2 Function key on a USB Keyboard while the system boots. Once at the BIOS screen you need to make some changes -
1) Boot Menu - Secure Boot Disabled
2) Power / Secondary Power Settings -
a) Deep S4/S5 - Disabled
b) Wake on LAN from S4/S5 - Stay Off
c) USB S4/S5 Power - Enabled
d) Wake on USB from S5 - Disabled
e) Wake from Thunderbolt Device - Disabled
3) Press F10 to Save and exit.
NOTE: Native 10th gen i5 DDR4 RAM speed is lower than the 3200MHz kit bought. Intel specs a maximum of 2933MHz for the CPU. Not a problem. The Crucial kit bought automatically slows it’s speed to match the system requirements. This is fine and perfectly reliable. It's a cheaper option too and somewhat future-proof if a new build is undertaken at any point.
Now on reboot, by pressing the BIOS boot selector key F10 you can choose to boot the USB installer from the list. Once loaded, use the Disk Utility option to format your destination drive as APFS, then back-out of Disk Utility, choose Install macOS, select your destination drive and let it run its course.
Post Installation
The work has already been done in the EFI I have uploaded. To make the new main drive independent of the USB stick for booting just copy the same EFI folder used before, into the EFI paritition of the main drive, making sure you pick the correct drive again, as explained above.
We are using OpenCore bootloader v 0.9.3
I’ll run through what’s there so you know a little more when you wish to modify or create your own.
System-Definition = Macmini8,1
ACPI:
SSDT-AWAC.aml - needed to boot reliably around RTC
SSDT-EC.aml - dummy embedded controller
SSDT-PLUG.aml - CPU power management
Kexts:
Lilu.kext - Vital plug-in manager
VirtualSMC.kext - Vital System kext
SMCProcessor.kext - companion kext
SMCSuperIO.kext - companion kext
Whatevergreen.kext - Graphics plug-in for Lilu
USBPorts.kext - USB port configuration file
AirportItlwm.kext - Intel Wireless support **
AppleALC.kext - HDMI audio-out activation
IntelMausi.kext - Ethernet
IntelBluetoothFirmware/Injector kexts - To enable the Intel Bluetooth
** You will need to enter your wireless access-point password for AirportItlwm.kext to work. Though it looks just like macOS’s built-in wireless configuration this is actually spoofing Ethernet.
Audio - Limits
As discussed earlier, this model NUC does not have a separate audio codec or Line-out, so the only sound output available is via HDMI and the monitor or TV. This is "activated" using the AppleALC.kext and an audio Layout-ID of 28. I've done this for you in the attached EFI.
USB - Issues
The motherboard has 4x Internal USB ports and 5x external ports. The Internal ports comprise 1x for the Intel Bluetooth, 1x for system use and 2x unused USB2 motherboard headers. Externally we have 3x USB3 ports and 2x USB-C 3.2/TB3 ports.
You will notice that there is port duplication in the Hackintool screen grab. This is because the Thunderbolt chipset attaches itself, piggyback, to the main Intel USB chipset. A little confusing when you see that the back-panel Type-C port takes HS03 at 0x00300000 (TB3) the same as the front USB-A port at 0x14300000.
The problem for us here is that we can only have *one* port definition per Port ID, so port 0x03 - that HS03 dual-personality port - can *not* be set as both USB-A *and* Type-C, despite that being the hardware we have. The first one to be seen by the system is the USB-A port and that shows in the grab, but the TB3 port will work as intended. Directly editing the DSDT tables might help but that would be a tricky task especially if the BIOS version used differed built to build, so we will leave it as-is for now. IORegistryExplorer shows the TB3 ports quite happily running on the RP05 node and working.
A Mac is not a PC and maybe sometimes we should remember this.
The included USBPorts.kext configures the ports to make best use of everything we have. The limitation being the back panel USB-C/TB3 port will only act as USB2 unless a TB3 device is plugged-in, because SS03 is allocated to the front USB-A port. I have removed the Internal, non-used ports to bring the total number down below 15x ports as required. The multi-controller rule is not clear-cut here (and I don’t support it anyway).
Here is the result of the USBPorts.kext included in the EFI folder:
USB Port mapping:
What Works:
USB2, USB3 and USB-C
Audio - HDMI
Ethernet
WiFi & BT
Video out - HDMI and USB-C/TB3
Sleep/Wake/Shutdown
iCloud / iMessage / Facetime / Music / App Store
What Doesn’t Work:
Continuity and Handoff due to the use of the Intel wireless chipset.
Conclusion:
In use the little NUC is very well behaved as a hackintosh. In the same fashion as a laptop the main fan will speed-up when under stress and become almost silent when idling. Replacing or changing memory and SSD is probably the easiest I've ever had to do. The Intel mini PCs are very well-built indeed. The BIOS offers some surprising extras too. You can change the colours, blink-rates and brightness of the two main LEDs - power and HDD/SDD activity. While in sleep mode the main power LED will pulsate just like the older generation Mac Minis. Something Apple has decided has no value in their latest models and no-longer includes.
I chose Big Sur for this install because I wasn't sure how well it would turn out to begin with. In my opinion Big Sur is the most solid and reliable recent macOS for a new build. Usually everything works; USB especially. Both Monterey and Ventura bring their own problems and deprecated hardware support. Sonoma PB too.
**The serial-numbers in the attached EFI folder are dummies. Please generate and use your own unique ones.**
Updates -
New:
14th August 2023 - See post #7 for an updated USBPorts kext and Thunderbolt SSDT.
New:
8th September 2023 - See post #12 for complete, updated Big Sur EFI with TB.
New:
a) 11th September 2023 - See post #13 for complete, new, EFI folder for Monterey.
b) Also the SD card reader is now working with the updated EFIs and Monterey.
Attachments
Last edited:


