- Joined
- Dec 7, 2011
- Messages
- 545
- Motherboard
- Razer Blade 15 - Clover
- CPU
- i7-8750H
- Graphics
- UHD 630/GTX 1060 - 1920x1080
- Mac
- Mobile Phone
I got everything up and running perfectly on my hackintosh!
My system specs:
Mobo: Gigabyte Z68MX-UD2H-B3
BIOS Version: UEFI 1c
Processor: Intel i5 2500K
RAM - 8GB 1600MHZ
Main Hard Drive - 256GBCrucial M4 SSD
Graphics: Nvidia GT220 1GB Ram
What Works:
EVERYTHING!
Including USB 3.0!!!
I have not come across an item that doesn't work!
First:
I made a Unibeast Install by following this guide - http://www.tonymacx86.com/61-unibeast-install-os-x-mountain-lion-any-supported-intel-based-pc.html
Also download MultiBeast and stick on the root of the same flash drive you put the Unibeast Mountain Lion installation on AFTER you have done the Unibeast install to the flash drive. You can get MultiBeast from here - http://www.tonymacx86.com/downloads.php?do=file&id=139
Second:
I updated my BIOS, if you haven't already update your BIOS to the new UEFI BIOS then update it. This guide might not work for you if you don't. The new BIOS makes the system much faster. Here's a guide on how to do it, I used this guide and it worked flawlessly. (You need a windows machine in order to use this guide to update your BIOS to work, if you do not have access to a Windows machine you're going to have to Google how to update it from a Mac) - http://www.tonymacx86.com/mountain-...-working-dsdt-not-required-12.html#post413702
Also you must go to the Gigabyte site and download the new UEFI BIOS that's specifically for your board!
Third:
Boot from the Unibeast Flash Drive that has Mountain Lion on it. Select the Mountain Lion Installation.
Now for me, I had to boot the installation with PCIRootUID=0 at the Unibeast menu in order for the Installation to boot up successfully. It might be different for you, but if you get a black screen after the Apple Loading screen when selecting the Installation, use the PCIRoodUID=0 flag and it will solve your problem.
Fourth:
Once in the OS X Mountain Lion Installation, go to Disk Utility and select the Hard Drive that you want to install Mountain Lion on and Erase it. You want to start with a clean drive! After that, go and do the normal install, it'll take around 10 minutes.
Fifth:
After the install is done, reboot your computer.
Boot up from the Unibeast Flash Drive you created again. Don't boot the installation this time, boot the actual Mountain Lion Install.
Once again, you may have to use the PCIRootUID=0 flag again in order to get it to boot properly.
Go through the set-up screen, navigate to the Unibeast flash drive, find MultiBeast that you copied to it and copy it to your desktop.
Now because you updated your BIOS to the new UEFI BIOS you DO NOT need a DSDT")
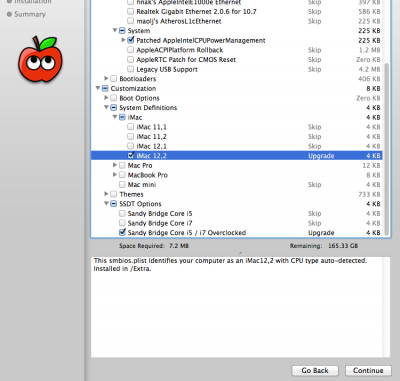
If you have this same motherboard select the same options that I selected in MultiBeast and you will have successful installation! Follow my screen shots attached to the bottom of this post for all the options you should check.
Note! Since I have an SSD I select the Trim option under Disk, if you have a regular hard drive this is not needed and you should not check it.
Note!! The last option you have to check, the SSDT Section. Make sure that YOU Select what YOUR processor is. Since mine is a Sandy Bridge Core i5 and it's overclocked, I selected the option that has the i5 overclock.
If you are not overclocked then select the standard i5 or i7 option.
If you have the new Ivy Bridge processor and not the Sandy Birdge Version then do not select anything in this section.
For System Profile you can choose whatever you want. Except MacPro 5,1. If you select this profiler you will get a kernel panic when booting and you will have to reinstall Mountain Lion!!!
Once you select all the options, click install, follow the prompts then reboot! Take out the Flash Drive and boot straight from your hard drive!
That's it!
Good luck!
If you have any questions feel free to ask, I'll respond as quick as I can.
I spent a whole day getting Mountain Lion to work on my system and I must have reinstalled it around 10 times until I finally got it perfect so I most likely can help you with any issues you have.
My system specs:
Mobo: Gigabyte Z68MX-UD2H-B3
BIOS Version: UEFI 1c
Processor: Intel i5 2500K
RAM - 8GB 1600MHZ
Main Hard Drive - 256GBCrucial M4 SSD
Graphics: Nvidia GT220 1GB Ram
What Works:
EVERYTHING!
Including USB 3.0!!!
I have not come across an item that doesn't work!
First:
I made a Unibeast Install by following this guide - http://www.tonymacx86.com/61-unibeast-install-os-x-mountain-lion-any-supported-intel-based-pc.html
Also download MultiBeast and stick on the root of the same flash drive you put the Unibeast Mountain Lion installation on AFTER you have done the Unibeast install to the flash drive. You can get MultiBeast from here - http://www.tonymacx86.com/downloads.php?do=file&id=139
Second:
I updated my BIOS, if you haven't already update your BIOS to the new UEFI BIOS then update it. This guide might not work for you if you don't. The new BIOS makes the system much faster. Here's a guide on how to do it, I used this guide and it worked flawlessly. (You need a windows machine in order to use this guide to update your BIOS to work, if you do not have access to a Windows machine you're going to have to Google how to update it from a Mac) - http://www.tonymacx86.com/mountain-...-working-dsdt-not-required-12.html#post413702
Also you must go to the Gigabyte site and download the new UEFI BIOS that's specifically for your board!
Third:
Boot from the Unibeast Flash Drive that has Mountain Lion on it. Select the Mountain Lion Installation.
Now for me, I had to boot the installation with PCIRootUID=0 at the Unibeast menu in order for the Installation to boot up successfully. It might be different for you, but if you get a black screen after the Apple Loading screen when selecting the Installation, use the PCIRoodUID=0 flag and it will solve your problem.
Fourth:
Once in the OS X Mountain Lion Installation, go to Disk Utility and select the Hard Drive that you want to install Mountain Lion on and Erase it. You want to start with a clean drive! After that, go and do the normal install, it'll take around 10 minutes.
Fifth:
After the install is done, reboot your computer.
Boot up from the Unibeast Flash Drive you created again. Don't boot the installation this time, boot the actual Mountain Lion Install.
Once again, you may have to use the PCIRootUID=0 flag again in order to get it to boot properly.
Go through the set-up screen, navigate to the Unibeast flash drive, find MultiBeast that you copied to it and copy it to your desktop.
Now because you updated your BIOS to the new UEFI BIOS you DO NOT need a DSDT
If you have this same motherboard select the same options that I selected in MultiBeast and you will have successful installation! Follow my screen shots attached to the bottom of this post for all the options you should check.
Note! Since I have an SSD I select the Trim option under Disk, if you have a regular hard drive this is not needed and you should not check it.
Note!! The last option you have to check, the SSDT Section. Make sure that YOU Select what YOUR processor is. Since mine is a Sandy Bridge Core i5 and it's overclocked, I selected the option that has the i5 overclock.
If you are not overclocked then select the standard i5 or i7 option.
If you have the new Ivy Bridge processor and not the Sandy Birdge Version then do not select anything in this section.
For System Profile you can choose whatever you want. Except MacPro 5,1. If you select this profiler you will get a kernel panic when booting and you will have to reinstall Mountain Lion!!!
Once you select all the options, click install, follow the prompts then reboot! Take out the Flash Drive and boot straight from your hard drive!
That's it!
Good luck!
If you have any questions feel free to ask, I'll respond as quick as I can.
I spent a whole day getting Mountain Lion to work on my system and I must have reinstalled it around 10 times until I finally got it perfect so I most likely can help you with any issues you have.