
- Joined
- Jul 6, 2011
- Messages
- 79
- Mac
- Classic Mac
- Mobile Phone
Frostcall's Build - i5-2500k, GA-Z68MX-UD2H-B3, Radeon HD 6850 - Lion / Snow Leopard
Component List.
Mac OS X version 10.6 Snow Leopard
http://www.amazon.com/gp/product/B001AMHWP8?ie=UTF8
GIGABYTE GA-Z68MX-UD2H-B3 LGA 1155 Intel Z68 HDMI SATA 6Gb/s USB 3.0 Micro ATX Intel Motherboard
http://www.amazon.com/gp/product/B005484N9W
GIGABYTE ATI Radeon HD6850 1GB DDR5 2DVI/HDMI/DisplayPort PCI-Express Video Card GV-R685OC-1GD
http://www.amazon.com/gp/product/B004F6GJAU/
Intel Core i5-2500K Processor 3.3GHz 6 MB Cache Socket LGA1155
http://www.amazon.com/gp/product/B004EBUXHQ/
Cooler Master Hyper 212 Plus 120mm Sleeve CPU Cooler, RR-B10-212P-G1
http://www.amazon.com/gp/product/B002G1YPH0/
Liteon 24X DVDrw Sata Retail
http://www.amazon.com/gp/product/B002QGDWLK/
Corsair Vengeance Blu 8 GB PC3-12800 1600mHz DDR3 240-Pin SDRAM Dual Channel Memory Kit for Intel and AMD Platforms CMZ8GX3M2A1600C9B
http://www.amazon.com/gp/product/B004QBUL1C/
OCZ Technology 50 GB Vertex 2 Series SATA II 2.5-Inch Solid State Drive (SSD) OCZSSD2-2VTX50G
http://www.amazon.com/gp/product/B003DS7IGA/
Seagate Barracuda Green 2TB SATA 6Gb/s 64MB Cache 3.5-Inch Internal Bare Drive ST2000DL003
http://www.amazon.com/gp/product/B004CCS266/
OCZ ModXStream Pro 600W Modular High Performance Power Supply compatible with Intel Sandy Bridge Core i3 i5 i7 and AMD Phenom
http://www.amazon.com/gp/product/B001EYV690/
Cooler Master HAF 932 Advanced Full Tower Case with SuperSpeed USB 3.0 - (RC-932-KKN5-GP)
http://www.amazon.com/gp/product/B001EPUQAE
ASUS VH226H Black 21.5" 2ms(GTG) HDMI Widescreen 16:9 Full HD 1080P LCD Monitor 300 cd/m2 1000:1 (ASCR 12000 : 1) Built in Speakers
http://www.newegg.com/Product/Product.aspx?Item=N82E16824236051
WL ADPT ROSEWILL RNX-N180UBE USB RETAIL (Wireless N USB adapter)
WL ADPT ROSEWILL RNX-N180UBE USB RETAIL
Belkin Mini BlueTooth Adapter F8T016[/amazon]
http://www.amazon.com/gp/product/B001E96JBK/
Apple Keyboard with Numeric Keypad
http://www.amazon.com/gp/product/B005DLDTAE/
Apple Magic Trackpad
http://www.amazon.com/gp/product/B003XIJ3MW/
Comments:
===========
WORKING:
Video
Audio
LAN
Sleep
Bluetooth (OOB)
WiFi
Dual Monitor Support (Display port and top DVI port)
Overclocking
Lion upgrade
USB 3.0 (the motherboard ports)
NOT WORKING:
HDMI port
Lower (solo) DVI port
===========
GEEKBENCH (32bit, On Fresh Reboot, No overclocking): 9016
Screen shot 2011-07-12 at 2.54.37 PM.png
GeekBench with 16GB Ram and Overclocked to 4.0Ghz: 10466
Screen shot 2011-07-16 at 10.08.38 AM.png
*I FAILED 5 times before getting it working. Stick with it, you will figure it out*
===========
Software Used
===========
iBoot 3.1.1
MultiBeast 3.8
Update Helper
Retail OS X Snow Leopard
Mac OS X 10.6.8 Combo Update
F5 version for of the bios for this motherboard
z8mxud2h.f5.zip
The F5 version of the DSDT file for this bios (renamed to DSDT.aml and placed on desktop)
===========
Step by Step:
===========
0. Download MultiBeast ( I used 3.7.3 for mine but 3.8 works too), the DSDT for your MB (I used the F5 DSDT for this motherboard), Update Helper, F5 bios update, Mac OS X 10.6.8 Combo Update. Put these all on a USB drive for later.
1. Build your system. Leave out the Video card. I had all memory and hard drives installed. You will need to plug your monitor into the onboard video for now.
1.5 Flash your bios with the latest image. For this board, it was F5. I had to use a windows machine to grab extract the bios update.
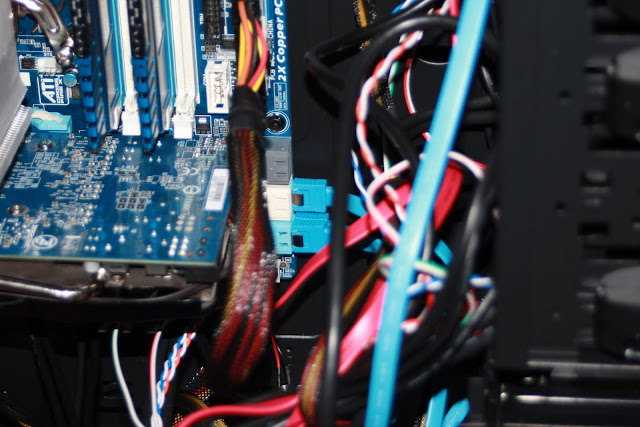
2. Make sure you plug everything into the White and Blue SATA connectors.
3. In the BIOS, make sure you set the CDROM to boot first, followed by the Hard Drive.
4. In the BIOS, set the correct HD boot order. For me, I want to boot from the SSD, so I set the OCZ drive first, followed by the Seagate.
5. In the BIOS, make sure you set HPET to 64, and enable AHCI (there are 2 places for AHCI on this MB).
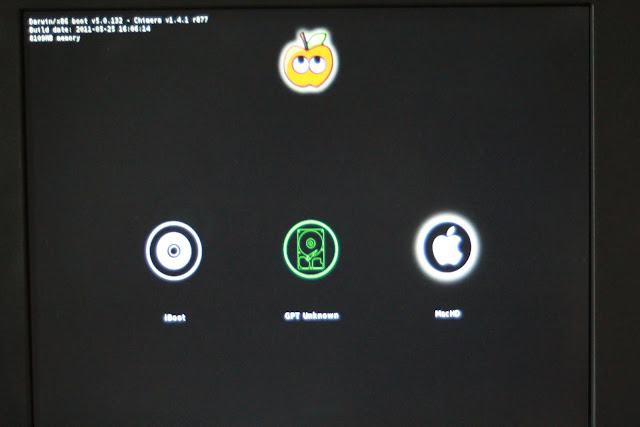
6. Boot up using iBoot. After it get's to boot screen, swap out the iBoot disk for the Retail 10.6 disk and press F5 to refresh. Then, select the install disk and hit ENTER.
7. Install Snow Leopard on your SSD. You can always choose to use Disk Utility first if you want to split any drives.

8. After installation, it will restart automatically and try to boot (and it won't). So, put the iBoot disk back in the DVD drive and restart. At the boot screen, select your Mac Hard drive (I named mine MacHD)
9. Now, you are at your desktop. Move your Combo Update, MultiBeast, DSDT file and 10.6.8 Helper to the Desktop. After moving them, RENAME your DSDT file to DSDT.aml
REMOVE YOUR USB Drive, This is important.
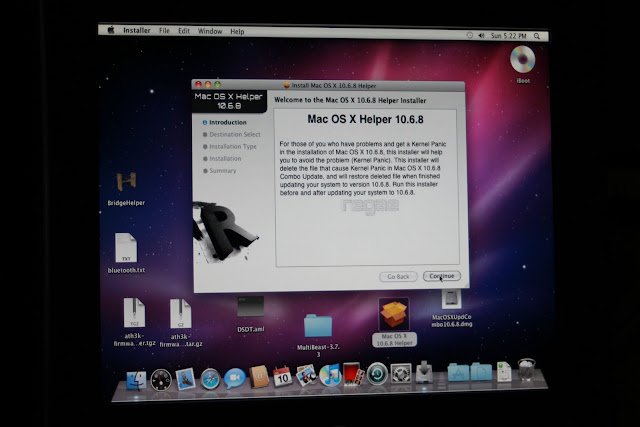
Then run 10.6.8 Helper, choosing the 'Before Update' option. After it installs, reboot LEAVING THE iBoot Disk in the drive.
10. After rebooting, select the Mac HD partition again (or whatever you named it) and get back to your desktop.
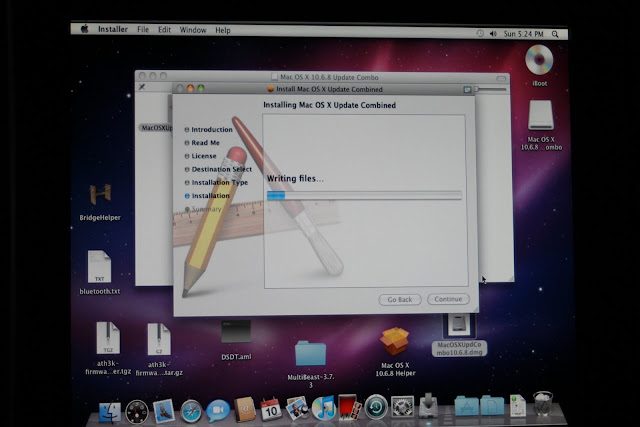
11. Now, run the 10.6.8 Combo Update. BUT DON'T REBOOT YET!
12. Minimize the Combo Update after it is finished, and install MultiBeast. For this motherboard, select the following options:
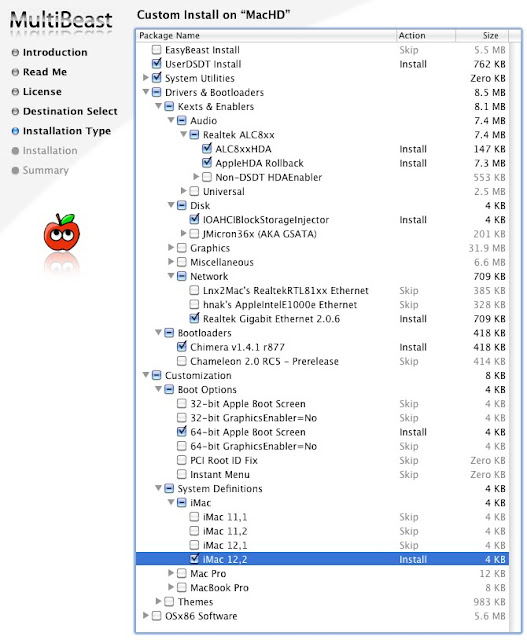
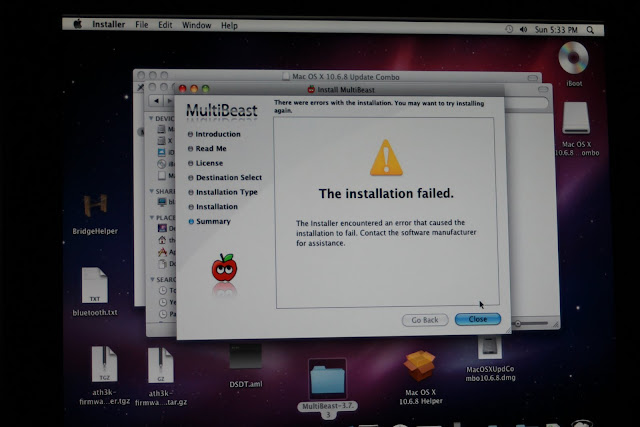
It's important to note that MultiBeast (the version I ran anyway) has a tendency to crash the first time you run it. Just reopen it, and run it until it installs. It's also important to note that it 'failed' to install but it actually worked just fine. Don't reboot yet! You will probably see the Network pop up and ask for settings. For me, DHCP works great. Apply your settings and move on to the next step.
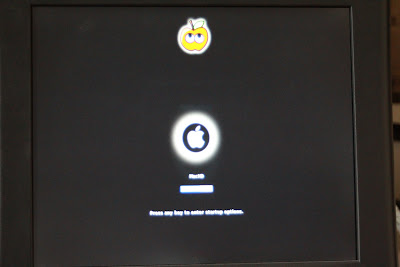
13. Run 10.6.8 Helper again, but this time select 'After Update'. NOW restart. Be sure to eject your iBoot disk during the restart. You should now see these this screen, just let it boot:
If everything went well, you will be at your desktop with everything working. Shutdown the computer, unplug the power, and install your Video Card. Be sure NOT to use the HDMI port as it doesnt work in this install. Use the top DVI port or the Display port. also, onboard video does not work in 10.6.8 with HDMI. Turn everything back on and enjoy!
Audio is working, Network is working, Flash is up. After installing everything, I put in the Belkin BlueTooth adapter and it worked out of box. I bought this one because it said that it worked with OS X (and it does!). Also, I'm not getting 30' from it. More like 4'.
EDITS:
USB 3.0
I just upgraded to Lion. I don't remember the ports working in Snow Leopard. When I re-ran Multibeast in Lion, I added the NEC USB 3.0 kext. I'm not sure if it was Lion or that kext that did the trick.
WIFI Update!
Wifi is now up and running!
My Rosewill RNX-N180UBE came in the mail today. I plugged it into my USB port, then installed the 1.8.8 driver for OSX 10.6 from here: http://www.rosewill.com/products/d_1721 ... Detail.htm
After a reboot, it's up and running like a champ! It does use it's own program/driver thing to get the wifi going, but it's smooth like butter. Mini Update I have been seeing occasional times where my USB wifi device would stop working. I had to unplug it and plug it back in. Not sure why it does this sometimes.
Dual Monitors!
I could only get Dual Monitors to work like so:
OOB, Display Port and 1 of the 2 (the 'top' one) DVI port work.
So, I have a Display Port to HDMI adapter running on my primary monitor.
I have my secondary monitor plugged into the 'top' DVI port. (the one next to the HDMI and Display ports)
Audio Popping in Leopard
Run Antipop: http://www.tomsick.net/downloads/antipop-1.0.2.dmg
It will fix the pop noises you hear when audio comes in.
DO NOT USE THIS IN LION. If you do, your audio will stop working after a few hours of use.
No Video After doing this?
On the card listed above, only the Display Port and top DVI port (the one next to the Display Port) function.
A list of working cards:
wiki/index.php/Graphics_Card_Database
LION Update
So, I followed Tony's steps. I ran into 2 snags:
1. When I went to Disk Utilities, I did not have 8gb of free space on my SSD even though in Finder, it showed that I had 15gb. So, instead, I created an 8 GB partition on my other internal HD, then restored the DMG of my downloaded copy of Lion to it, then ran xMove on that partition. After a reboot, everything went fine.
2. On rebooting into Lion, audio no longer worked. I was able to fix it by using this method
To quote fishsticks and marques0:
I deleted the files I could find, re-ran Multibeast, rebooted and BAM, all audio is working instead of just in Chrome.
Component List.
Mac OS X version 10.6 Snow Leopard
http://www.amazon.com/gp/product/B001AMHWP8?ie=UTF8
GIGABYTE GA-Z68MX-UD2H-B3 LGA 1155 Intel Z68 HDMI SATA 6Gb/s USB 3.0 Micro ATX Intel Motherboard
http://www.amazon.com/gp/product/B005484N9W
GIGABYTE ATI Radeon HD6850 1GB DDR5 2DVI/HDMI/DisplayPort PCI-Express Video Card GV-R685OC-1GD
http://www.amazon.com/gp/product/B004F6GJAU/
Intel Core i5-2500K Processor 3.3GHz 6 MB Cache Socket LGA1155
http://www.amazon.com/gp/product/B004EBUXHQ/
Cooler Master Hyper 212 Plus 120mm Sleeve CPU Cooler, RR-B10-212P-G1
http://www.amazon.com/gp/product/B002G1YPH0/
Liteon 24X DVDrw Sata Retail
http://www.amazon.com/gp/product/B002QGDWLK/
Corsair Vengeance Blu 8 GB PC3-12800 1600mHz DDR3 240-Pin SDRAM Dual Channel Memory Kit for Intel and AMD Platforms CMZ8GX3M2A1600C9B
http://www.amazon.com/gp/product/B004QBUL1C/
OCZ Technology 50 GB Vertex 2 Series SATA II 2.5-Inch Solid State Drive (SSD) OCZSSD2-2VTX50G
http://www.amazon.com/gp/product/B003DS7IGA/
Seagate Barracuda Green 2TB SATA 6Gb/s 64MB Cache 3.5-Inch Internal Bare Drive ST2000DL003
http://www.amazon.com/gp/product/B004CCS266/
OCZ ModXStream Pro 600W Modular High Performance Power Supply compatible with Intel Sandy Bridge Core i3 i5 i7 and AMD Phenom
http://www.amazon.com/gp/product/B001EYV690/
Cooler Master HAF 932 Advanced Full Tower Case with SuperSpeed USB 3.0 - (RC-932-KKN5-GP)
http://www.amazon.com/gp/product/B001EPUQAE
ASUS VH226H Black 21.5" 2ms(GTG) HDMI Widescreen 16:9 Full HD 1080P LCD Monitor 300 cd/m2 1000:1 (ASCR 12000 : 1) Built in Speakers
http://www.newegg.com/Product/Product.aspx?Item=N82E16824236051
WL ADPT ROSEWILL RNX-N180UBE USB RETAIL (Wireless N USB adapter)
WL ADPT ROSEWILL RNX-N180UBE USB RETAIL
Belkin Mini BlueTooth Adapter F8T016[/amazon]
http://www.amazon.com/gp/product/B001E96JBK/
Apple Keyboard with Numeric Keypad
http://www.amazon.com/gp/product/B005DLDTAE/
Apple Magic Trackpad
http://www.amazon.com/gp/product/B003XIJ3MW/
Comments:
===========
WORKING:
Video
Audio
LAN
Sleep
Bluetooth (OOB)
WiFi
Dual Monitor Support (Display port and top DVI port)
Overclocking
Lion upgrade
USB 3.0 (the motherboard ports)
NOT WORKING:
HDMI port
Lower (solo) DVI port
===========
GEEKBENCH (32bit, On Fresh Reboot, No overclocking): 9016
Screen shot 2011-07-12 at 2.54.37 PM.png
GeekBench with 16GB Ram and Overclocked to 4.0Ghz: 10466
Screen shot 2011-07-16 at 10.08.38 AM.png
*I FAILED 5 times before getting it working. Stick with it, you will figure it out*
===========
Software Used
===========
iBoot 3.1.1
MultiBeast 3.8
Update Helper
Retail OS X Snow Leopard
Mac OS X 10.6.8 Combo Update
F5 version for of the bios for this motherboard
z8mxud2h.f5.zip
The F5 version of the DSDT file for this bios (renamed to DSDT.aml and placed on desktop)
===========
Step by Step:
===========
0. Download MultiBeast ( I used 3.7.3 for mine but 3.8 works too), the DSDT for your MB (I used the F5 DSDT for this motherboard), Update Helper, F5 bios update, Mac OS X 10.6.8 Combo Update. Put these all on a USB drive for later.
1. Build your system. Leave out the Video card. I had all memory and hard drives installed. You will need to plug your monitor into the onboard video for now.
1.5 Flash your bios with the latest image. For this board, it was F5. I had to use a windows machine to grab extract the bios update.
2. Make sure you plug everything into the White and Blue SATA connectors.
3. In the BIOS, make sure you set the CDROM to boot first, followed by the Hard Drive.
4. In the BIOS, set the correct HD boot order. For me, I want to boot from the SSD, so I set the OCZ drive first, followed by the Seagate.
5. In the BIOS, make sure you set HPET to 64, and enable AHCI (there are 2 places for AHCI on this MB).
6. Boot up using iBoot. After it get's to boot screen, swap out the iBoot disk for the Retail 10.6 disk and press F5 to refresh. Then, select the install disk and hit ENTER.
7. Install Snow Leopard on your SSD. You can always choose to use Disk Utility first if you want to split any drives.
8. After installation, it will restart automatically and try to boot (and it won't). So, put the iBoot disk back in the DVD drive and restart. At the boot screen, select your Mac Hard drive (I named mine MacHD)
9. Now, you are at your desktop. Move your Combo Update, MultiBeast, DSDT file and 10.6.8 Helper to the Desktop. After moving them, RENAME your DSDT file to DSDT.aml
REMOVE YOUR USB Drive, This is important.
Then run 10.6.8 Helper, choosing the 'Before Update' option. After it installs, reboot LEAVING THE iBoot Disk in the drive.
10. After rebooting, select the Mac HD partition again (or whatever you named it) and get back to your desktop.
11. Now, run the 10.6.8 Combo Update. BUT DON'T REBOOT YET!
12. Minimize the Combo Update after it is finished, and install MultiBeast. For this motherboard, select the following options:
It's important to note that MultiBeast (the version I ran anyway) has a tendency to crash the first time you run it. Just reopen it, and run it until it installs. It's also important to note that it 'failed' to install but it actually worked just fine. Don't reboot yet! You will probably see the Network pop up and ask for settings. For me, DHCP works great. Apply your settings and move on to the next step.
13. Run 10.6.8 Helper again, but this time select 'After Update'. NOW restart. Be sure to eject your iBoot disk during the restart. You should now see these this screen, just let it boot:
If everything went well, you will be at your desktop with everything working. Shutdown the computer, unplug the power, and install your Video Card. Be sure NOT to use the HDMI port as it doesnt work in this install. Use the top DVI port or the Display port. also, onboard video does not work in 10.6.8 with HDMI. Turn everything back on and enjoy!
Audio is working, Network is working, Flash is up. After installing everything, I put in the Belkin BlueTooth adapter and it worked out of box. I bought this one because it said that it worked with OS X (and it does!). Also, I'm not getting 30' from it. More like 4'.
EDITS:
USB 3.0
I just upgraded to Lion. I don't remember the ports working in Snow Leopard. When I re-ran Multibeast in Lion, I added the NEC USB 3.0 kext. I'm not sure if it was Lion or that kext that did the trick.
WIFI Update!
Wifi is now up and running!
My Rosewill RNX-N180UBE came in the mail today. I plugged it into my USB port, then installed the 1.8.8 driver for OSX 10.6 from here: http://www.rosewill.com/products/d_1721 ... Detail.htm
After a reboot, it's up and running like a champ! It does use it's own program/driver thing to get the wifi going, but it's smooth like butter. Mini Update I have been seeing occasional times where my USB wifi device would stop working. I had to unplug it and plug it back in. Not sure why it does this sometimes.
Dual Monitors!
I could only get Dual Monitors to work like so:
OOB, Display Port and 1 of the 2 (the 'top' one) DVI port work.
So, I have a Display Port to HDMI adapter running on my primary monitor.
I have my secondary monitor plugged into the 'top' DVI port. (the one next to the HDMI and Display ports)
Audio Popping in Leopard
Run Antipop: http://www.tomsick.net/downloads/antipop-1.0.2.dmg
It will fix the pop noises you hear when audio comes in.
DO NOT USE THIS IN LION. If you do, your audio will stop working after a few hours of use.
No Video After doing this?
On the card listed above, only the Display Port and top DVI port (the one next to the Display Port) function.
A list of working cards:
wiki/index.php/Graphics_Card_Database
LION Update
So, I followed Tony's steps. I ran into 2 snags:
1. When I went to Disk Utilities, I did not have 8gb of free space on my SSD even though in Finder, it showed that I had 15gb. So, instead, I created an 8 GB partition on my other internal HD, then restored the DMG of my downloaded copy of Lion to it, then ran xMove on that partition. After a reboot, everything went fine.
2. On rebooting into Lion, audio no longer worked. I was able to fix it by using this method
To quote fishsticks and marques0:
I removed files from /System/Extensions and /Extra/Extensions :
- ALC8xxHDA.kext in /Extra/Extensions
- AppleHDA.kext in /System/Extensions
- HDAEnabler889.kext in /System/Extensions
On a Gigabyte GA-Z68MX-UD2H-B3 motherboard with the ALC889 audio chip.
During the multi beast (re)install I checked HLC8xxHDA and AppleHDA Rollback options as marques0 wisely recommended.
I deleted the files I could find, re-ran Multibeast, rebooted and BAM, all audio is working instead of just in Chrome.

