- Joined
- Sep 22, 2010
- Messages
- 26
- Motherboard
- ASUS MAXIMUS X HERO (WIFI/AC)
- CPU
- i7-8700K
- Graphics
- RX 580
- Mac
- Mobile Phone
Alan's Thin mini-ITX: GA-H87TN - i3-4330 - HD4600
Components
Gigabyte GA-H87TN Thin mini-ITX Motherboard
http://www.newegg.com/Product/Product.aspx?Item=N82E16813128668
Intel Core i3-4330 Haswell Processor
http://www.newegg.com/Product/Product.aspx?Item=N82E16819116945
Lian-Li PC-Q05 Thin Mini-ITX Case
http://www.newegg.com/Product/Product.aspx?Item=N82E16811112357
Intel HTS1155LP CPU Cooler
http://www.newegg.com/Product/Product.aspx?Item=N82E16835203012
Samsung 840 EVO 120GB mSata
http://www.newegg.com/Product/Product.aspx?Item=N82E16820147315
Azurewave AW-CE123H 802.11ac/nbg WiFi+BT PCI Express Card
http://www.amazon.com/gp/product/B00HRFS1GQ/
GMYLE Micro USB Bluetooth 4.0 Dongle
http://www.amazon.com/gp/product/B007MKMJGO
FSP Group Mini ITX / 19V DC 180W Power Adapter
http://www.amazon.com/gp/product/B00F4O155Q/
Already Owned
PNY 8GB DDR3 SODIMM
http://www3.pny.com/8GB-2x4GB-PC3-10666-1333MHz-DDR3-Notebook-SODIMM-P3018C429.aspx
Kingston SSDNow V+200 120GB SSD
http://www.newegg.com/Product/Product.aspx?Item=N82E16820239374
LG Flatron E2350V 23" LCD Monitor
Comments
I've owned a gutted G4 Cube for sometime now and planned on using the components for it. However, at this time, I'm leaning toward a scratch build. The components were selected by both cost and need. For my computing needs, I do not need a fast(er) processor nor a discrete GPU.
Edit: Due to other obligations, I ended up using the Lian-Li case above.
Installation Notes
The GA-H87TN uses a AMI Aptio EFI/Bios Firmware so Unibeast will not work. This installation is using OSX Mavericks 10.9.2 and the Clover Boot Loader.
Clover Boot Loader
Once I loaded "Optimized Defaults" in the EFI/Bios, I followed the Clover Guide to boot the board. Make sure to use the UEFI boot only options and not the Legacy Bios options when building the USB Drive.
For config.plist, I started out with config.plist-Intel-HD4600-desktop.
The onboard ethernet port uses a Realtek RTL8111g. Head on over to Insanelymac for Meize's RTL8111 Kext. Add the Kext to /Volumes/EFI/EFI/CLOVER/kexts/10.9/ as noted in the Clover Guide.
After following the Clover Guide, you should have a bootable system with a working ethernet port.
Enabling Onboard Audio
There are multiple ways to enable onboard. They are all documented in toledo's guide: Mavericks: Audio Realtek ALC AppleHDA. I chose to implement via Clover Patched Realtek ALC Installation which is specifically at toleda/audio_CloverALC.
Installation:
1. Download and unpack the zip files from the following locations:
2. Change the audio id to 2 in config.plist. It should look like this:
Code:
<key>Audio</key>
<dict>
    <key>Inject</key>
    <string>2</string>
 </dict>
3. Via Finder, navigate to Downloads/audio_CloverALC-master/.
- Unpack realTekALC.kext.zip.
- Copy realTekALC.kext to /Volumes/EFI/EFI/CLOVER/kexts/10.9/
4. Via Finder, navigate to Downloads/audio_CloverALC-master/.
- Unpack config-audio_cloverALC.plist.zip
From config-audio_cloverALC.plist, there are two KextsToPatch sections that need to be added to config.plist. They are:
Code:
<dict>
<key>Comment</key>
<string>10.9/AppleHDA/Resources/xml>zml</string>
<key>Find</key>
<data>
eG1sLnps
</data>
<key>Name</key>
<string>AppleHDA</string>
<key>Replace</key>
<data>
em1sLnps
</data>
</dict>
Code:
<dict>
    <key>Comment</key>
    <string>10.9/AppleHDA/Realtek ALC887</string>
    <key>Find</key>
    <data>
    ixnUEQ==
    </data>
    <key>Name</key>
    <string>AppleHDA</string>
    <key>Replace</key>
    <data>
    hwjsEA==
    </data>
</dict>
5. Via Finder, navigate to Downloads/audio_ALC887-master/cloverALC/.
- Execute audio_cloverALC887-90_patch.command
6. Reboot
If everything went right, you should have audio working from the green port by selecting the second Line Out in output devices.
Example Sound Output Devices Screenshot:

Enabling HDMI Audio
Since I used the clover patching method to enable onboard audio, I went the same route to enable HDMI audio. The documentation is located at Mavericks:HDMI Audio - AppleHDA [Guide] and specifically toleda/audio_CloverHDMI. I also chose the SSDT method.
Installation:
1. Download and unpack the zip files from the following locations:
- toleda/audio_CloverHDMI
- toleda/audio_hdmi_8series
2. Via Finder, navigate to Downloads/audio_CloverHDMI-master/
- Unpack and open config-hdmi-hd4600-92.plist
- For 10.9.4, use config-hdmi-hd4600-92_V2.plist, the KextsToPatch Find/Replace values are different than what is shown below but it's basically the same.
You will need to add the DropTables key to the ACPI key to your config.plist. The DropTables key looks like:
Code:
<key>DropTables</key><array>
    <dict>
        <key>Signature</key>
        <string>SSDT</string>
        <key>TableId</key>
        <string>SaSsdt </string>
        <key>Comment</key>
        <string>HD4600+ HDMI Audio, copy/paste 2 properties</string>
    </dict>
</array>
Add all of the KextsToPatch to your config.plist. They look like:
Code:
<dict>
<key>Name</key>
<string>AppleHDAController</string>
<key>Find</key>
<data>PQwMAAB1Yesw</data>
<key>Replace</key>
<data>PQwMAAB1YesO</data>
<key>Comment</key>
<string>10.9/HD4600/HDMI audio 1/2</string>
</dict>
<dict>
<key>Name</key>
<string>AppleHDAController</string>
<key>Find</key>
<data>PQwNAAB1Ug==</data>
<key>Replace</key>
<data>PQwMAAB1Ug==</data>
<key>Comment</key>
<string>10.9/HD4600/HDMI audio 2/2</string>
</dict>
<dict>
<key>Name</key>
<string>AppleIntelFramebufferAzul</string>
<key>Find</key>
<data>AQUJAAAEAACHAAAA</data>
<key>Replace</key>
<data>AQUJAAAIAAAGAAAA</data>
<key>Comment</key>
<string>10.9.2/Azul/Port 05/DP>HDMI</string>
</dict>
<dict>
<key>Name</key>
<string>AppleIntelFramebufferAzul</string>
<key>Find</key>
<data>AgQKAAAEAACHAAAA</data>
<key>Replace</key>
<data>AgQKAAAIAAAGAAAA</data>
<key>Comment</key>
<string>10.9.2/Azul/Port 06/DP>HDMI</string>
</dict>
<dict>
<key>Name</key>
<string>AppleIntelFramebufferAzul</string>
<key>Find</key>
<data>AwYIAAAEAAARAAAA</data>
<key>Replace</key>
<data>AwYIAAAIAAAGAAAA</data>
<key>Comment</key>
<string>10.9.2/Azul/Port 07/DP>HDMI</string>
</dict>3. Via Finder, navigate to Downloads/audio_hdmi_8series-master/ssdt_series
- Unpack audio_ssdt-hdmi_hd5k-amd-nvidia-2_v2 and navigate to the folder
- Copy SSDT-1.aml to /Volumes/EFI/EFI/CLOVER/ACPI/patched/. If SSDT-1.aml already exists rename it to SSDT-2.aml (or 3 or 4, etc). If SSDT.aml doesn't exist, rename to SSDT.aml.
In config.plist, you will need to change DropOem to Yes under the SSDT key. However setting DropOem to false also seems to work. It should look something like:
Code:
<key>SSDT</key>
<dict>
    <key>DropOem</key>
    <YES/>
    <key>Generate</key>
    <dict>
        <key>CStates</key>
        <false/>
        <key>PStates</key>
        <false/>
    </dict>
</dict>
4. If you don't want screwed up graphics when you reboot, in config.plist:
- Remove <key>ig-platform-id</key> <string>0D220003</string>
- Change Inject Intel to false
It should look like this:
Code:
<key>Graphics</key>
<dict>
    <key>Inject</key>
    <dict>
        <key>ATI</key>
        <false/>
        <key>Intel</key>
        <false/>
        <key>NVidia</key>
        <false/>
    </dict>
</dict>
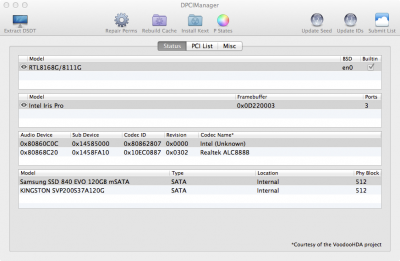
5. Rebuild the cache with your favorite tool. Mine is DPCIManager.
6. Reboot
If all went well, HDMI audio should now be enabled.
Example Sound Output Devices Screenshot:

Example DPCIManager Screenshot:

Credits
tonymacx86 - Clover Guide
Meize - Meize's RTL8111 Kext
toleda - All audio guides
Thanks to them!!! Without them, it would have taken many more hours to do the install. If I forgot to credit someone, please let me know.
I've uploaded my current config.plist as and example.
If there are any errors to the build or documentation, please let me know.
Alan
Edit History:
09/18/2014 - Updated Component List
09/25/2014 - Added comment to HDMI Audio section for 10.9.4
09/25/2014 - Put back Edit History section that was deleted before.
Attachments
Last edited:
