- Joined
- Oct 17, 2013
- Messages
- 7
- Motherboard
- GA-Z87X-UD3H
- CPU
- i7 4770K
- Graphics
- GTX 770 4GB
- Mac
- Classic Mac
- Mobile Phone
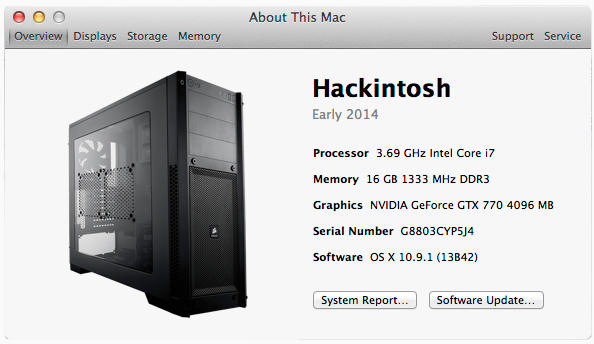
[SUCCESS] Xtremekiters Build: Core i7-4770K - GA-Z87X-UD3H - 16GB RAM - GTX 770 4GB
Components
Gigabyte GA-Z87X-UD3H ATX Motherboard
http://www.amazon.com/dp/B00CU4L508/
http://www.newegg.com/Product/Product.aspx?Item=N82E16813128592
Intel i7-4770K Haswell Processor
http://www.amazon.com/dp/B00CO8TBQ0/
http://www.newegg.com/Product/Product.aspx?Item=N82E16813128592
Corsair Carbide Series Black 300R Windowed Computer Case (CC-9011017-WW)
http://www.amazon.com/dp/B008B6ONXA/
http://www.newegg.com/Product/Product.aspx?Item=N82E16811139016
2 x SAMSUNG 840 Pro Series MZ-7PD256BW 2.5" 256GB SATA III MLC Internal Solid State Drive (SSD)
http://www.amazon.com/dp/B009NB8WRU/
http://www.newegg.com/Product/Product.aspx?Item=N82E16820147193
MSI Gaming N770 TF 4GD5/OC GeForce GTX 770 4GB 256-bit GDDR5 PCI Express 3.0 HDCP Ready SLI Support Video Card
http://www.newegg.com/Product/Product.aspx?Item=N82E16814127747
CORSAIR Vengeance LP 16GB (2 x 8GB) 240-Pin DDR3 SDRAM DDR3 1600 (PC3 12800) Desktop Memory Model CML16GX3M2A1600C9
http://www.amazon.com/dp/B007TG8QRW
http://www.newegg.com/Product/Product.aspx?Item=N82E16820233388
CORSAIR Hydro Series H100i Extreme Performance Water/Liquid CPU Cooler. 240mm
http://www.amazon.com/dp/B009ZN2NH6
http://www.newegg.com/Product/Product.aspx?Item=N82E16835181032
TP-LINK TL-WDN4800 Dual Band Wireless N900 PCI Express Adapter,2.4GHz 450Mbps/5Ghz 450Mbps, Include Low-profile Bracket
http://www.amazon.com/dp/B007GMPZ0A
http://www.newegg.com/Product/Product.aspx?Item=N82E16833704133
Already Owned
3 x Dell UltraSharp U2410 24-inch Widescreen LCD High Performance Monitor with HDMI, DVI, DisplayPort and HDCP
http://www.amazon.com/dp/B00302DNZ4
Apple Aluminum Wired Keyboard
http://www.amazon.com/dp/B000V07N9U/
Comments
EDIT: I built this machine using the latest tonymacx86 guides.
http://www.tonymacx86.com/374-unibeast-install-os-x-mavericks-any-supported-intel-based-pc.html
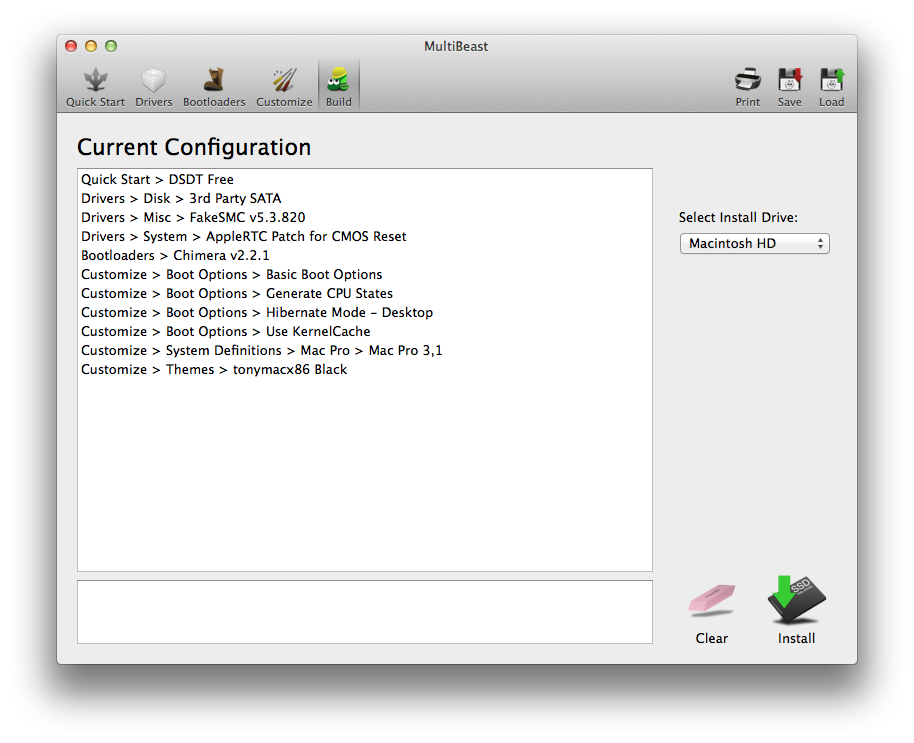
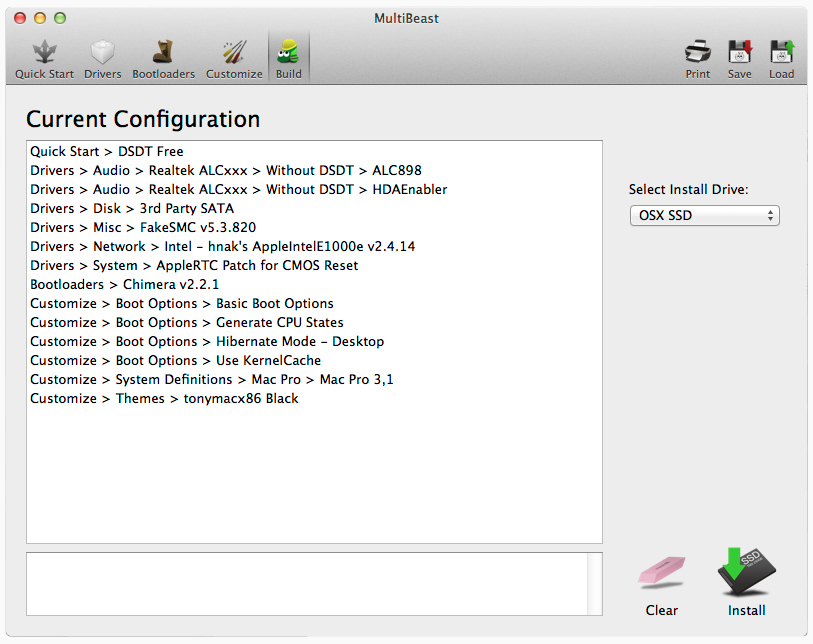
I installed OSX Mavericks and was able to boot right into the OS with no problem. After booting from the USB key I installed MultiBeast and used the following DSDT Free settings.
Here is a link to my .mb file.
http://www.tonymacx86.com/members/xtremekiter/albums/ga-z87x-ud3h/79194-hackintosh.mb
There were a few things that did not work, like iMessage and iCloud, but they are working now. I followed this guide:
http://www.tonymacx86.com/general-help/110471-how-fix-imessage.html
Just doing this did not work for me, but for some reason, after I changed my System Definition to a newer version (defaults to 3,1) I was able to log into iMessage and iCloud, then change the System Definition back to 3,1 and it works. This could be just a coincidence, but it took me a few days to get it working.
The other major issue I had was getting the dual boot to work at the Chimera screen. When I was presented with the option to boot into OS X Mavericks or Windows_NTSF, I always got the “Boot MGR is missing” error. To fix this you have to re-install Windows. When you are on the screen to pick which disk you want to install Windows to, there will be 2 partitions, a 100mb partition which is your recovery disk, and your main partition where you would normally install Windows. Delete the recovery disk partition and install on the other partition. For some reason when booting, OSX looks for the Boot MGR only on one partition when it is on the other.
Other than those main issues, everything works great, no issues at all. My MSI GTX 770 4GB GPU worked right out of the box and still works great after the driver updates. I am able to run 3 x Dell U2410 screens off the one card beautifully! I would advice getting the 4GB version if you want to run more than one screen.
Edit: I had to make one minor case mod to install the Corsair H100i. Well, not really a mod, but I couldn't use the default holes on top of the case because the fans and radiator would not fit that closely to the case due to the motherboard's CPU heat sinks. Luckily, all the screws fit through the metal mesh, except for the farthest 2, which was no big deal.
Another problem I was having was my time would be all out of wack from booting into OSX Mavericks or Windows 7. The problem was easily fixed using this guide:
http://www.tonymacx86.com/general-help/48477-mac-os-x-resets-time-windows-7-a.html
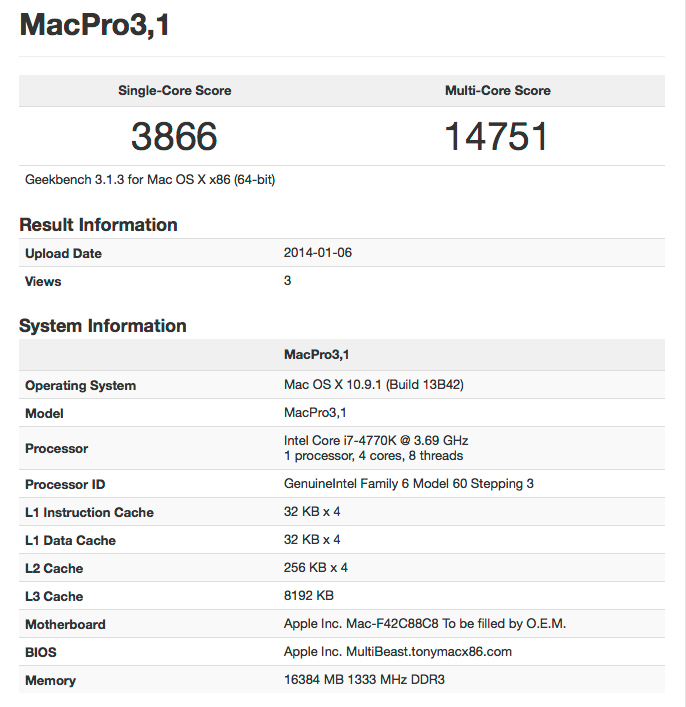
Geekbench
THEME
One thing I haven't seen too much of is theming. Although not necessary to having a running and working Hackintosh, it does add a little bit of flare to your machine. I used the latest Mavs Style theme from Theme Park:
http://forum.voodooprojects.org/index.php?board=7.0

Use Unarchiver to unzip the files and drag the theme folder into your /Extra/Themes folder.
In order for Chimera to recognize the new theme, you must rename the folder to "Default". Because the original theme is already named "Default", rename the original "Default" folder to something like "Default1" so you still have it. From here you can adjust your org.chameleon.Boot.plist and theme.plist files accordingly. Here are my org.chameleon.plist file as an example.
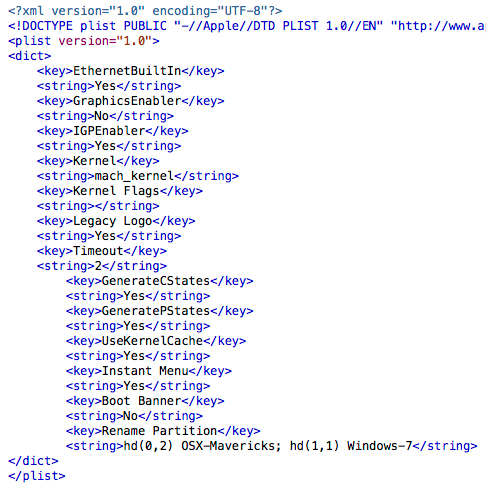
In the org.chameleon.plist file I added some keys and strings. I added "Instant Menu" and set it to "Yes" so I can choose which partition (OSX-Mavericks or Windows-7) I want to boot. This will also stop Chimera from booting automatically, so you must choose which partition. "Boot Banner" => "No" is just so there is no text at the top left of the screen during boot. I also renamed my partitions to my liking with the "Rename Partition" key. You can find which drive to target (hd(#,#)) by starting Terminal, and typing:
diskutil list
Although, I have found this not so reliable and you may have to start guessing with the combinations until you target the right one. <-- This is what I did, ha...
In the theme.plist file, i adjusted the "boot_width", "boot_height", "screen_width", and "screen_height" to match my screen resolution.
I can’t believe I waited this long to build it, I am even using a custom theme for the boot loader and it looks oh so pretty!
If anyone wants to build a rock solid system, use this as a guide. If you have a similar build and have questions, I’m no expert, but I will definitely try!
Big shout out to the tonymacx86 community for the amazing tutorials, software, and advice. I could not have done this without you all and feel that sharing my build will help contribute to the community.
Xtremekiters Build: Core i7-4770K - GA-Z87X-UD3H - 16GB RAM - GTX 770 4GB
Components
Gigabyte GA-Z87X-UD3H ATX Motherboard
http://www.amazon.com/dp/B00CU4L508/
http://www.newegg.com/Product/Product.aspx?Item=N82E16813128592
Intel i7-4770K Haswell Processor
http://www.amazon.com/dp/B00CO8TBQ0/
http://www.newegg.com/Product/Product.aspx?Item=N82E16813128592
Corsair Carbide Series Black 300R Windowed Computer Case (CC-9011017-WW)
http://www.amazon.com/dp/B008B6ONXA/
http://www.newegg.com/Product/Product.aspx?Item=N82E16811139016
2 x SAMSUNG 840 Pro Series MZ-7PD256BW 2.5" 256GB SATA III MLC Internal Solid State Drive (SSD)
http://www.amazon.com/dp/B009NB8WRU/
http://www.newegg.com/Product/Product.aspx?Item=N82E16820147193
MSI Gaming N770 TF 4GD5/OC GeForce GTX 770 4GB 256-bit GDDR5 PCI Express 3.0 HDCP Ready SLI Support Video Card
http://www.newegg.com/Product/Product.aspx?Item=N82E16814127747
CORSAIR Vengeance LP 16GB (2 x 8GB) 240-Pin DDR3 SDRAM DDR3 1600 (PC3 12800) Desktop Memory Model CML16GX3M2A1600C9
http://www.amazon.com/dp/B007TG8QRW
http://www.newegg.com/Product/Product.aspx?Item=N82E16820233388
CORSAIR Hydro Series H100i Extreme Performance Water/Liquid CPU Cooler. 240mm
http://www.amazon.com/dp/B009ZN2NH6
http://www.newegg.com/Product/Product.aspx?Item=N82E16835181032
TP-LINK TL-WDN4800 Dual Band Wireless N900 PCI Express Adapter,2.4GHz 450Mbps/5Ghz 450Mbps, Include Low-profile Bracket
http://www.amazon.com/dp/B007GMPZ0A
http://www.newegg.com/Product/Product.aspx?Item=N82E16833704133
Already Owned
3 x Dell UltraSharp U2410 24-inch Widescreen LCD High Performance Monitor with HDMI, DVI, DisplayPort and HDCP
http://www.amazon.com/dp/B00302DNZ4
Apple Aluminum Wired Keyboard
http://www.amazon.com/dp/B000V07N9U/
Comments
EDIT: I built this machine using the latest tonymacx86 guides.
http://www.tonymacx86.com/374-unibeast-install-os-x-mavericks-any-supported-intel-based-pc.html
I installed OSX Mavericks and was able to boot right into the OS with no problem. After booting from the USB key I installed MultiBeast and used the following DSDT Free settings.
Here is a link to my .mb file.
http://www.tonymacx86.com/members/xtremekiter/albums/ga-z87x-ud3h/79194-hackintosh.mb
http://www.tonymacx86.com/general-help/110471-how-fix-imessage.html
Just doing this did not work for me, but for some reason, after I changed my System Definition to a newer version (defaults to 3,1) I was able to log into iMessage and iCloud, then change the System Definition back to 3,1 and it works. This could be just a coincidence, but it took me a few days to get it working.
The other major issue I had was getting the dual boot to work at the Chimera screen. When I was presented with the option to boot into OS X Mavericks or Windows_NTSF, I always got the “Boot MGR is missing” error. To fix this you have to re-install Windows. When you are on the screen to pick which disk you want to install Windows to, there will be 2 partitions, a 100mb partition which is your recovery disk, and your main partition where you would normally install Windows. Delete the recovery disk partition and install on the other partition. For some reason when booting, OSX looks for the Boot MGR only on one partition when it is on the other.
Other than those main issues, everything works great, no issues at all. My MSI GTX 770 4GB GPU worked right out of the box and still works great after the driver updates. I am able to run 3 x Dell U2410 screens off the one card beautifully! I would advice getting the 4GB version if you want to run more than one screen.
Edit: I had to make one minor case mod to install the Corsair H100i. Well, not really a mod, but I couldn't use the default holes on top of the case because the fans and radiator would not fit that closely to the case due to the motherboard's CPU heat sinks. Luckily, all the screws fit through the metal mesh, except for the farthest 2, which was no big deal.
Another problem I was having was my time would be all out of wack from booting into OSX Mavericks or Windows 7. The problem was easily fixed using this guide:
http://www.tonymacx86.com/general-help/48477-mac-os-x-resets-time-windows-7-a.html
Geekbench
THEME
One thing I haven't seen too much of is theming. Although not necessary to having a running and working Hackintosh, it does add a little bit of flare to your machine. I used the latest Mavs Style theme from Theme Park:
http://forum.voodooprojects.org/index.php?board=7.0
Use Unarchiver to unzip the files and drag the theme folder into your /Extra/Themes folder.
In order for Chimera to recognize the new theme, you must rename the folder to "Default". Because the original theme is already named "Default", rename the original "Default" folder to something like "Default1" so you still have it. From here you can adjust your org.chameleon.Boot.plist and theme.plist files accordingly. Here are my org.chameleon.plist file as an example.
In the org.chameleon.plist file I added some keys and strings. I added "Instant Menu" and set it to "Yes" so I can choose which partition (OSX-Mavericks or Windows-7) I want to boot. This will also stop Chimera from booting automatically, so you must choose which partition. "Boot Banner" => "No" is just so there is no text at the top left of the screen during boot. I also renamed my partitions to my liking with the "Rename Partition" key. You can find which drive to target (hd(#,#)) by starting Terminal, and typing:
diskutil list
Although, I have found this not so reliable and you may have to start guessing with the combinations until you target the right one. <-- This is what I did, ha...
In the theme.plist file, i adjusted the "boot_width", "boot_height", "screen_width", and "screen_height" to match my screen resolution.
I can’t believe I waited this long to build it, I am even using a custom theme for the boot loader and it looks oh so pretty!
If anyone wants to build a rock solid system, use this as a guide. If you have a similar build and have questions, I’m no expert, but I will definitely try!
Big shout out to the tonymacx86 community for the amazing tutorials, software, and advice. I could not have done this without you all and feel that sharing my build will help contribute to the community.
Last edited by a moderator: