
- Joined
- Sep 21, 2010
- Messages
- 13,414
- Motherboard
- HP 17" 17-by3053cl
- CPU
- i5-1035G1
- Graphics
- Intel UHD Graphics, 1920x1080
- Mac
- Classic Mac
- Mobile Phone
Table of Contents
The Installation
Summary
Benchmarks
Updates
The Installation
This installation guide was originally part of my build description which I moved here when Sierra 10.12.0 was release to keep the build description from getting too long. I'm going to only hit the essentials of the installation which are only peculiar to the HERO. The following assumes you've got all your components installed in the computer system's case.
Making the UniBeast USB Thumb Drive
Use the tonymacx86 guide UniBeast: Install OS X El Capitan on Any Supported Intel-based PC. Note: your USB Thumb drive needs to have 7.63 GB of free space to build the UniBeast installation thumb drive. Otherwise, you'll need a 16GB USB thumb drive which is a better size so you can copy the following items to the thumb drive for use in the post installation phase:
 MultiBeast for El Capitan which you can probably put on a 8GB USB thumb drive, but that's about it
EFI Mounter V3
KextBeast which you'll use to install the Codec Commander kext
For proper processor power management, get the SSDT for your processor from ammulder's Guide and rename it SSDT.aml; I chose the SSDT for my i7-6700K. Note: ammulder's SSDTs are for non overclocking speeds; for overclocking, you'll need to create a SSDT for your processor using PikeRalpha's ssdtPRGen.sh script located here.
Rehabman's Codec Commander kext for making the audio (after wakeup from sleep) work which we'll install using KextBeast
Clover Configurator for fine tuning
(Optional) the nVidia Web drivers for the Maxwell chipset cards (750, 750 Ti, 950 Ti, etc). See tonymacx86's sticky thread in the Graphics forum section or MacVidCards driver list.
BIOS Setup
Follow Step 3 in the tonymacx86 guide.
Update the BIOS to the latest version which is 2202 (September 26, 2016). If you're without a working computer, download it on a friend's computer and follow the USB BIOS Flashback method on page 2-12 of the GENE User's Guide.
Once the BIOS is updated, boot into the BIOS, use the Advanced Mode and make the following changes:
Installation Notes
Follow Steps 4 & 5 in the tonymacx86 guide. But,
Insert the UniBeast USB Thumb Drive in the USB port in the bottom USB port at the bottom of the stack with the PS/2 port at the top (see Rear Port graphic above);
(Optional) If you have a current nVidia graphics card, at the Clover boot screen, click on the "Gears" icon and add Boot Argument value "nv_disable=1" (without the quotes) until you install the nVidia web drivers
Boot into the El Capitan Installer on the UniBeast Installer USB thumb drive to begin the two part installation; at the end of Part 1, you need to reboot the newly created installation disk. (Optional) Nvidia graphics card users will again need to use the Boot Argument "nv_disable=1".
When the Part 2 install process ask you to log into iCloud, do not log in - skip it - as it messes up Messages.
Drag & drop MultiBeast and Codec Commander zip files from the thumb drive to your Applications folder, unzip them, run MultiBeast and selection the following:
Quick Start > UEFI Boot Mode
Drivers > Audio > Realtek ALC1150
Drivers > Audio > 100 Series Audio
(Optional) Drivers > Disk > 3rd Party SATA
(Optional) Drivers > Misc > FakeSMC Plugins
(Optional) Drivers > Misc > FakeSMC HWMonitor Application
Drivers > Network > Intel > IntelMausiEthernet
Drivers > USB > 3rd Party USB 3.0 (RehabMan's GenericUSBXHCI.kext)
Drivers > USB > Increase Max Port Limit (and adds RehabMan's USBInjectAll.kext)
Build <--- To see your full configuration
Save <--- Save your MultiBeast configuration file somewhere convenient
Click on the Install button in the MultiBeast window bottom right hand corner and wait for MultiBeast to finish. (Optional) If you have a current Nvidia graphics card, copy the Nviida driver from the thumb drive onto your Desktop, unzip it and install the driver now, but don't reboot when the installer is done, just leave it along as we'll come back to it.
Drag & drop the Codec Commander zip file from the thumb drive onto your Desktop and un-zip the file.
Drag & drop the KextBeast on your Desktop, unzip it and run it; chose to put the kexts in the /Library/Extensions folder.
Now you need to install your processor's SSDT.aml:
Open the Terminal and run the following:
Note the El Capitan drive's EFI partition's "diskXs1" designation - could be something like "disk1s1";
Run EFI Mounter v3 to mount the UniBeast USB drive's EFI partition;
Navigate to EFI > EFI > CLOVER > ACPI > patched folder;
Drag & drop the SSDT.aml from the thumb drive ino the ...ACPI > patched folder. Now click on the Restart button in the nVidia Web Driver window or reboot the computer if you didn't install the Nvidia drivers.
Reboot into the BIOS.
Change BOOT > Boot Options Priorities > Select your installation disk to either the:
EXIT to save the BIOS update and reboot.
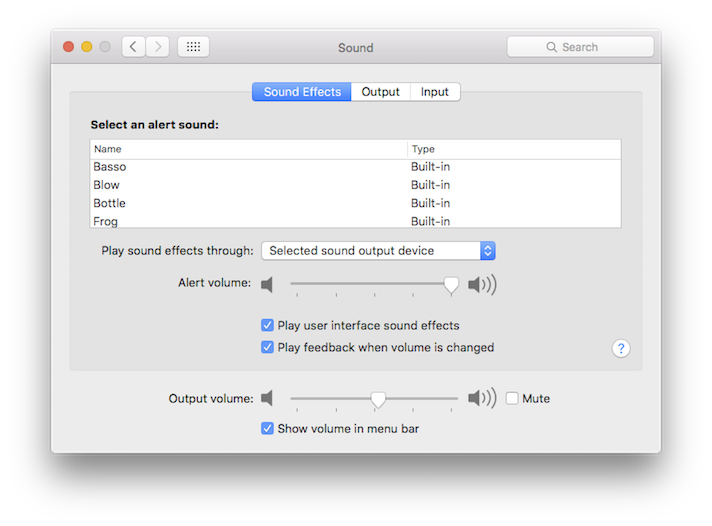
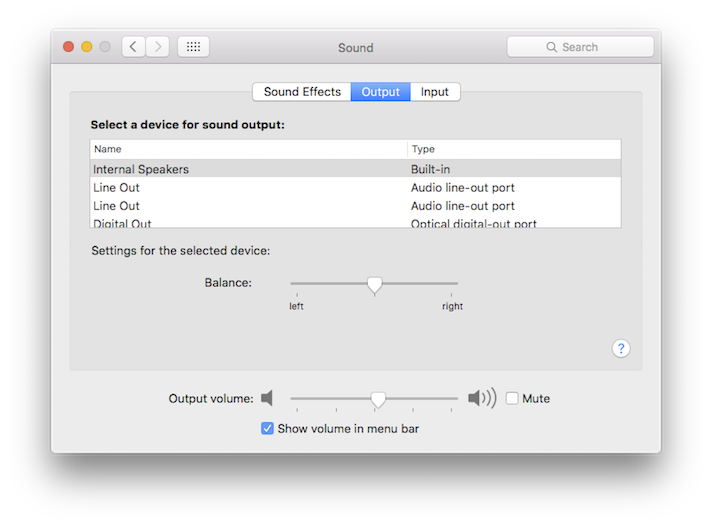
To get audio working you'll need to use the Green sound port on the Rear Panel with the System Preference's Sound pane set up as follows:
Welcome to Clover and El Capitan!

Summary
This hackintosh is fantastic! Enjoy your hackintosh. I am really enjoying MyHero.
What Works
What Doesn't Work
Benchmarks
Soon
Updates
October 03, 2016. Move this guide from the build description. Additionally, noted BIOS updated to 2202 (September 26, 2016).
September 14, 2016. Update the MultiBeast note to recommend iMac14,2 system definition in preparation for installing Sierra.
September 06, 2016. Updated to the latest BIOS v2001.
July 29, 2016. Removed a non existent MultiBeast configuration option in the MultiBeast configuration. Thanks to Porkfoo for ponting out this mistake.
July 27, 2016. Noted latest BIOS version is 1902 and corrected the link to the BIOS page. Thanks, portfoo, for calling it to my attention.
July 15, 2016. Added the Syba Firewire 800/400 PCIe card and an Apple iSight Firewire webcam to the Already Owned component list
July 11, 2016. In the MultiBeast configuration, I left out "Drivers > Audio > 100 Series Audio" although I had it in the MultiBeast Build screen snapshot.
The Installation
Summary
Benchmarks
Updates
The Installation
This installation guide was originally part of my build description which I moved here when Sierra 10.12.0 was release to keep the build description from getting too long. I'm going to only hit the essentials of the installation which are only peculiar to the HERO. The following assumes you've got all your components installed in the computer system's case.
Making the UniBeast USB Thumb Drive
Use the tonymacx86 guide UniBeast: Install OS X El Capitan on Any Supported Intel-based PC. Note: your USB Thumb drive needs to have 7.63 GB of free space to build the UniBeast installation thumb drive. Otherwise, you'll need a 16GB USB thumb drive which is a better size so you can copy the following items to the thumb drive for use in the post installation phase:
MultiBeast for El Capitan which you can probably put on a 8GB USB thumb drive, but that's about it EFI Mounter V3 KextBeast which you'll use to install the Codec Commander kext For proper processor power management, get the SSDT for your processor from ammulder's Guide and rename it SSDT.aml; I chose the SSDT for my i7-6700K. Note: ammulder's SSDTs are for non overclocking speeds; for overclocking, you'll need to create a SSDT for your processor using PikeRalpha's ssdtPRGen.sh script located here. Rehabman's Codec Commander kext for making the audio (after wakeup from sleep) work which we'll install using KextBeast Clover Configurator for fine tuning (Optional) the nVidia Web drivers for the Maxwell chipset cards (750, 750 Ti, 950 Ti, etc). See tonymacx86's sticky thread in the Graphics forum section or MacVidCards driver list.BIOS Setup
Follow Step 3 in the tonymacx86 guide.
Update the BIOS to the latest version which is 2202 (September 26, 2016). If you're without a working computer, download it on a friend's computer and follow the USB BIOS Flashback method on page 2-12 of the GENE User's Guide. Once the BIOS is updated, boot into the BIOS, use the Advanced Mode and make the following changes:Extreme Tweeker
AI Overclocker Tuner > X.M.P.
Extreme Tweeking > EnableAdvanced Items
System Agent (SA) Configuration > VT-d > Disable
PCH Configuration > IOAPIC 24-119 > Disabled
USB Configuration > Legacy USB Support > Auto
USB Configuration > XHCI Hand Off > Enabled
APM Configuration > Power on by PCI - E/PCI > DisabledBoot Menu
Fast Boot > Disabled
Boot Logo Display > Disabled
Secure Boot > OS Type > Other OS
Boot Option 1 > USB installer thumb drive Exit > Save Changes
AI Overclocker Tuner > X.M.P. Extreme Tweeking > Enable System Agent (SA) Configuration > VT-d > Disable PCH Configuration > IOAPIC 24-119 > Disabled USB Configuration > Legacy USB Support > Auto USB Configuration > XHCI Hand Off > Enabled APM Configuration > Power on by PCI - E/PCI > Disabled Fast Boot > Disabled Boot Logo Display > Disabled Secure Boot > OS Type > Other OS Boot Option 1 > USB installer thumb drive Exit > Save ChangesInstallation Notes
Follow Steps 4 & 5 in the tonymacx86 guide. But,
Insert the UniBeast USB Thumb Drive in the USB port in the bottom USB port at the bottom of the stack with the PS/2 port at the top (see Rear Port graphic above); (Optional) If you have a current nVidia graphics card, at the Clover boot screen, click on the "Gears" icon and add Boot Argument value "nv_disable=1" (without the quotes) until you install the nVidia web drivers Boot into the El Capitan Installer on the UniBeast Installer USB thumb drive to begin the two part installation; at the end of Part 1, you need to reboot the newly created installation disk. (Optional) Nvidia graphics card users will again need to use the Boot Argument "nv_disable=1". When the Part 2 install process ask you to log into iCloud, do not log in - skip it - as it messes up Messages. Drag & drop MultiBeast and Codec Commander zip files from the thumb drive to your Applications folder, unzip them, run MultiBeast and selection the following: Quick Start > UEFI Boot Mode Drivers > Audio > Realtek ALC1150 Drivers > Audio > 100 Series Audio (Optional) Drivers > Disk > 3rd Party SATA (Optional) Drivers > Misc > FakeSMC Plugins (Optional) Drivers > Misc > FakeSMC HWMonitor Application Drivers > Network > Intel > IntelMausiEthernet Drivers > USB > 3rd Party USB 3.0 (RehabMan's GenericUSBXHCI.kext) Drivers > USB > Increase Max Port Limit (and adds RehabMan's USBInjectAll.kext) Build <--- To see your full configurationNote that I initially used the default Mac Pro 3,1 System Definition. I recommend now recommend iMac14,2 in preparation for installing Sierra. The Mac Pro 3,1 is not supported in Sierra.

Save <--- Save your MultiBeast configuration file somewhere convenient Click on the Install button in the MultiBeast window bottom right hand corner and wait for MultiBeast to finish. (Optional) If you have a current Nvidia graphics card, copy the Nviida driver from the thumb drive onto your Desktop, unzip it and install the driver now, but don't reboot when the installer is done, just leave it along as we'll come back to it. Drag & drop the Codec Commander zip file from the thumb drive onto your Desktop and un-zip the file. Drag & drop the KextBeast on your Desktop, unzip it and run it; chose to put the kexts in the /Library/Extensions folder. Now you need to install your processor's SSDT.aml: Open the Terminal and run the following:
Code:
diskutil listUEFI Samsung 951 M.2 drive
or
UEFI setting for the El Capitan drive.
or
UEFI setting for the El Capitan drive.
EXIT to save the BIOS update and reboot.To get audio working you'll need to use the Green sound port on the Rear Panel with the System Preference's Sound pane set up as follows:
Welcome to Clover and El Capitan!
Summary
This hackintosh is fantastic! Enjoy your hackintosh. I am really enjoying MyHero.
What Works
- USB 3.1 ports work, but at USB 3.0 speeds. The USB 3.1 Type C connect must be inserted at the Clover boot screen and disconnected after shutdown or at reboot because, somehow, the BIOS won't boot with it plugged in.

- Sleep & Wake-up, both manual (Apple > Sleep) and scheduled (Energy Saver SysPerf pane). Wake-up takes about 15-20 seconds to complete while CodexCommander does its thing.
- Audio through the Green back panel port. Audio works after sleep/wake-up with the Codec Commander kext.
- iMessages (See P1lgram's build description on how to get iMessages working.)
What Doesn't Work
- So far, everything is working as it should.
- Continuity and Handoff because I don't have a Broadcom iMac wireless/Bluetooth 4 card and PCIe yet, but is on order.
Benchmarks
Soon
Updates
October 03, 2016. Move this guide from the build description. Additionally, noted BIOS updated to 2202 (September 26, 2016).
September 14, 2016. Update the MultiBeast note to recommend iMac14,2 system definition in preparation for installing Sierra.
September 06, 2016. Updated to the latest BIOS v2001.
July 29, 2016. Removed a non existent MultiBeast configuration option in the MultiBeast configuration. Thanks to Porkfoo for ponting out this mistake.
July 27, 2016. Noted latest BIOS version is 1902 and corrected the link to the BIOS page. Thanks, portfoo, for calling it to my attention.
July 15, 2016. Added the Syba Firewire 800/400 PCIe card and an Apple iSight Firewire webcam to the Already Owned component list
July 11, 2016. In the MultiBeast configuration, I left out "Drivers > Audio > 100 Series Audio" although I had it in the MultiBeast Build screen snapshot.
Last edited: