- Joined
- Aug 4, 2012
- Messages
- 3
- Motherboard
- Z77-DS3H
- CPU
- 1155
- Graphics
- HD6870
- Mac
- Classic Mac
- Mobile Phone
Full Specs:
GA-Z77-DS3H - F8
Radeon HD-6870
Intel Core i5-3570K
16GB RAM
Cooler Master GX Series 650W
Applewifi Card w/PCI Adapter
x3 1TB internal HD
booting lion 10.7.4
booting Mountain Lion 10.8.1
booting windows 7 ultimate 64bit
My install went as follows:
UEFI Bios Configuration should be correct:
SATA mode Selection = ACHI
XHCI Pre-Boot Driver = Enabled
xHCI mode = Auto
USB2.0 Controller = Enabled
Audio Controller = Enabled
Init Display First = Auto
Internal Graphics = Auto
Internal Graphics Memory Size = 64M
DVMT Total Memory Size = MAX
Legacy USB Support = Enabled
XHCI Hand-Off = Enabled
ECHI Hand-Off = Enabled
AC BACK = Always Off
Resume by Alarm = Disabled
ErP = Disabled
High Precision Event Timer = Enabled
Internal Graphics Standby Mode = Enabled
Internal Graphics Deep Standby Mode = Enabled
1. Purchase Mac OS X Lion 10.7.4 (Retail App or USB)
2. Prepare a USB drive per UniBeast Guide
3. Create a bootable USB drive using UniBeast- name it ( USB )
4. Run BridgeHelper targeting USB
5. Boot from USB and install Mac OS X Lion (Name the drive Lion)
A. In the top menu bar choose Utilities, and open Disk Utility
B. Highlight your target hard drive for the Lion installation in left column.
C. Click Partition tab
D. Click Current and choose 1 Partition
E. Click Options...
F. Choose GUID Partition Method
G. Under Name: type Lion (You can rename it later)
H. Under Format: choose Mac OS Extended (Journaled)
I. Click Apply then Partition
J. Close Disk Utility
When the installer asks you where to install, choose Lion, or your existing install.
Here's where it gets weird, because the USB stick won't reference its own kernel when booting the new installation. So your new Lion hard drive still has the incompatible vanilla kernel, and won't boot. So we boot into the installer again, and remove, then copy the working kernel via the handy built-in Terminal.
6. Boot from USB AGAIN
7. At Installation screen, go to menubar, Utilities
8. Open Terminal
9. Type the following and hit enter:
rm /Volumes/Lion/mach_kernel
Then type the following and hit enter:
cp /Volumes/USB/mach_kernel /Volumes/Lion/
10. Reboot from USB and choose Lion.
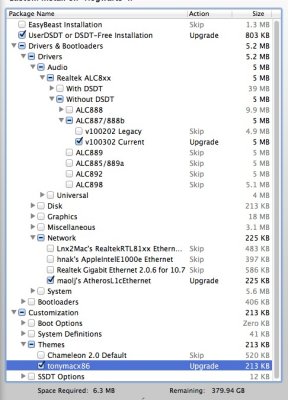
11. Ran Multibeast with the following options
AppleHDA Rollback
ALC887/888b
ALC888b/887 v100302 Current
FakeSMC
maolj's AtherosL1cEthernet
Chimera
12. Ran BridgeHelper 5.0
13. Reboot
Mountain Lion
1. Purchase Mac OS X Mountain Lion (Retail App or USB)
2. Prepare a USB drive per UniBeast Guide
3. Navigate to System/Library/Extensions
4. MAKE A BACKUP OF the kext "ATI6000Controller.kext" and then DELETE it.
5. Booting from your UniBeast Drive.
A. In the top menu bar choose Utilities, and open Disk Utility
B. Highlight your target hard drive for the Mountain Lion installation in left column.
C. Click Partition tab
D. Click Current and choose 1 Partition
E. Click Options...
F. Choose GUID Partition Method
G. Under Name: type Mountain Lion (You can rename it later)
H. Under Format: choose Mac OS Extended (Journaled)
I. Click Apply then Partition
J. Close Disk Utility
2. Install Mountain Lion as you usually would
3. After installation, bootup Mountain Lion by booting into your flash drive and then booting into ML
4. Copy the ATI6000Controller.kext kext to your new desktop
5. Run KextBeast (Download: http://www.tonymacx86.com/downloads.php?do=cat&id=3)
6.Ran Multibeast with the following options

[FONT=&]7. Reboot
[/FONT] thx tonymac and macmac

GA-Z77-DS3H - F8
Radeon HD-6870
Intel Core i5-3570K
16GB RAM
Cooler Master GX Series 650W
Applewifi Card w/PCI Adapter
x3 1TB internal HD
booting lion 10.7.4
booting Mountain Lion 10.8.1
booting windows 7 ultimate 64bit
My install went as follows:
UEFI Bios Configuration should be correct:
SATA mode Selection = ACHI
XHCI Pre-Boot Driver = Enabled
xHCI mode = Auto
USB2.0 Controller = Enabled
Audio Controller = Enabled
Init Display First = Auto
Internal Graphics = Auto
Internal Graphics Memory Size = 64M
DVMT Total Memory Size = MAX
Legacy USB Support = Enabled
XHCI Hand-Off = Enabled
ECHI Hand-Off = Enabled
AC BACK = Always Off
Resume by Alarm = Disabled
ErP = Disabled
High Precision Event Timer = Enabled
Internal Graphics Standby Mode = Enabled
Internal Graphics Deep Standby Mode = Enabled
1. Purchase Mac OS X Lion 10.7.4 (Retail App or USB)
2. Prepare a USB drive per UniBeast Guide
3. Create a bootable USB drive using UniBeast- name it ( USB )
4. Run BridgeHelper targeting USB
5. Boot from USB and install Mac OS X Lion (Name the drive Lion)
A. In the top menu bar choose Utilities, and open Disk Utility
B. Highlight your target hard drive for the Lion installation in left column.
C. Click Partition tab
D. Click Current and choose 1 Partition
E. Click Options...
F. Choose GUID Partition Method
G. Under Name: type Lion (You can rename it later)
H. Under Format: choose Mac OS Extended (Journaled)
I. Click Apply then Partition
J. Close Disk Utility
When the installer asks you where to install, choose Lion, or your existing install.
Here's where it gets weird, because the USB stick won't reference its own kernel when booting the new installation. So your new Lion hard drive still has the incompatible vanilla kernel, and won't boot. So we boot into the installer again, and remove, then copy the working kernel via the handy built-in Terminal.
6. Boot from USB AGAIN
7. At Installation screen, go to menubar, Utilities
8. Open Terminal
9. Type the following and hit enter:
rm /Volumes/Lion/mach_kernel
Then type the following and hit enter:
cp /Volumes/USB/mach_kernel /Volumes/Lion/
10. Reboot from USB and choose Lion.
11. Ran Multibeast with the following options
AppleHDA Rollback
ALC887/888b
ALC888b/887 v100302 Current
FakeSMC
maolj's AtherosL1cEthernet
Chimera
12. Ran BridgeHelper 5.0
13. Reboot
Mountain Lion
1. Purchase Mac OS X Mountain Lion (Retail App or USB)
2. Prepare a USB drive per UniBeast Guide
3. Navigate to System/Library/Extensions
4. MAKE A BACKUP OF the kext "ATI6000Controller.kext" and then DELETE it.
5. Booting from your UniBeast Drive.
A. In the top menu bar choose Utilities, and open Disk Utility
B. Highlight your target hard drive for the Mountain Lion installation in left column.
C. Click Partition tab
D. Click Current and choose 1 Partition
E. Click Options...
F. Choose GUID Partition Method
G. Under Name: type Mountain Lion (You can rename it later)
H. Under Format: choose Mac OS Extended (Journaled)
I. Click Apply then Partition
J. Close Disk Utility
2. Install Mountain Lion as you usually would
3. After installation, bootup Mountain Lion by booting into your flash drive and then booting into ML
4. Copy the ATI6000Controller.kext kext to your new desktop
5. Run KextBeast (Download: http://www.tonymacx86.com/downloads.php?do=cat&id=3)
6.Ran Multibeast with the following options

[FONT=&]7. Reboot
[/FONT]
 thx tonymac and macmac


