Contribute
Register

DQ77KB (thin mini-itx) / i7-3770s / 16GB Memory / M850 SSD / El Capitan updated -> Sierra

Status
Not open for further replies.
Joined
Mar 27, 2011
Messages
54
Motherboard
DQ77KB
CPU
i7-3770s
Graphics
HD 4000
Mac
  1. MacBook Air
Mobile Phone
  1. Android
IMG_2299.jpg
:: Preparation and installation ::

I have not installed Sierra on this yet, i will try updating soon.

EDIT: Successfully updated to Sierra. Used multibeast to install new drivers. I will not update the multibeast or unibeast link.. I have not attempted to install this fresh from Sierra.

Verify you are on the latest bios version—It was 58 when I posted this. I did not need to patch my bios!

Downloads
Download UniBeast 6.x: https://www.tonymacx86.com/resources/categories/tonymacx86-downloads.3
Download MultiBeast 8.x for El Capitan: https://www.tonymacx86.com/resources/categories/tonymacx86-downloads.3
Download latest Clover: https://sourceforge.net/projects/cloverefiboot/
Download Clover Configurator: https://www.tonymacx86.com/resources/clover-configurator.328/
Download SimpleMLB.sh: https://gist.github.com/theracermaster/b6a9db46b14061d4c995 (note: disregard the “Depreciated” sign)
Download CloverHDMI: https://github.com/toleda/audio_CloverHDMI/blob/master/audio_cloverHDMI-120.command.zip
Download El Capitan from Mac App Store

-Follow this guide to install UniBeast on a flash drive: https://www.tonymacx86.com/threads/...pitan-on-any-supported-intel-based-pc.172672/

-Copy all the above files to the USB drive

-Enter bios setup and change/verify the following settings (restore default settings first - F9):
  • Configuration -> OnBoard -> HPET = Enabled
  • Configuration -> SATA -> Mode = AHCI
  • Security -> Execute Disable Bit = Enabled
  • Trusted Execution = Enabled
  • VT-d = Disabled
  • Configuration -> Video -> LVDS setting at the bottom -> Disabled (This will enable you to be able to set a primary and secondary port above)
  • Set primary video port to HDMI and secondary port to DisplayPort
-Save and exit bios
-Boot off the USB you made earlier by pressing F10 —When the menu shows up, select the usb under UEFI mode
-It should boot normally into the installation screen. I didn’t use safe mode or verbose or anything
-Format the drive you are using the same as you did the USB stick from disk utility
-Install by going through the steps
-Once it’s done, restart, pressing F10 once again to boot off the USB. When the boot screen shows up, select El Capitan from El Capitan(or whatever you named the hard drive when you formatted it during the install)
-If it booted up successfully, and you see the welcome screen, continue to the next steps!

:: Configuration ::

-Follow the steps, being sure not to log into iCloud yet!
-Once on the desktop, Run the Multibeast you added to the USB drive earlier. Select the following:
  • Quick Start -> UEFI Boot Mode = Selected
  • Drivers -> Audio -> Realtek ALCxxx -> ALC892 = Selected
  • Drivers -> Misc -> FakeSMC HWMonitor (optional) = Selected
  • Drivers -> Intel -> AppleIntelE1000e v3.3.3 = Selected
  • Drivers -> USB -> Realtek ALCxxx -> 7/8/9 Series USB Support = Selected
  • Customize -> System -> Mac mini -> Mac mini 6,2 = Selected
-Go to the build tab and make sure its installing to your hard drive—Install
-Exit Multibeast—Copy the rest of the extra USB files you copied earlier to the desktop—Remove USB—Reboot
-It should now boot off your drive using the earlier installed Clover via Multibeast
-Install the latest version of clover now that you copied to the desktop
-Reboot

:: Configuring your SMBIOS correctly for iCloud ::

-I followed this guide verbatim: https://www.tonymacx86.com/threads/guide-how-to-configure-your-systems-smbios-correctly.198155/

-Just for records, I will put short notes of it (just in case!)

-Open Clover Configurator
-Mount EFI partition
-Open EFI/CLOVER/config.plist
-in RtVariables, make sure MLB is empty, BooterConfig = 0x28, CsrActiveConfig = 0x67, and UseMacAddr0 is selected
-Open SMBIOS tab
-Select the magic wand tool
-Select the Mac mini icon (second from right)
-Click both shake buttons multiple times
-Click ok
-Copy Serial Number field
-check that it’s not in use already at: https://checkcoverage.apple.com/
-Open terminal
-type uuidgen and enter—Do this 5 or 6 times
-Copy the last one that was generated and paste it into the SMuuid field in clover configurator
-click File -> save
-Reboot

-Open clover configurator, mount efi, open config.plist again
-open terminal window and drag/drop simpleMLB.sh
-Copy number down and paste it into SMBIOS -> Board Serial Number spot
-File -> save
-Reboot
-Sign into all iCloud apps—all done!

:: Enabling HDMI audio ::

Source: https://www.tonymacx86.com/threads/audio-hdmi-audio-applehda-guide.143760/

-Extract cloverHDMI-120.command.zip file
-double click the .command file
-follow the on screen prompts to enable INTEL audio—Say “N” to the Nvidia/ati sections
-It will also ask about enabling for DisplayPort—say yes
-reboot—done

::Generate correct SSDT for power management::

-I followed this guide verbatim: https://www.tonymacx86.com/threads/quick-guide-to-generate-a-ssdt-for-cpu-power-management.177456/

-Again, I will give short notes:

-Open terminal and paste: curl -o ~/ssdtPRGen.sh https://raw.githubusercontent.com/Piker-Alpha/ssdtPRGen.sh/master/ssdtPRGen.sh
-chmod +x ~/ssdtPRGen.sh
-sudo ~/ssdtPRGen.sh
-Follow on screen prompts (say no to the last question)
-exit
-Mount EFI partition (you can use clover configurator)
-Go to folder: ~/Library/ssdtPRGen/
-copy the ssdt.aml file and put it in /EFI/CLOVER/ACPI/patched/
-name it SSDT.aml
-If there is one already named SSDT.aml, rename it ssdt-1.aml
-reboot—done

That's about it!! Any questions, please ask! I apologize for the lack of details and pictures--I did this quickly so i don't forget O_O :p

IMG_20170219_131154.jpg IMG_20170219_131609.jpg
 
Last edited:
View attachment 245543
:: Preparation and installation ::

I have not installed Sierra on this yet, i will try updating soon.

EDIT: Successfully updated to Sierra. Used multibeast to install new drivers. I will not update the multibeast or unibeast link.. I have not attempted to install this fresh from Sierra.

Verify you are on the latest bios version—It was 58 when I posted this. I did not need to patch my bios!

Downloads
Download UniBeast 6.x: https://www.tonymacx86.com/resources/categories/tonymacx86-downloads.3
Download MultiBeast 8.x for El Capitan: https://www.tonymacx86.com/resources/categories/tonymacx86-downloads.3
Download latest Clover: https://sourceforge.net/projects/cloverefiboot/
Download Clover Configurator: https://www.tonymacx86.com/resources/clover-configurator.328/
Download SimpleMLB.sh: https://gist.github.com/theracermaster/b6a9db46b14061d4c995 (note: disregard the “Depreciated” sign)
Download CloverHDMI: https://github.com/toleda/audio_CloverHDMI/blob/master/audio_cloverHDMI-120.command.zip
Download El Capitan from Mac App Store

-Follow this guide to install UniBeast on a flash drive: https://www.tonymacx86.com/threads/...pitan-on-any-supported-intel-based-pc.172672/

-Copy all the above files to the USB drive

-Enter bios setup and change/verify the following settings (restore default settings first - F9):
  • Configuration -> OnBoard -> HPET = Enabled
  • Configuration -> SATA -> Mode = AHCI
  • Security -> Execute Disable Bit = Enabled
  • Trusted Execution = Enabled
  • VT-d = Disabled
  • Configuration -> Video -> LVDS setting at the bottom -> Disabled (This will enable you to be able to set a primary and secondary port above)
  • Set primary video port to HDMI and secondary port to DisplayPort
-Save and exit bios
-Boot off the USB you made earlier by pressing F10 —When the menu shows up, select the usb under UEFI mode
-It should boot normally into the installation screen. I didn’t use safe mode or verbose or anything
-Format the drive you are using the same as you did the USB stick from disk utility
-Install by going through the steps
-Once it’s done, restart, pressing F10 once again to boot off the USB. When the boot screen shows up, select El Capitan from El Capitan(or whatever you named the hard drive when you formatted it during the install)
-If it booted up successfully, and you see the welcome screen, continue to the next steps!

:: Configuration ::

-Follow the steps, being sure not to log into iCloud yet!
-Once on the desktop, Run the Multibeast you added to the USB drive earlier. Select the following:
  • Quick Start -> UEFI Boot Mode = Selected
  • Drivers -> Audio -> Realtek ALCxxx -> ALC892 = Selected
  • Drivers -> Misc -> FakeSMC HWMonitor (optional) = Selected
  • Drivers -> Intel -> AppleIntelE1000e v3.3.3 = Selected
  • Drivers -> USB -> Realtek ALCxxx -> 7/8/9 Series USB Support = Selected
  • Customize -> System -> Mac mini -> Mac mini 6,2 = Selected
-Go to the build tab and make sure its installing to your hard drive—Install
-Exit Multibeast—Copy the rest of the extra USB files you copied earlier to the desktop—Remove USB—Reboot
-It should now boot off your drive using the earlier installed Clover via Multibeast
-Install the latest version of clover now that you copied to the desktop
-Reboot

:: Configuring your SMBIOS correctly for iCloud ::

-I followed this guide verbatim: https://www.tonymacx86.com/threads/guide-how-to-configure-your-systems-smbios-correctly.198155/

-Just for records, I will put short notes of it (just in case!)

-Open Clover Configurator
-Mount EFI partition
-Open EFI/CLOVER/config.plist
-in RtVariables, make sure MLB is empty, BooterConfig = 0x28, CsrActiveConfig = 0x67, and UseMacAddr0 is selected
-Open SMBIOS tab
-Select the magic wand tool
-Select the Mac mini icon (second from right)
-Click both shake buttons multiple times
-Click ok
-Copy Serial Number field
-check that it’s not in use already at: https://checkcoverage.apple.com/
-Open terminal
-type uuidgen and enter—Do this 5 or 6 times
-Copy the last one that was generated and paste it into the SMuuid field in clover configurator
-click File -> save
-Reboot

-Open clover configurator, mount efi, open config.plist again
-open terminal window and drag/drop simpleMLB.sh
-Copy number down and paste it into SMBIOS -> Board Serial Number spot
-File -> save
-Reboot
-Sign into all iCloud apps—all done!

:: Enabling HDMI audio ::

Source: https://www.tonymacx86.com/threads/audio-hdmi-audio-applehda-guide.143760/

-Extract cloverHDMI-120.command.zip file
-double click the .command file
-follow the on screen prompts to enable INTEL audio—Say “N” to the Nvidia/ati sections
-It will also ask about enabling for DisplayPort—say yes
-reboot—done

::Generate correct SSDT for power management::

-I followed this guide verbatim: https://www.tonymacx86.com/threads/quick-guide-to-generate-a-ssdt-for-cpu-power-management.177456/

-Again, I will give short notes:

-Open terminal and paste: curl -o ~/ssdtPRGen.sh https://raw.githubusercontent.com/Piker-Alpha/ssdtPRGen.sh/master/ssdtPRGen.sh
-chmod +x ~/ssdtPRGen.sh
-sudo ~/ssdtPRGen.sh
-Follow on screen prompts (say no to the last question)
-exit
-Mount EFI partition (you can use clover configurator)
-Go to folder: ~/Library/ssdtPRGen/
-copy the ssdt.aml file and put it in /EFI/CLOVER/ACPI/patched/
-name it SSDT.aml
-If there is one already named SSDT.aml, rename it ssdt-1.aml
-reboot—done

That's about it!! Any questions, please ask! I apologize for the lack of details and pictures--I did this quickly so i don't forget O_O :p
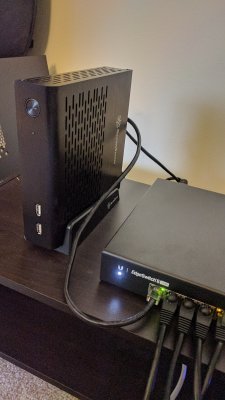
View attachment 245544 View attachment 245546
 
Hi,
I have just installed OS Sierra 10.12.6 as a new install but used the latest current Multibeast. Only my system definition is different, iMac 14.2. Currently running an i3 3225 with 8Gb ram, Samsung 850 Pro SSD.
I have not done any other customisations as yet. Sound out works. Have not tried the HDMI patch.
Not a big fan of Geekbench etc scores but I'm thinking of upgrading to a i7 3770s and wonder whether it's worth to expense?
Do you have any figures for your system with the i7 3770s cpu installed?

Thanks
 
@Yorkie5712, please update your profile (personal details) with your Motherboard, CPU and Graphics Card.
If you have a prebuilt computer enter make and model instead of motherboard (Mobo).
The Rules said:
Profiles need to contain at least your primary system to assist others with helping you.
 
Status
Not open for further replies.
Back
Top