- Joined
- Aug 10, 2012
- Messages
- 7
- Motherboard
- ASUS
- CPU
- i5
- Graphics
- HD 5770
- Mac
- Mobile Phone
Components
MotherBoard : ASUS P8Z77-V LE
CPU : Intel® Core i5 3550 - 3,4 GHz
RAM : Corsair Vengeance DDR3 2133 MHz - 8 GB Kit ( 2 x 4 GB )
Storage : HDD Western Digital - 500 GB • SSD Kingston v200 - 64 GB
Others : Optical Drive - some spare cables for USB, Ethernet, Speakers and Mic, PSU
My Work
Everything started when I found on a PC magazine an article that was describing the Hackintosh and this website.
That made me curious and I went on tonymacx86... my first thought was... AMAZING...
I started reading every post that involved "Modding a PowerMac G5"... and I decided to make one myself... or at least try
So I started looking around for an used G5 case... i found one with every component in the inside ( broken ) it and immediately bought it...
When it arrived I decided that I'll absolutely NOT cut a single piece of the case... it would be a shame to cut something like this...
So here starts my adventure!
I say that now... SORRY but I didn't take any photo during the work!!! I remembered that after I finished... so you will find photos of the completed work.
So....
The first thing to do was dismantle all the components and take a good look inside the case. Once I've done it I started asking myself... where could I put the PSU?? Where should I put the HDD Tray?? In short... WHERE SHOULD I PUT EVERYTHING??
After a lot of accurate calculations I decided to "completely ( more or less ) redesign the interior of the case"...
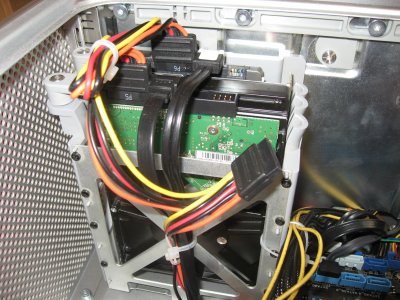
"The PSU will be placed where the HDD tray normally is, the HDD tray will be screwed under the Optical Drive" this was my decision.
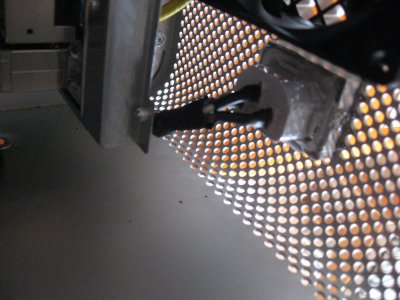
So I cut the steel plate that supports the HDD Tray and the Optical Drive. In this way the problem of the PSU fan its resolved. I made 2 holes in the steel plate and used 2 fan screws to fasten the PSU.
Then I made 3 holes, on the same steel plate, so I can fasten the HDD tray under the Optical Drive.
And here comes the hard work... how could I fit the MoBo in this case? Thanks to my brother I solved this problem... I could use an old PC case and cut out the MoBo support plate, the PCI and the rear panel plate.
I used the MAC mobo supports and drilled holes in correspondence of such supports...
Once I've done it I switched on the rear panel...that wasn't as hard as i thought...
For the USB i plugged in a male-male USB cable and with a tester I found the pin-out on the MoBo... from here I just soldered the cables in the right place.
For the speakers and mic the same thing...plugged an audio cable and checked the pin-out with a tester...
The ethernet was a problem...it wasn't working with the same way as the previous cables...so i desoldered the connector from the MoBo, smashed it and kept only the "gray part" ( the one that you can see from the outside ). I used a female-female ethernet adapter to get che little clips that I was searching... i glued the clips on the "gray part" with HOT GLUE and then glued the connector on the MoBo... soldered the cables in their right places...and that's all...
Once done it I prepared the front panel cable ( thanks to the posts that i found on this forum )...
I ask again sorry for not having work-in-progress photos but I was so concentrated on this work that it flow out of my mind
I hope that you will like it !!
Here you can find the photos of my mod :
 Generic Inside
 HDD Tray ( under the Optical Drive )
 PC MoBo Support, PCI and Rear panel
 PSU hole for the fan ( see the fan screws )
 Rear Panel ( outside )
 PSU Cable
 Front panel ( with the secondary USB that I added for the Bluetooth Receiver )
 Rear Panel Detail
 Front Panel ( outside )
MotherBoard : ASUS P8Z77-V LE
CPU : Intel® Core i5 3550 - 3,4 GHz
RAM : Corsair Vengeance DDR3 2133 MHz - 8 GB Kit ( 2 x 4 GB )
Storage : HDD Western Digital - 500 GB • SSD Kingston v200 - 64 GB
Others : Optical Drive - some spare cables for USB, Ethernet, Speakers and Mic, PSU
My Work
Everything started when I found on a PC magazine an article that was describing the Hackintosh and this website.
That made me curious and I went on tonymacx86... my first thought was... AMAZING...
I started reading every post that involved "Modding a PowerMac G5"... and I decided to make one myself... or at least try
So I started looking around for an used G5 case... i found one with every component in the inside ( broken ) it and immediately bought it...
When it arrived I decided that I'll absolutely NOT cut a single piece of the case... it would be a shame to cut something like this...
So here starts my adventure!
I say that now... SORRY but I didn't take any photo during the work!!! I remembered that after I finished... so you will find photos of the completed work.
So....
The first thing to do was dismantle all the components and take a good look inside the case. Once I've done it I started asking myself... where could I put the PSU?? Where should I put the HDD Tray?? In short... WHERE SHOULD I PUT EVERYTHING??
After a lot of accurate calculations I decided to "completely ( more or less ) redesign the interior of the case"...
"The PSU will be placed where the HDD tray normally is, the HDD tray will be screwed under the Optical Drive" this was my decision.
So I cut the steel plate that supports the HDD Tray and the Optical Drive. In this way the problem of the PSU fan its resolved. I made 2 holes in the steel plate and used 2 fan screws to fasten the PSU.
Then I made 3 holes, on the same steel plate, so I can fasten the HDD tray under the Optical Drive.
And here comes the hard work... how could I fit the MoBo in this case? Thanks to my brother I solved this problem... I could use an old PC case and cut out the MoBo support plate, the PCI and the rear panel plate.
I used the MAC mobo supports and drilled holes in correspondence of such supports...
Once I've done it I switched on the rear panel...that wasn't as hard as i thought...
For the USB i plugged in a male-male USB cable and with a tester I found the pin-out on the MoBo... from here I just soldered the cables in the right place.
For the speakers and mic the same thing...plugged an audio cable and checked the pin-out with a tester...
The ethernet was a problem...it wasn't working with the same way as the previous cables...so i desoldered the connector from the MoBo, smashed it and kept only the "gray part" ( the one that you can see from the outside ). I used a female-female ethernet adapter to get che little clips that I was searching... i glued the clips on the "gray part" with HOT GLUE and then glued the connector on the MoBo... soldered the cables in their right places...and that's all...
Once done it I prepared the front panel cable ( thanks to the posts that i found on this forum )...
I ask again sorry for not having work-in-progress photos but I was so concentrated on this work that it flow out of my mind
I hope that you will like it !!
Here you can find the photos of my mod :
 Generic Inside
 HDD Tray ( under the Optical Drive )
 PC MoBo Support, PCI and Rear panel
 PSU hole for the fan ( see the fan screws )
 Rear Panel ( outside )
 PSU Cable
 Front panel ( with the secondary USB that I added for the Bluetooth Receiver )
 Rear Panel Detail
 Front Panel ( outside )
