Contribute
Register

Gigabyte Z490 Vision D (Thunderbolt 3) + i5-10400 + AMD RX 580

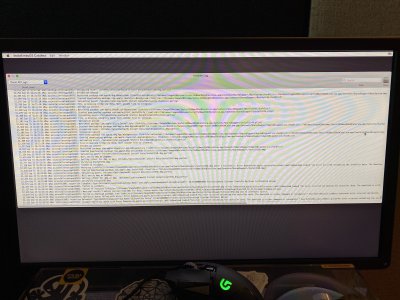
Here is the attached log file from the installation @CaseySJ , it appears like it is hanging up trying to validate InstallESD.dmg

It says "Code=8 An error occured validating the installer data. The download is either damaged or incomplete"

@canyondust will try running it as an imacpro 1,1
 

Attachments

  • Installer Log 15-Sep-2020.txt
    2 MB · Views: 67
  • IMG_1405.jpg
    IMG_1405.jpg
    4.6 MB · Views: 38
Here is the attached log file from the installation @CaseySJ , it appears like it is hanging up trying to validate InstallESD.dmg

It says "Code=8 An error occured validating the installer data. The download is either damaged or incomplete"

@canyondust will try running it as an imacpro 1,1
Based on the error below, several questions/suggestions:
  • What is the size of the USB flash disk? 16GB? 32GB?
  • Is it a name brand (good quality) USB 3.x flash disk?
  • On which system did you create the USB flash disk? Another Hackintosh? A Macintosh?
  • Is the system date correct on the Z490 Vision D? The date would appear either on menu bar or by running Terminal and typing date.
Code:
Sep 15 16:19:07 iMac osinstallersetupd[671]: Started downloading package com.apple.dmg.BaseSystem (linkfile-validated:///Volumes/Image%20Volume/Install%20macOS%20Catalina.app/Contents/SharedSupport/BaseSystem.chunklist:::/Volumes/Image%20Volume/Install%20macOS%20Catalina.app/Contents/SharedSupport/BaseSystem.dmg)
Sep 15 16:19:07 iMac osinstallersetupd[671]: Validating asset: /Volumes/Catalina/macOS Install Data/BaseSystem.dmg.partial
Sep 15 16:19:08 iMac osinstallersetupd[671]: Verification of file failed at chunk number: 40
Sep 15 16:19:08 iMac osinstallersetupd[671]: Failed to validate
 
Heres a strange one for ya... When creating usb sticks from my newly made z490 Hackintosh I seem to run into problems. I noticed the other day when I made a Catalina Install USB via "createinstallmedia" the install from it failed and acted buggy. Then when using BalenaEtcher today to make a Linux Live Stick It errors out on trying to make the USB stick. When I move over to my MacBookPro all works as expected. The USB ports seem to work fine when Im just copying data to them, or using them for mice, etc... Seems to have an issue with block level writes... Has anyone else experienced anything like this? Any work arounds?? ~Thanks!
 
Heres a strange one for ya... When creating usb sticks from my newly made z490 Hackintosh I seem to run into problems. I noticed the other day when I made a Catalina Install USB via "createinstallmedia" the install from it failed and acted buggy. Then when using BalenaEtcher today to make a Linux Live Stick It errors out on trying to make the USB stick. When I move over to my MacBookPro all works as expected. The USB ports seem to work fine when Im just copying data to them, or using them for mice, etc... Seems to have an issue with block level writes... Has anyone else experienced anything like this? Any work arounds?? ~Thanks!
Is it a USB 2.0 flash disk by any chance?
 
Based on the error below, several questions/suggestions:
  • What is the size of the USB flash disk? 16GB? 32GB?
  • Is it a name brand (good quality) USB 3.x flash disk?
  • On which system did you create the USB flash disk? Another Hackintosh? A Macintosh?
  • Is the system date correct on the Z490 Vision D? The date would appear either on menu bar or by running Terminal and typing date.
Code:
Sep 15 16:19:07 iMac osinstallersetupd[671]: Started downloading package com.apple.dmg.BaseSystem (linkfile-validated:///Volumes/Image%20Volume/Install%20macOS%20Catalina.app/Contents/SharedSupport/BaseSystem.chunklist:::/Volumes/Image%20Volume/Install%20macOS%20Catalina.app/Contents/SharedSupport/BaseSystem.dmg)
Sep 15 16:19:07 iMac osinstallersetupd[671]: Validating asset: /Volumes/Catalina/macOS Install Data/BaseSystem.dmg.partial
Sep 15 16:19:08 iMac osinstallersetupd[671]: Verification of file failed at chunk number: 40
Sep 15 16:19:08 iMac osinstallersetupd[671]: Failed to validate

Im using a 64gb SanDisk Ultra 3.0 and the installer was created on a 2018 macbook pro running mojave. I can go dig up a smaller drive. The time is set correct verified thru terminal
 
Is there a way on the Gigabyte Vision D z490 to disable individual NVMe ports within the BIOS? You can do this for individual SATA ports, for all the ethernet ports, etc... I cant ind the setting for NVMe though. Seems it would be really helpful for multi-boot systems not needing to remove the VideoCard and each stick to save your UEFI from getting blown out during install.
 
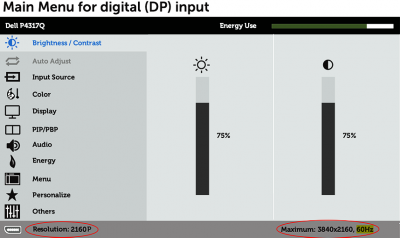
If there's a Reset or Factory Reset function on the monitor (via the monitor's on-board menu system) please try that first.
Factory Reset didn't help is same as it was only 30Hz, what can I do more?
Monitor Display menu is just fine

Pic01.png
 
Im using a 64gb SanDisk Ultra 3.0 and the installer was created on a 2018 macbook pro running mojave. I can go dig up a smaller drive. The time is set correct verified thru terminal
Because you have a 2018 MacBook Pro, it is actually possible to run the Catalina installer on that system, but install Catalina on an external SSD.

For example:
  • We can buy a cheap 128GB SATA SSD and install it in an equally cheap USB 3.0 external enclosure.
    • The beauty of this approach is that the 128GB SATA SSD and USB 3.0 external enclosure can then be used for subsequent bootable backups.
  • Then we connect the external USB 3.0 enclosure to the MacBook Pro.
  • We use Disk Utilityto format the external SSD:
    • Name: Catalina (or anything suitable)
    • Format: APFS
    • Scheme: GUID Partition Map
  • Now we run the Catalina Installer on the MacBook Pro.
    • Do not use the USB install disk.
    • Instead, copy the full Install macOS Catalina app that was created by GibMacOS to the Applications folder on the MacBook Pro and double-click to run it.
  • When it asks for the destination drive, we select the external SSD.
  • Let the installation finish. When the Welcome screen appears, go through each page of the welcome screen to setup the new Catalina O/S and create a user account.
    • Do not sign in to iCloud!! Click "Skip" at this step.
  • When Catalina setup is finished, we keep the external SSD connected to the MacBook Pro and then:
    • Mount EFI partition of the external SSD
    • Copy the OpenCore EFI folder to the EFI partition of the external SSD
    • Now we can eject the external SSD
  • Then we connect the external SSD to the Hackintosh and start up the machine.
  • We press F12 at the BIOS Splash Screen and select the external SSD.
  • OpenCore Picker will appear and macOS will already be installed.
  • Boot macOS and log in.
Now we can use Carbon Copy Cloner to clone the external USB SSD onto the internal NVMe SSD:
  • Ensure that the internal NVMe SSD has been formatted:
    • Name: Catalina (or anything suitable)
    • Format: APFS
    • Scheme: GUID Partition Map
  • Then clone the external SSD to the internal NVMe SSD.
  • When cloning is done, mount the EFI partition of (a) external SSD and (b) NVMe SSD.
  • Copy the EFI folder from external SSD to EFI partition of internal NVMe SSD.
  • Reboot and remove the external SSD.
  • When OpenCore Picker appears, boot from the internal NVMe SSD.
 
Last edited:
Factory Reset didn't help is same as it was only 30Hz, what can I do more?
Monitor Display menu is just fine

View attachment 488231
One option is to use SwitchResX. Here's what it looks like on my 2020 13" MacBook Pro.
  • First I select my monitor on the left side (MX27UC).
  • Then I select Current Resolutions and I can see which modes are available and which one is currently active.
Screen Shot 2020-09-15 at 11.30.00 AM.png


SwitchResX adds an icon to the right side of the Menu Bar. When I click on it, I can change to any of the supported resolutions:
Screen Shot 2020-09-15 at 11.30.53 AM.png
 
Back
Top