
- Joined
- Jun 25, 2010
- Messages
- 126
- Motherboard
- GA-Z490 Elite
- CPU
- Intel Core i9-10850
- Graphics
- RX 6800XT
- Mac
- Mobile Phone
The system I have has:
GA-H55M-UD2H Motherboard
2.8 GHz Intel Core i5 processor
8 Gb 1066 MHz DDR2 RAM
Nvidia GeForce GT240 video card 512Mb RAM Graphics
I created a non-UEFI installer USB stick with Unibeast onto an 8Gb Sandisk USB stick and installed from that. On initial boot, I had to flag three things from the Clover boot screen. Under the "options" icon (the default icon is black with three gears). On the Graphics injector section, I checked injectNVidia (press the spacebar to select it, then exit that menu by scrolling down to return). Under PCI Devices menu I checked (by pressing the spacebar) USBOwnership and USB injector. The second may not be necessary, but it worked with it checked. If you don't do this step you will boot up with no USB devices working.
Boot into the installer and finish the install. Upon reboot, you must go through the selections mentioned above at the Clover boot menu, but this time boot into the HFS partition where you installed OSX 10.11. Once you go through the setup menu and are onto the desktop, download the latest Multibeast (my network was already working). Start Multibeast.
Select Quick Start, NON-UEFI setup. Go to network and select the latest Realtek driver, which in my case was RealtekRTL8111 v2.2.1. under Customize, you need to set the system definition to iMac 11.3 (mine would NOT boot without this!). Then under the final build, make sure it installs on the correct drive. You may notice I did not select an audio driver, that is because no matter what I selected, nothing worked. I ended up having to use Toledo's audio script, which is a miraculous problem solver!
Download two programs, Clover Configurator and EFI Mounter v3. Use the EFI Mounter v3 to mount your EFI partition. Once mounted, run the Clover Configurator. Open the /EFI/Clover/config.plist.
You need to change a few things there. Under the ACPI settings, make sure you have checked everything like this screenshot shows.

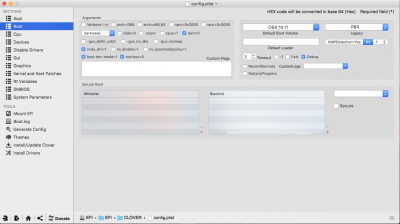
Then go to the Boot menu and select these things:
(See the attached image file at the end, for some reason in would not insert inline, sorry)
Under Devices, set the AudioID to 1, which insures the traditional behavior I was used to in a Mac.
Under the RT Variables, make your CsrActiveConfig 0x67 to turn off SIP. You can change it back later if you want, I leave it off.
Under SMBIOS insure your system definition is iMac 11,3.
If all is good, save the config.plist file.
Shut down the computer, remove the install USB stick, and start up the computer. You should boot with no problems.
To get the audio working, you should loosely familiarize yourself with this page:
http://www.tonymacx86.com/threads/audio-realtek-alc-applehda-guide.143757/
From that page there is a link to Toledo's latest ALC install scripts. The link is:
https://github.com/toleda/audio_CloverALC
Click on the title, which is a link: audio_CloverALC and when you arrive at the next page, there is a download link on the right side to download the zip file. Unzip it and copy (not move) the audio_cloverALC-110.sh file to your home directory (you can delete it later). Mount your EFI partition using EFI Mounter v3 before you run the script. Once it's mounted, fire up the terminal, which will default to your home directory (that is why you moved the script file there).
Type in: sudo ./audio_cloverALC-110.sh and the script will run. Make sure your audio ID is 1!. Answer the questions and when it's finished, you should be able to reboot with full sound.
It took me about 4 hours of research, many experimental tries and endless reboots to work through this. I hope this makes things easier for the next guy. Good luck.
GA-H55M-UD2H Motherboard
2.8 GHz Intel Core i5 processor
8 Gb 1066 MHz DDR2 RAM
Nvidia GeForce GT240 video card 512Mb RAM Graphics
I created a non-UEFI installer USB stick with Unibeast onto an 8Gb Sandisk USB stick and installed from that. On initial boot, I had to flag three things from the Clover boot screen. Under the "options" icon (the default icon is black with three gears). On the Graphics injector section, I checked injectNVidia (press the spacebar to select it, then exit that menu by scrolling down to return). Under PCI Devices menu I checked (by pressing the spacebar) USBOwnership and USB injector. The second may not be necessary, but it worked with it checked. If you don't do this step you will boot up with no USB devices working.
Boot into the installer and finish the install. Upon reboot, you must go through the selections mentioned above at the Clover boot menu, but this time boot into the HFS partition where you installed OSX 10.11. Once you go through the setup menu and are onto the desktop, download the latest Multibeast (my network was already working). Start Multibeast.
Select Quick Start, NON-UEFI setup. Go to network and select the latest Realtek driver, which in my case was RealtekRTL8111 v2.2.1. under Customize, you need to set the system definition to iMac 11.3 (mine would NOT boot without this!). Then under the final build, make sure it installs on the correct drive. You may notice I did not select an audio driver, that is because no matter what I selected, nothing worked. I ended up having to use Toledo's audio script, which is a miraculous problem solver!
Download two programs, Clover Configurator and EFI Mounter v3. Use the EFI Mounter v3 to mount your EFI partition. Once mounted, run the Clover Configurator. Open the /EFI/Clover/config.plist.
You need to change a few things there. Under the ACPI settings, make sure you have checked everything like this screenshot shows.
Then go to the Boot menu and select these things:
(See the attached image file at the end, for some reason in would not insert inline, sorry)
Under Devices, set the AudioID to 1, which insures the traditional behavior I was used to in a Mac.
Under the RT Variables, make your CsrActiveConfig 0x67 to turn off SIP. You can change it back later if you want, I leave it off.
Under SMBIOS insure your system definition is iMac 11,3.
If all is good, save the config.plist file.
Shut down the computer, remove the install USB stick, and start up the computer. You should boot with no problems.
To get the audio working, you should loosely familiarize yourself with this page:
http://www.tonymacx86.com/threads/audio-realtek-alc-applehda-guide.143757/
From that page there is a link to Toledo's latest ALC install scripts. The link is:
https://github.com/toleda/audio_CloverALC
Click on the title, which is a link: audio_CloverALC and when you arrive at the next page, there is a download link on the right side to download the zip file. Unzip it and copy (not move) the audio_cloverALC-110.sh file to your home directory (you can delete it later). Mount your EFI partition using EFI Mounter v3 before you run the script. Once it's mounted, fire up the terminal, which will default to your home directory (that is why you moved the script file there).
Type in: sudo ./audio_cloverALC-110.sh and the script will run. Make sure your audio ID is 1!. Answer the questions and when it's finished, you should be able to reboot with full sound.
It took me about 4 hours of research, many experimental tries and endless reboots to work through this. I hope this makes things easier for the next guy. Good luck.
Attachments
Last edited:
")