
- Joined
- Nov 25, 2010
- Messages
- 1,211
- Motherboard
- AsRock X570M Pro4
- CPU
- Ryzen 3700x
- Graphics
- RX 580
Introduction
With the growing interest in iMac G5 builds appearing on this forum (which is great to see!) I thought I would take the time to post some info which may prove helpful for upcoming mods. It comes as a result of some research and testing which in all honesty I wish I could've accomplished sooner. Myself, I've built three G5 projects, only one of which (a non-iSight A1076 model) utilized the original Apple Power Supply. This thread will focus primarily on the iSight models of iMac PSU.
My three iMac G5 projects are linked below for reference.
http://www.tonymacx86.com/imac-mods/148974-ersterhernds-imac-g5-20-inch-a1076-project.html
http://www.tonymacx86.com/imac-mods/128390-ersterhernds-imac-g5-isight-20-a1145-project.html
http://www.tonymacx86.com/imac-mods/124456-ersterhernds-imac-g5-isight-17-project.html
The two iSight builds I completed did not use the original iMac PSU. There was three reasons for this...
1. I had no idea of the PSU pinouts or operating function.
2. They were only in fair to poor working condition.
3. I was fearful of connecting an new Intel NUC to an old PSU.
Reasons aside, there are many old iMacs still around with Power Supplies in excellent condition. Furthermore, there are new and refurbished PSU's available online. The iMac mods completed on this forum so far produce only a small fraction of the power draw and heat that the original G5 computers did, so the life expectancy of a decent original PSU is likely dramatically increased. That, combined with the efficiency, cost-effectiveness and 'coolness factor' of re-using original parts makes the stock PSU option very attractive.
One problem exists though; other than an occasional dated internet forum post, there is little if any information about the iSight PSU's available anywhere. After embarking on some research and testing, this thread will hopefully answer most questions about these obscure pieces of hardware.
The Hardware
The iSight model of PSU exists in many variants & part numbers, but primarily in one of two forms.
1. The 17-inch iSight iMac G5 PSU
This version consists of an AC to DC 185W PSU and a DC-DC converter which is attached by a short 5-pin connector cable. The 120V or 240V comes in via the iMac power cord and AC Filter, then is distributed in 3.3V, 5V and 12V DC and Ground through a 12-pin (2x6) & SATA connection cable to the iMac Logic Board.
The 185W PSU

The DC-DC Converter

The 2x6 Pin & SATA Connector Cable

2. The 20-inch iSight iMac G5 PSU
This version consists of the same AC to DC 185W PSU but with a DC-DC converter specific to the 20-inch model only. The same 5-pin connector is used to join the PSU to a second piece. In this case, the DC-DC converter is combined with an LCD inverter to supply power for the six backlights in the 20" LCD. The backlighting is 24V, which is upconverted from 12V by this combination DC-DC/LCD Inverter. There is a 2x7 14-pin connector hard-wired to this part, and also there are four connections for the LCD Inverter Cables to plug into. It is a MUCH different part than the simpler DC-DC converter of the 17" iMac.
The 185W PSU (same or variant of the 17-inch version)
The combination DC-DC Converter & LCD Inverter
(Note the hard-wired 2x7 14-pin connector cable)

The Pinouts
For purposes of demonstration, I will label the pin numbers in the following format. This may be different than displayed elsewhere. I will include both the 17 and 20 inch iSight pinouts in a single diagram. The connector as shown below is from a 17" iMac iSight. The 20" version contains 2 extra pins which are simply drawn onto the photo.
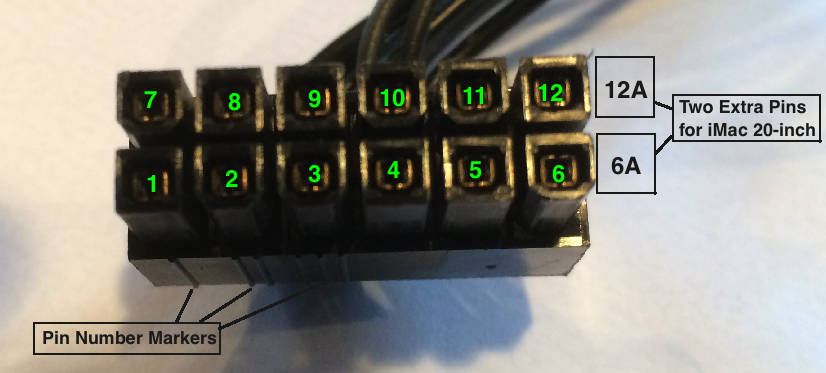
Pin Number, Name and Confirmed Input/Output
1. PS3V3_RUN = 3.3V
2. PS5V_RUN = 5.0V
3. PS_GND = Ground
4. PS12V_RUN = 12.0V
5. PS_GND = Ground
6. POWER_GOOD = Not Used
6A. LCD_PWM = TO Brightness Control 0.8-3.3V (20-inch only)
7. PS3V3_ALL = 3.3V
8. PS_GND = Ground
9. PS5V_ALL = 5.0V
10. PS12V_ALL = 12.0V
11. PS12V_ALL = 12.0V
12. SYS_POWERUP_L_BUF = TO Ground/3.3V to Switch On/Off pins 1-6A
12A. INV_CPU_HI = Not Used (20-inch only)
The Function
The pins on both the 17" and 20" iSight G5 models are divided into two separate banks. Pins 1 through 6A (Bank One) are 'run time' pins that can be turned either on or off via pin 12. Pins 7 through 12A (Bank Two) are 'always on' pins that are active at any time the AC is plugged in. When pin 12 is connected to a 3.3V source (ideally pin 7) then pins 1 through 6A are turned off. When pin 12 is connected to ground (ideally pin 8) then pins 1 thru 6A become live.
Pin 12 Controls the on/off switching of Pin Bank One.

For iMac Mods, this two-bank layout with one switchable and one 'always on' bank of power provides a huge advantage. It allows the system to use only the native power supply, with the ability to turn the power on or off very simply, without the use of a second power supply or microcontroller circuit. Additionally, the feature of the LCD_PWM pin 6A on the 20-inch model gives single-wire control of the screen brightness. All 24V upconversion for the backlights is handled by the DC-DC converter.
The Practical Application
There are likely many ways to put this Power Supply into effective use. Here is just one method that I've successfully tested that will work in an iMac Mod. It uses a simple relay to switch the iMac power supply Bank One pins on and off. The relay is can be purchased at this link.
I will reference the use of the Intel NUC for purposes of this demonstration. The i5 Haswell D54250WYK operates at 12V which could be supplied by the 'always on' pins 10 or 11 of the iMac PSU. Even using older 19V versions of the NUC (pre-Haswell) the 12V iMac supply could be easily brought up to 19V using a DC step-up converter. The Intel NUC is currently the best candidate for success in iMac G5 mods.
Schematic Diagram for utilizing the Intel NUC with the iMac iSight Power Supply
(Connection to 17" model shown, 20 inch adds two pins 6A and 12A on right end of connector)
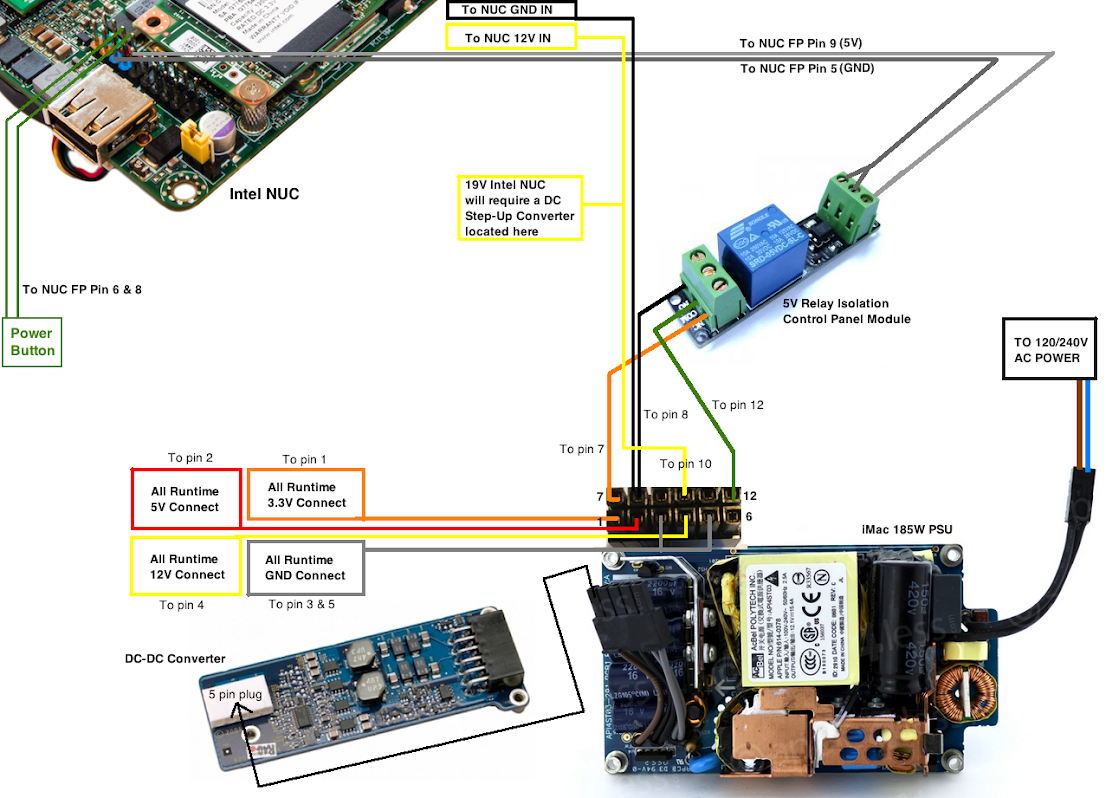
Photo of the relay working perfectly to switch the Apple iMac PSU Pins 1 thru 6A on and off.

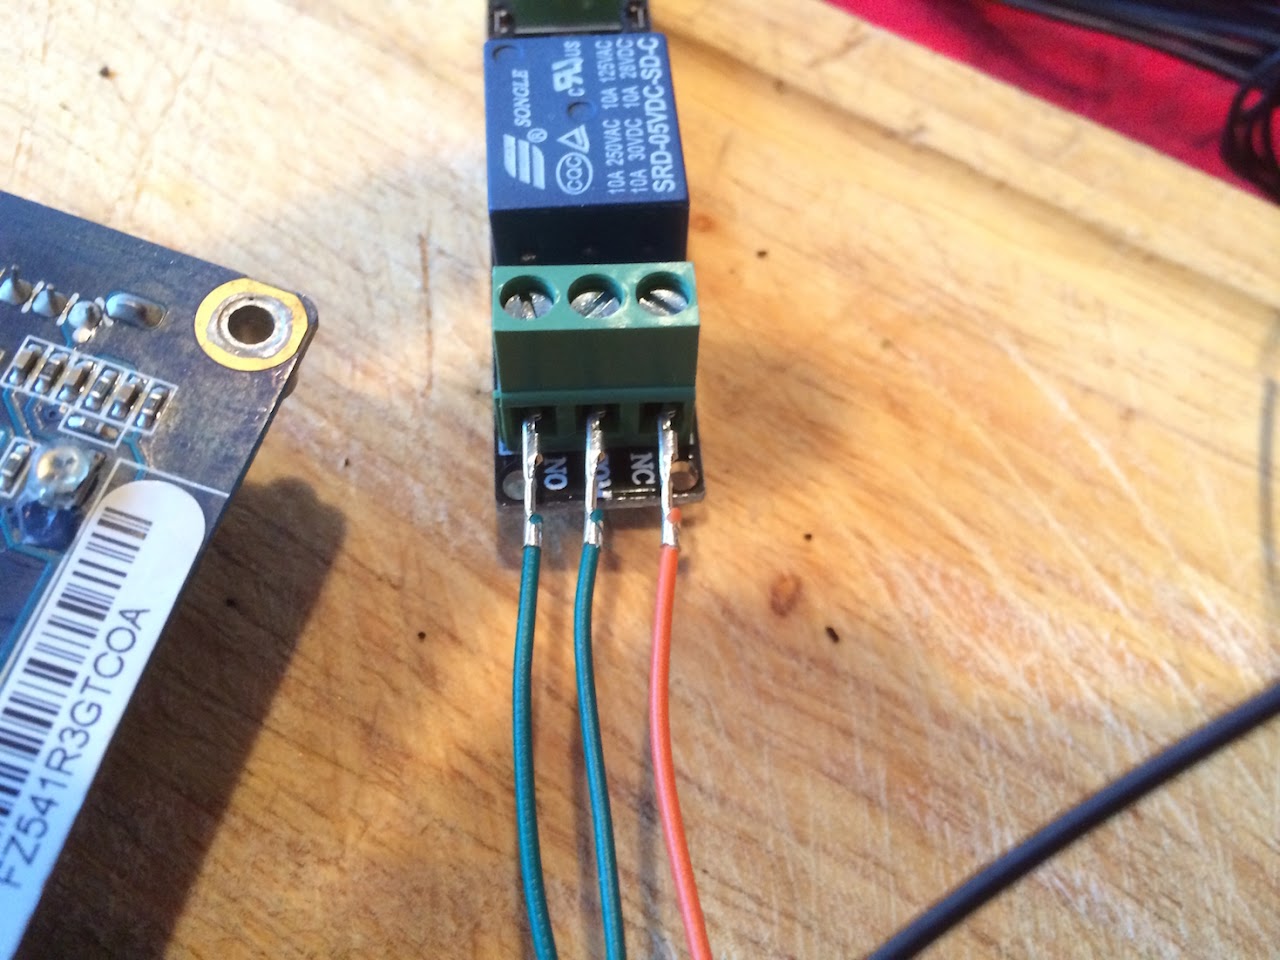
Photo of the 'Control' side of the Relay (in a real application would be wired to the Intel NUC)
The White wire will go to a 5V source (USB pin or Front Panel Pin on Intel NUC)
The Purple wires go to a ground (USB or Front Panel GND Pin on Intel NUC)

Photo of the 'Load' side of the Relay wired to the iMac PSU
The Orange wire goes to Pin 7 of the iMac PSU (3.3V ALL)
The Center Green wire goes to Pin 12 of the iMac PSU (SYS_POWERUP_L_BUF)
The Left Green wire goes to Pin 8 of the iMac PSU (PS_GND)
The sequence of operation would be as follows:
1. Plugged into 'always on' Pin Bank Two 12V pin 10, the Intel NUC sits ready in standby mode.
Fans, LCD, Backlights etc are all OFF as they are plugged into Pin Bank One which is off (pin 12 = 3.3V).
2. iMac Power Button pressed. NUC starts and sends 5V to Relay via USB 5V or Front Panel Pin 9.
Relay becomes energized, switches the load circuit side from 3V to GND on the iMac PSU Pin Bank One.
Pin 12 goes to ground (was 3.3V when system off) and Pin Bank One becomes live.
3. Fans, Backlights, LCD and all other runtime components become active via Pin Bank One.
4. At shutdown, the reverse sequence occurs, leaving Pin Bank One 'off' and only the NUC in standby.
A demonstration video to illustrate this sequence. It clearly shows the iMac PSU ability to maintain an 'always on' and 'switchable' set of power simultaneously via Pin 12 connected to a Relay.
1. The 12V 'always on' fan resembles the Intel NUC.
2. The white 5V wire resembles the power supplied from Front Panel Pin 9 on the NUC
3. The switchable on/off fan resembles all other components in the system (LCD, Fans etc)
Here is a YouTube Video of the working model...
I hope this post helps to illustrate the easily usable functionality of the iSight native PSU. I'd like to thank YouTube user 3beltwesty for his efforts in preparing 5 videos during his research of this iMac power supply. His informative tutorial gave me a lot of information that I wish I'd had much sooner. I will likely be pulling one of my G5 iSight builds apart to give this a full-on attempt. Will post that progress if or when it occurs.
Ersterhernd
With the growing interest in iMac G5 builds appearing on this forum (which is great to see!) I thought I would take the time to post some info which may prove helpful for upcoming mods. It comes as a result of some research and testing which in all honesty I wish I could've accomplished sooner. Myself, I've built three G5 projects, only one of which (a non-iSight A1076 model) utilized the original Apple Power Supply. This thread will focus primarily on the iSight models of iMac PSU.
My three iMac G5 projects are linked below for reference.
http://www.tonymacx86.com/imac-mods/148974-ersterhernds-imac-g5-20-inch-a1076-project.html
http://www.tonymacx86.com/imac-mods/128390-ersterhernds-imac-g5-isight-20-a1145-project.html
http://www.tonymacx86.com/imac-mods/124456-ersterhernds-imac-g5-isight-17-project.html
The two iSight builds I completed did not use the original iMac PSU. There was three reasons for this...
1. I had no idea of the PSU pinouts or operating function.
2. They were only in fair to poor working condition.
3. I was fearful of connecting an new Intel NUC to an old PSU.
Reasons aside, there are many old iMacs still around with Power Supplies in excellent condition. Furthermore, there are new and refurbished PSU's available online. The iMac mods completed on this forum so far produce only a small fraction of the power draw and heat that the original G5 computers did, so the life expectancy of a decent original PSU is likely dramatically increased. That, combined with the efficiency, cost-effectiveness and 'coolness factor' of re-using original parts makes the stock PSU option very attractive.
One problem exists though; other than an occasional dated internet forum post, there is little if any information about the iSight PSU's available anywhere. After embarking on some research and testing, this thread will hopefully answer most questions about these obscure pieces of hardware.
The Hardware
The iSight model of PSU exists in many variants & part numbers, but primarily in one of two forms.
1. The 17-inch iSight iMac G5 PSU
This version consists of an AC to DC 185W PSU and a DC-DC converter which is attached by a short 5-pin connector cable. The 120V or 240V comes in via the iMac power cord and AC Filter, then is distributed in 3.3V, 5V and 12V DC and Ground through a 12-pin (2x6) & SATA connection cable to the iMac Logic Board.
The 185W PSU
The DC-DC Converter
The 2x6 Pin & SATA Connector Cable
2. The 20-inch iSight iMac G5 PSU
This version consists of the same AC to DC 185W PSU but with a DC-DC converter specific to the 20-inch model only. The same 5-pin connector is used to join the PSU to a second piece. In this case, the DC-DC converter is combined with an LCD inverter to supply power for the six backlights in the 20" LCD. The backlighting is 24V, which is upconverted from 12V by this combination DC-DC/LCD Inverter. There is a 2x7 14-pin connector hard-wired to this part, and also there are four connections for the LCD Inverter Cables to plug into. It is a MUCH different part than the simpler DC-DC converter of the 17" iMac.
The 185W PSU (same or variant of the 17-inch version)
The combination DC-DC Converter & LCD Inverter
(Note the hard-wired 2x7 14-pin connector cable)
The Pinouts
For purposes of demonstration, I will label the pin numbers in the following format. This may be different than displayed elsewhere. I will include both the 17 and 20 inch iSight pinouts in a single diagram. The connector as shown below is from a 17" iMac iSight. The 20" version contains 2 extra pins which are simply drawn onto the photo.
Pin Number, Name and Confirmed Input/Output
1. PS3V3_RUN = 3.3V
2. PS5V_RUN = 5.0V
3. PS_GND = Ground
4. PS12V_RUN = 12.0V
5. PS_GND = Ground
6. POWER_GOOD = Not Used
6A. LCD_PWM = TO Brightness Control 0.8-3.3V (20-inch only)
7. PS3V3_ALL = 3.3V
8. PS_GND = Ground
9. PS5V_ALL = 5.0V
10. PS12V_ALL = 12.0V
11. PS12V_ALL = 12.0V
12. SYS_POWERUP_L_BUF = TO Ground/3.3V to Switch On/Off pins 1-6A
12A. INV_CPU_HI = Not Used (20-inch only)
The Function
The pins on both the 17" and 20" iSight G5 models are divided into two separate banks. Pins 1 through 6A (Bank One) are 'run time' pins that can be turned either on or off via pin 12. Pins 7 through 12A (Bank Two) are 'always on' pins that are active at any time the AC is plugged in. When pin 12 is connected to a 3.3V source (ideally pin 7) then pins 1 through 6A are turned off. When pin 12 is connected to ground (ideally pin 8) then pins 1 thru 6A become live.
Pin 12 Controls the on/off switching of Pin Bank One.
For iMac Mods, this two-bank layout with one switchable and one 'always on' bank of power provides a huge advantage. It allows the system to use only the native power supply, with the ability to turn the power on or off very simply, without the use of a second power supply or microcontroller circuit. Additionally, the feature of the LCD_PWM pin 6A on the 20-inch model gives single-wire control of the screen brightness. All 24V upconversion for the backlights is handled by the DC-DC converter.
The Practical Application
There are likely many ways to put this Power Supply into effective use. Here is just one method that I've successfully tested that will work in an iMac Mod. It uses a simple relay to switch the iMac power supply Bank One pins on and off. The relay is can be purchased at this link.
I will reference the use of the Intel NUC for purposes of this demonstration. The i5 Haswell D54250WYK operates at 12V which could be supplied by the 'always on' pins 10 or 11 of the iMac PSU. Even using older 19V versions of the NUC (pre-Haswell) the 12V iMac supply could be easily brought up to 19V using a DC step-up converter. The Intel NUC is currently the best candidate for success in iMac G5 mods.
Schematic Diagram for utilizing the Intel NUC with the iMac iSight Power Supply
(Connection to 17" model shown, 20 inch adds two pins 6A and 12A on right end of connector)
Photo of the relay working perfectly to switch the Apple iMac PSU Pins 1 thru 6A on and off.
Photo of the 'Control' side of the Relay (in a real application would be wired to the Intel NUC)
The White wire will go to a 5V source (USB pin or Front Panel Pin on Intel NUC)
The Purple wires go to a ground (USB or Front Panel GND Pin on Intel NUC)
Photo of the 'Load' side of the Relay wired to the iMac PSU
The Orange wire goes to Pin 7 of the iMac PSU (3.3V ALL)
The Center Green wire goes to Pin 12 of the iMac PSU (SYS_POWERUP_L_BUF)
The Left Green wire goes to Pin 8 of the iMac PSU (PS_GND)
The sequence of operation would be as follows:
1. Plugged into 'always on' Pin Bank Two 12V pin 10, the Intel NUC sits ready in standby mode.
Fans, LCD, Backlights etc are all OFF as they are plugged into Pin Bank One which is off (pin 12 = 3.3V).
2. iMac Power Button pressed. NUC starts and sends 5V to Relay via USB 5V or Front Panel Pin 9.
Relay becomes energized, switches the load circuit side from 3V to GND on the iMac PSU Pin Bank One.
Pin 12 goes to ground (was 3.3V when system off) and Pin Bank One becomes live.
3. Fans, Backlights, LCD and all other runtime components become active via Pin Bank One.
4. At shutdown, the reverse sequence occurs, leaving Pin Bank One 'off' and only the NUC in standby.
A demonstration video to illustrate this sequence. It clearly shows the iMac PSU ability to maintain an 'always on' and 'switchable' set of power simultaneously via Pin 12 connected to a Relay.
1. The 12V 'always on' fan resembles the Intel NUC.
2. The white 5V wire resembles the power supplied from Front Panel Pin 9 on the NUC
3. The switchable on/off fan resembles all other components in the system (LCD, Fans etc)
Here is a YouTube Video of the working model...
I hope this post helps to illustrate the easily usable functionality of the iSight native PSU. I'd like to thank YouTube user 3beltwesty for his efforts in preparing 5 videos during his research of this iMac power supply. His informative tutorial gave me a lot of information that I wish I'd had much sooner. I will likely be pulling one of my G5 iSight builds apart to give this a full-on attempt. Will post that progress if or when it occurs.
Ersterhernd
Last edited:
")